
TechBuy - Approving and Rejecting Requisitions
Financial Managers and Approvers have the responsibility to review and approve TechBuy orders. The only orders a Financial Manager or Approver will not have to approve are punch-out orders submitted by a requester or an Approver.
There are two ways in the approval process to take action on a requisition:
- TechBuy application
- Email Approvals
This document will go through the steps of reviewing, approving, and rejecting requisitions in the TechBuy application and the Email Approval.
Accessing Requisitions Requiring Your Approval
There are three ways to access a requisition requiring your approval.
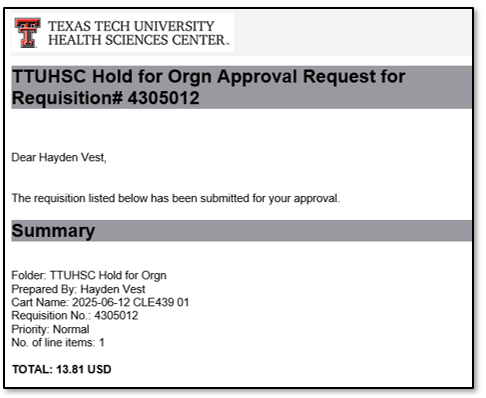
- Email Approval: If a document is awaiting your approval, you will be notified by email. Users must have the proper email notifications set up in their profile to receive email notifications for email approval. For additional information, refer to the Email Approvals section at the end of this training web page.
- TechBuy Application: To access requisitions that need review and approval, reference the Action Items Flag located in the upper right-hand corner and then click Requisitions to Approve.
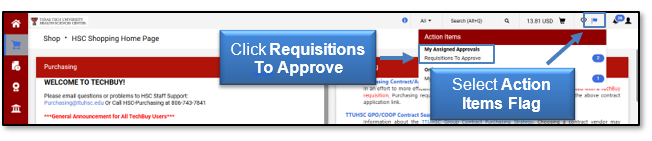
- TechBuy Application: The final way to access the documents that require your approval is to select Approvals and Requisitions to Approve.
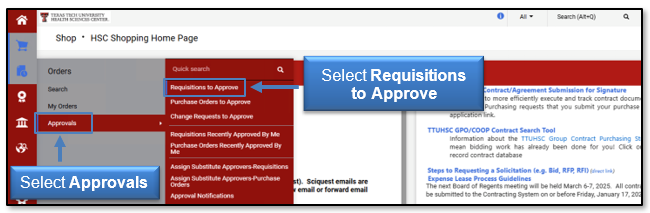
The Approvals will open the My Approvals page.
My Approvals
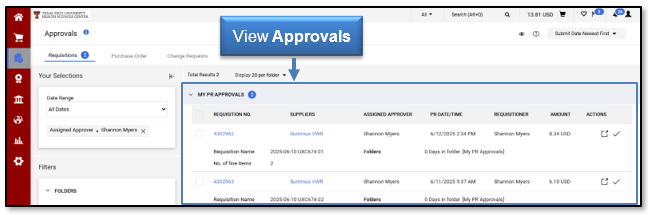
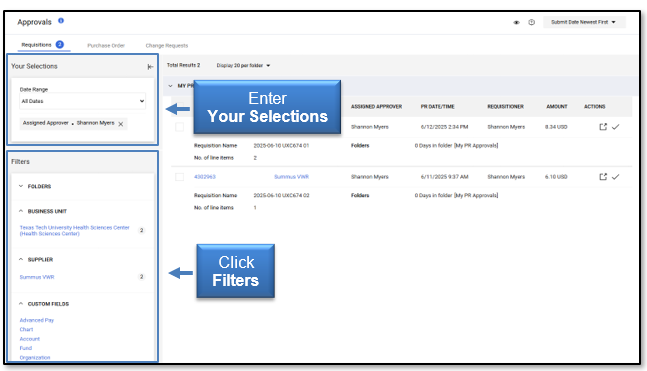
Approval activity in the TechBuy application is done from the My Approvals page. From this page, you can access and approve all documents that require your approval.
Filters: Filters are available on the left side of the approvals page and allow you to refine your search and narrow down the approval documents displayed. As you select filter options, the documents displayed will be refined, and the Your Selections area will be updated. You can refine the documents displayed by View Approvals For and Date Range.
You can sort the approval documents by various Filters such as Folders, Business Unit, Supplier, Custom Fields, Department, Priority, Form Type, Prepared By, and Prepared For. To select a specific filtering criteria, click the item in the filter section. The numbers to the right of the filters indicate how many documents fit that criteria.
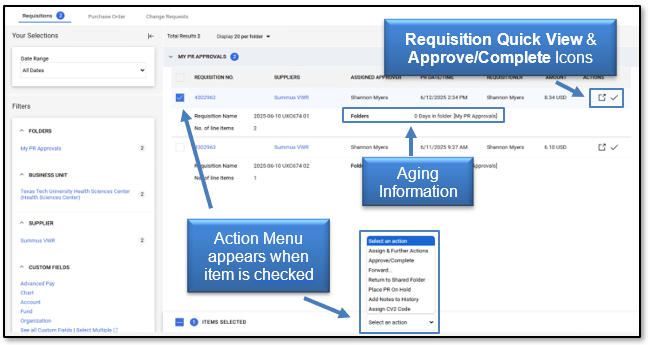
Aging Information: Aging information pertaining to each document allows you to see how long a document has been in a folder. The aging information is the specific number of days the document has been sitting in the approval folder, followed by the name of the specific folder.
Available Actions: You can take several actions from the My Approvals page.
- Approve/Complete Icon - To quickly approve/complete the document in your My PR Approvals folder, select the check mark.
- Requisition Quick View Icon - To view more details regarding the Requisition, select the
 icon. This view will provide a summary of the requisition and allow you to print the information, if needed.
 - Action Menu - The action drop-down menu allows you to perform an action on one or more documents. The menu will appear once an item is selected by checking a box to the left of the Reguisition Number. Select the desired action from the action drop-down menu. Once an action is selected, it will be immediately completed.
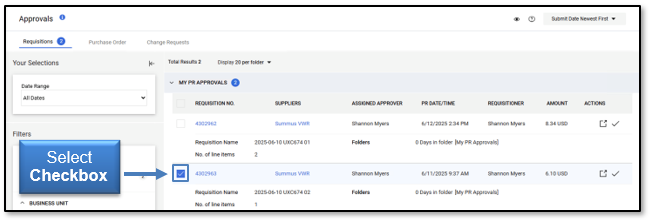
Assigning Requisition to Yourself to Approve
If an approval step can be approved by more than one person, you should assign the requisition to yourself prior to approving. Assigning the document to yourself signifies that you are responsible for the review and approval of the requisition. The document should state Not Assigned in the Assigned Approver column. If the document has been assigned, the name of the Approver will appear in the Assigned Approver column, and that individual has taken the responsibility to approve the requisition.
To assign the document to yourself, locate the requisition you wish to assign for your approval and click the  Assign icon.

Once you assign the requisition to yourself, it will populate in your My PR Approvals folder and cannot be approved by anyone but you. You are now listed as the Assigned Approver.
If you are the only person with authority to approve the requisition, the document will automatically populate in your My PR Approvals folder, and it will not be necessary to assign it to you.
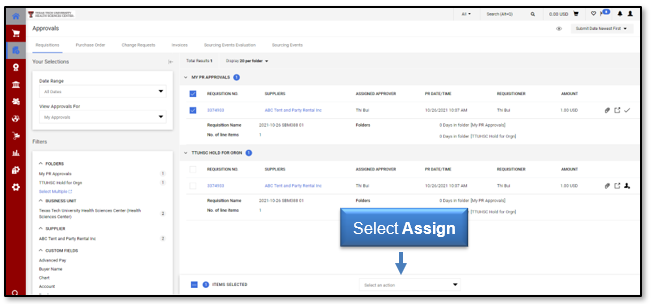
To move multiple requisitions to your My PR Approvals folder, select the checkbox for the individual documents that you would like to assign to your approvals folder or select the checkbox in the folder header to select all available requisitions.
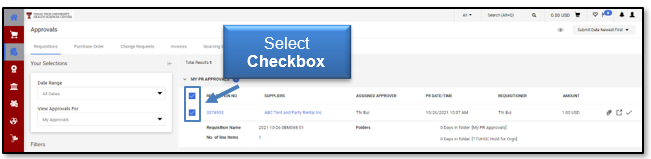
After you have selected the requisitions to assign, select the Assign option from the Action drop-down menu.
Unassigning Requisition
An approver must assign a requisition to themselves before approving or rejecting the document. Once you assign the requisition and it appears in your My PR Approvals folder, no other approver will have the ability to approve or complete the order. If you assign a requisition to yourself and another approver in your department who needs to process the order, you must return the requisition to the shared folder.
Select the assigned requisition from your My PR Approvals folder by selecting the checkbox to the left of the Requisition No. column.
Once the document is marked, select Return to Shared Folder from the Action drop-down menu.

The document will no longer appear in your My PR Approvals folder. It is returned to your shared folder, and any departmental approver will have the ability to assign the requisition for approval.
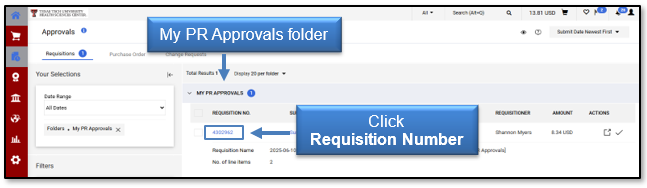
Reviewing Requisition
As an Approver, it is your responsibility to review a requisition before approving or rejecting. By approving a requisition, you are agreeing that the correct departmental and purchasing policies have been followed and that accounting information is correct.
To review a pending requisition, locate the My PR Approvals folder from the My Approvals page. To open a requisition, click the Requisition Number.
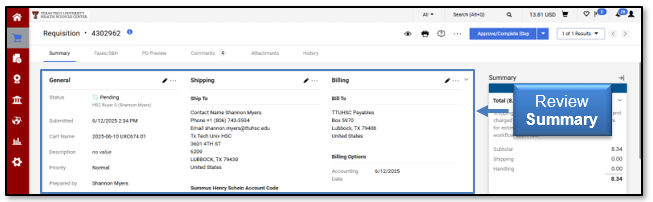
The requisition Summary page will open. As an approver, you can change the information on the requisition if necessary by clicking Edit (pencil icon). You can review the requisition from the Summary page by checking the Shipping, Billing, Line, and Header FOAP Summary and Supplier Info.
- Line and Header FOAP Summary: check for a valid FOAP combination.
- Header Level Notes and Attachments: review documentation.
- Line Level Notes and Attachments: review documentation.
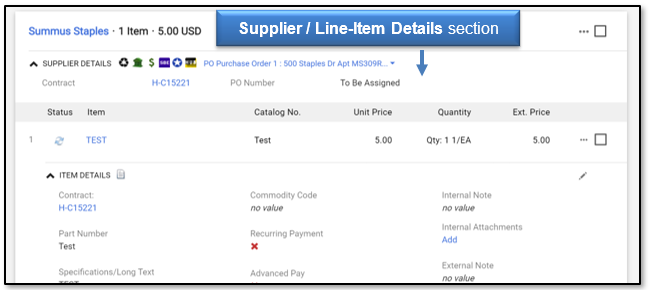
- Supplier/Line-Item Detail: review the items on the order.
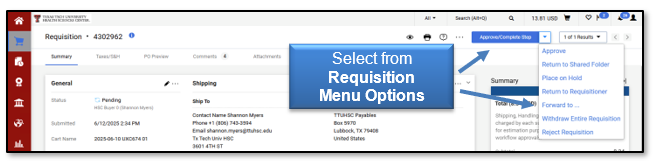
After all items have been reviewed and edited as necessary, the requisition can be approved, rejected, returned to the requisitioner, forwarded, or returned to the shared folder.
Approving Requisition
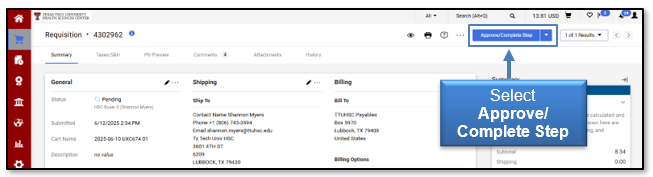
Standard Approval: With Standard Approval, you open the requisition, review the information, make any changes needed, and then approve the requisition.
To approve the requisition, select Approve/Complete Step.
Quick Approval: If you do not need to review or update the requisition, you can use the Quick Approval method. Locate the document you want to approve in your My PR Approvals folder. Click the Approve Action button.
The requisition will no longer appear in your My PR Approvals folder. You can review the requisition using the Document Search feature. If you need additional information on locating and tracking the requisition, refer to the Document Search training videos and documents.
Rejecting Requisition
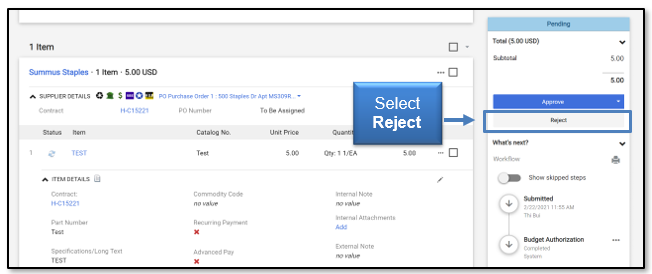
TechBuy allows the approver to reject the entire requisition in one single action or to select specific line items to reject. If the entire order is rejected, it cannot be resubmitted. If you select only specific line items to reject, the remaining items on the order will continue through the workflow approval process.
Open the requisition from your My PR Approvals folder and review the document. All items on the order will be listed under the Supplier/Line-Item Details section.
To reject the entire requisition, select the Reject button to the right.
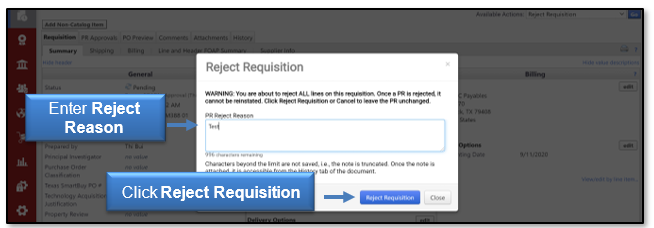
The Reject Requisition window will appear. Enter the PR Reject Reason in the text box and click Reject Requisition.
The requisition will no longer appear in your My PR Approvals folder. You can review the requisition using the Document Search feature. If you need additional information on locating and tracking the requisition, refer to TechBuy Document Search training resources.
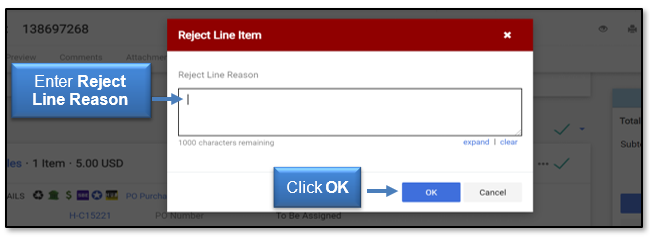
Rejecting Lines on Requisition: Open the requisition from your My PR Approvals folder. Select one or more line items to reject by selecting the checkbox to the right of the price. Click the dropdown and select Reject Selected Items.

The Add Note window will appear. Enter the Reject Line Reason in the text box and click OK.
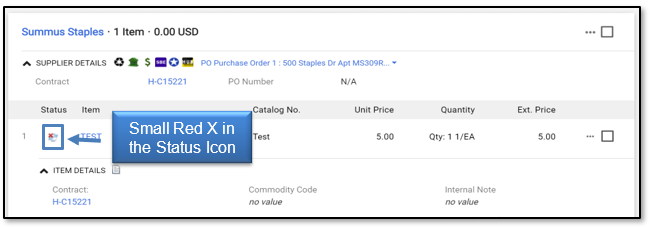
The items you marked as rejected will have a small red X in the status icon to the left of the item description.
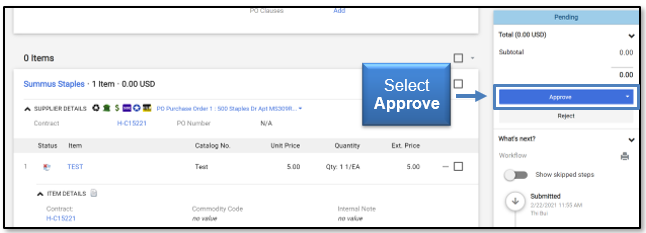
In order to finalize the order and approve the rejections, select Approve to the right.
The requisition will no longer appear in your My PR Approvals folder. You can review the requisition using the Document Search feature. If you need additional information on locating and tracking the requisition, refer to the Document Search training videos and documents.
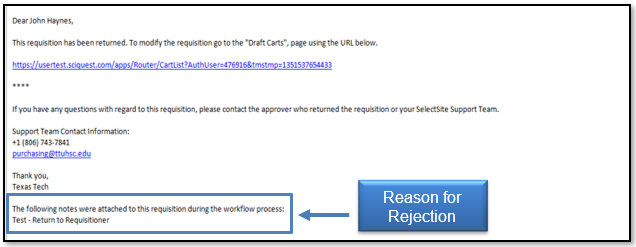
When an approver rejects a requisition or specific line items, the submitter will receive an email notification. Review the TechBuy User Profile document for more information. The reason for the rejection is listed at the bottom of the email.
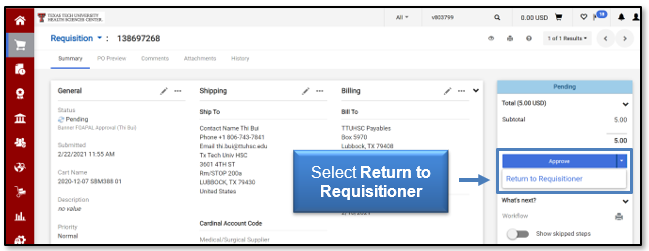
Returning Requisition
TechBuy allows an approver to return a requisition to the submitter. This will permit the submitter to make corrections to the order and resubmit it into the workflow approval process. In order to return a requisition, you must first assign the requisition to yourself and open it for review.
Select Return to Requisitioner from the Approve button drop-down menu.
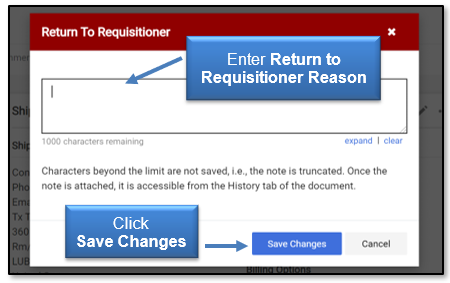
The Return to Requisitioner window will open. Enter a Reason for the return to inform the submitter of the purpose for returning the document, and select Save Changes.
When an approver returns a requisition, the submitter will receive an email notification. Review the TechBuy User Profile document for more information. The reason for the return is listed at the bottom of the email.

When a requisition is returned, the submitter will have access to it in the My Returned Requisitions section of the Shopping Carts - Drafts page. As a draft cart, the submitter will have the ability to make any necessary changes, deletions, or additions and resubmit the order. The history of the order will remain attached, but the order will process back to each workflow approval step.
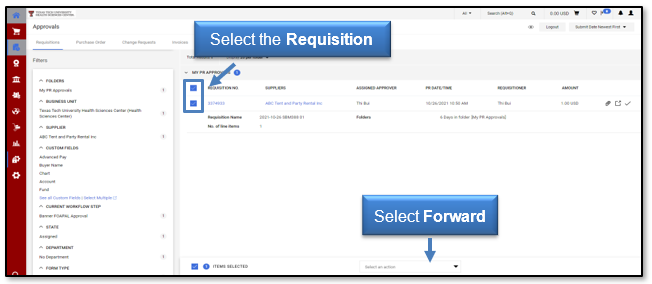
Forwarding Requisition
You may decide that a different individual with approval authority for your department is a more appropriate approver for a particular order and want to forward a requisition to that person.
To forward a requisition, check the box to the left of the Requisition No. column from the My Approvals page. Select Forward from the Action drop-down menu.
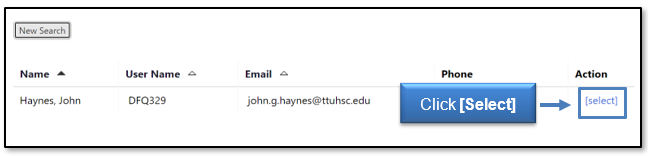
The User Search window will open. Enter the Last Name and First Name of the person who will receive the requisition and click Search.
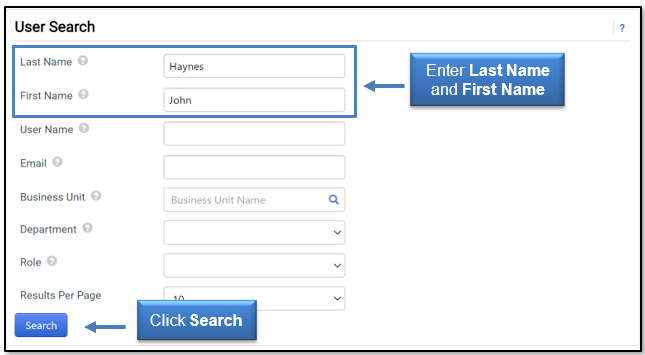
The results meeting your search criteria will open. Click [select] in the Action column.
The Forward window will appear. Enter a short note to the user with the reason for forwarding the requisition and select Forward.
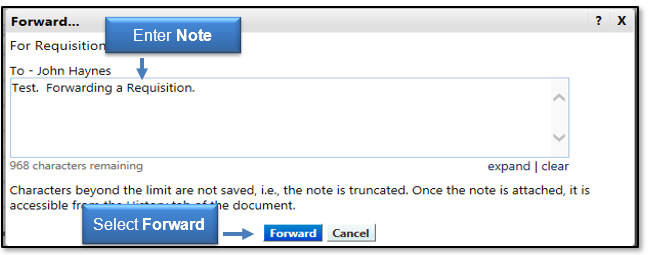
The requisition is now assigned to the selected user to approve. After you forward a requisition, only the Assigned Approver can approve the requisition.
My Recent Approvals
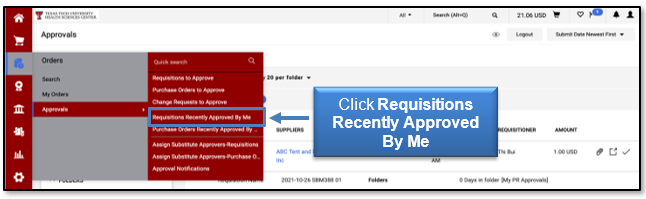
My Recent Approvals presents the Approver with a list of everything they have either approved, rejected, or returned. This feature allows you to quickly see a snapshot of the requisitions you have processed. To access My Recent Approvals, click the Orders & Documents icon, Approvals, and Requisitions Recently Approved By Me.
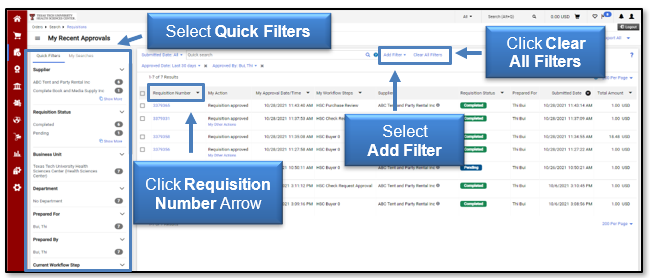
By default, the documents in the Outbox will display in ascending order based on Approval Date. You can change the display order by clicking the Requisition Number Arrow. You can also sort by any of the other column display arrows available.
There are also several filtering options to narrow the list of documents that are displayed. As you select filter options, the documents displayed will be refined, and the filters will be updated. To remove a filter, select the Delete Filter icon next to that filter or click Clear All Filters to remove all filters.
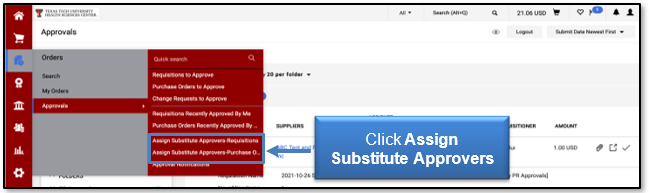
Assigning Substitute Approvers
If you, as an approver, are going to be absent or unavailable, you can designate an approver as a substitute. The substitute can review and approve documents routed to the original approver. The Assign Substitute Approvers pages present you with all of the folders you have access to and allow you to manage your substitutions separately from where you do your approvals.
Click Orders & Documents, Approvals, and select the Assign Substitute Approvers page.
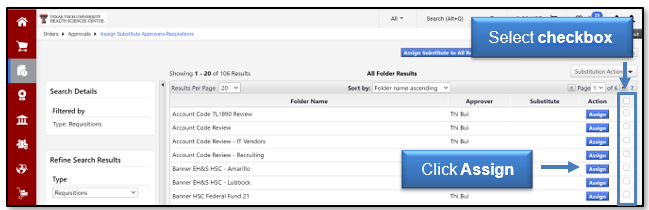
From an Assign Substitute Approvers page, you can assign and remove substitutes to and from a single folder, multiple folders, or all approval folders for which you are responsible.
Assigning Substitute to Single Folder or Multiple Folders: Select the folder(s) by clicking the checkbox to the right of the Action button and click Assign next to that folder.
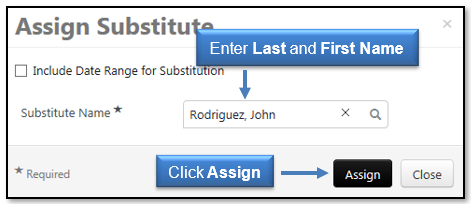
The Assign Substitute window will open. Enter the Last Name and First Name of the person or other search criteria to locate the approver and select Assign.
The substitute approver is assigned to the folder(s), and the name will appear in the Substitute column.

Assigning Substitute to All Folders: Click the Assign Substitute to All Requisition Folders button.
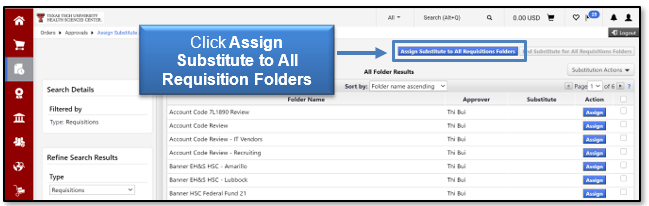
The Assign Substitute window will open. Enter the Last Name and First Name of the person or other search criteria to locate the approver and select Assign.
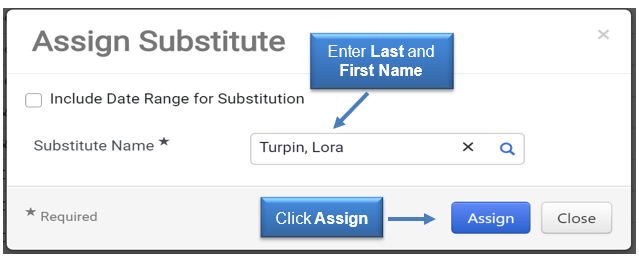
The substitute approver is assigned to all folders, and the name will appear in the Substitute column.
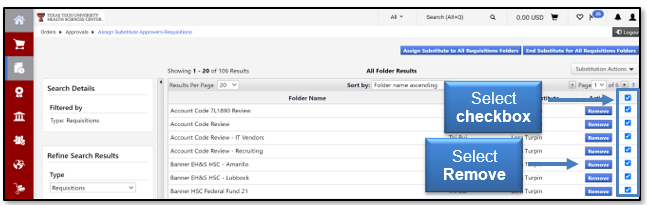
Removing Substitute Approver from Single Folder: Locate the appropriate folder, and click the Remove button in the Action column.

Removing Substitute Approver from Multiple Folders: Locate the appropriate folders, click the checkbox to the right of the Action button, and select Remove.
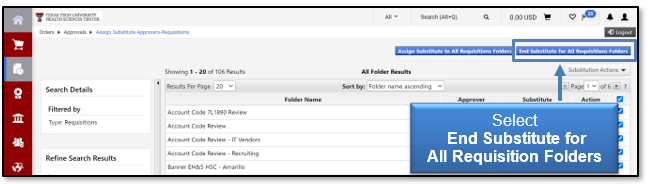
Removing Substitute Approver from All Folders: Select the End Substitute for All Requisition Folders button located above the folder list.
Email Approvals
You can take action on a requisition directly from an email notification link. The email can be accessed from a desktop or on many mobile devices. You are not required to be logged into TechBuy to take action. You will have the same actions that are available to you in TechBuy, including Assign to myself (for later review and action) and Approve.
Note: You may configure Preferred email format to receive either HTML or Plain Text (Defaults to HTML) for all approval emails by accessing your Profile > User Profile and Preferences > Language, Time Zone, and Display Settings > Save Changes.
With Email Approvals enabled, you will receive an enhanced approval email containing pertinent order information and a quick action webpage link where action can be taken. The email contains detailed order information to allow you to decide on what action to take on the entire requisition. After reviewing the order details in the email, select the Take Action button to access the secure approval web page.
Note: In order for you to receive the emails, you must have the PR pending Workflow approval email notification enabled. To enable this, access your Profile > Notification Preferences > Shopping, Carts & Requisitions, then click Edit Section, select Override, PR pending Workflow approval, select Email from the dropdown, and click Save Changes.
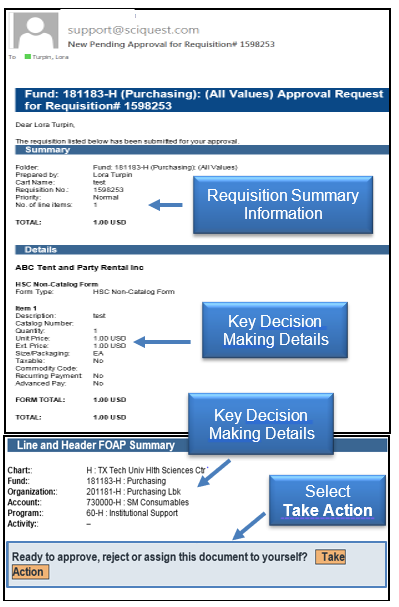
The web page allows you to select the specific desired action. Possible actions include Assign to myself and Approve.
A Comment section is also available to enter a comment for the action you have taken. You must enter your email approval code and then select Approve.
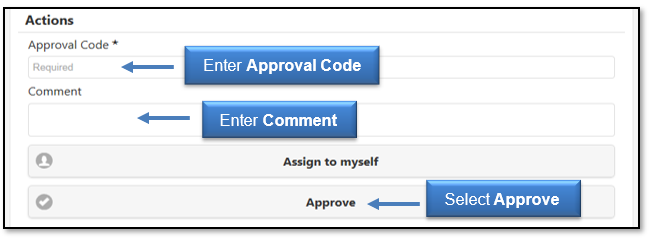
Once the action is complete, you will receive a confirmation.
Note: You will not be able to approve from email until you have configured an email approval code in your profile. To set up the email approval code, go to Profile > Update Security Settings > Change Email Approval Code. Your email approval code must contain four characters and may be a combination of letters, numbers, and characters.
If you do not set up an email approval code, the enhanced email with order information will not contain the Take Action link. Instead, a warning message will display directing you to TechBuy to take action on the Requisition, as well as to configure your email approval code to take action on future emails.

The action is logged in History as having been taken via email. The action is also logged in Comments.
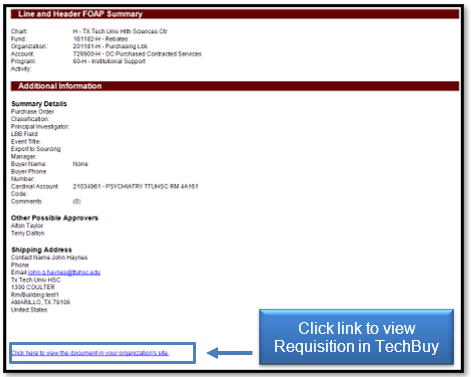
Enhanced Approval Email Notification
If you are not set up for Email Approvals, you can still receive enhanced email notifications that include detailed information for requisitions. Once configured, you will receive the enhanced email notification containing detailed information without the Take Action link. The enhanced email does include a link; Click here to view the document in your organization's site, allowing you to take action as normal on the requisition in TechBuy.
Note: In order for you to receive the emails, you must have the PR pending Workflow approval email notification enabled. To enable this, access your Profile > Notification Preferences > Shopping, Carts & Requisitions, then click Edit Section, select Override, PR pending Workflow approval, select Email from the dropdown, and click Save Changes.
For additional questions about TechBuy, email purchasing@ttuhsc.edu.