
Interdepartmental Billing (IV) Training
The IV module of the Financial Transactions System (FiTS) allows Service departments (funds beginning with 19) to bill for goods and services provided to other departmental FOAPs (Fund-Organization-Account-Program-Activity). The Fund, Organization, and Account fields are 6-digit required codes; the Program field is a 2-digit required code.
IV operating policy and procedure information is available in HSC OP 50.17, Establishment and Operation of Service Departments.
After successful submission, the system will load the IV to Banner. Transaction tracking, archiving, and retrieving information related to the IV is managed within the system as well.
FiTS allows a Service department to do the following:
- Start an IV
- Resume completion of an IV
- Submit an IV
- Review the Status of an IV
- Review the History of an IV
The system can be accessed from:
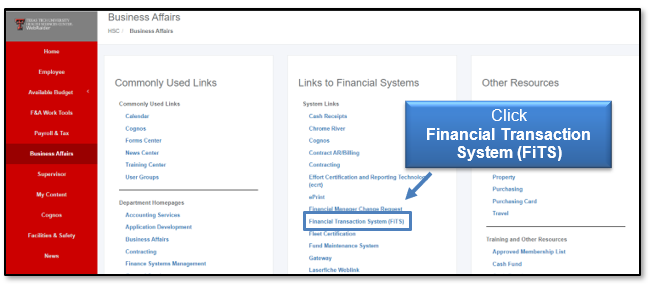
- FiTS
- WebRaider portal > Business Affairs tab > Links to Financial Systems > Financial Transaction System (FiTS)
Creating an IV
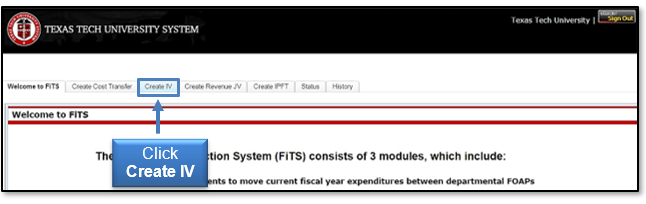
To begin an IV, click the Create IV tab at the top of the webpage.
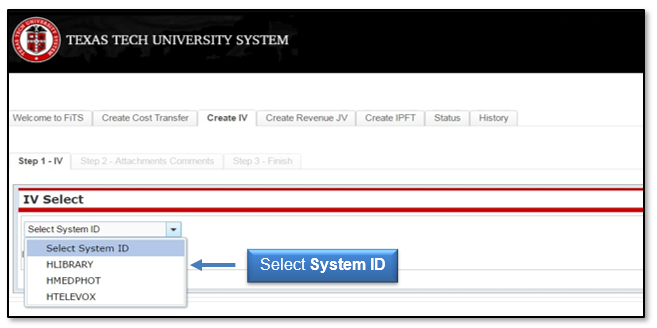
Select the System ID you want to bill from the drop-down box labeled Select System ID. This drop-down box will be populated with all the System IDs that an individual user is currently authorized to bill. If a System ID is not populated, please contact Financial Systems Management at fsm@ttuhsc.edu.
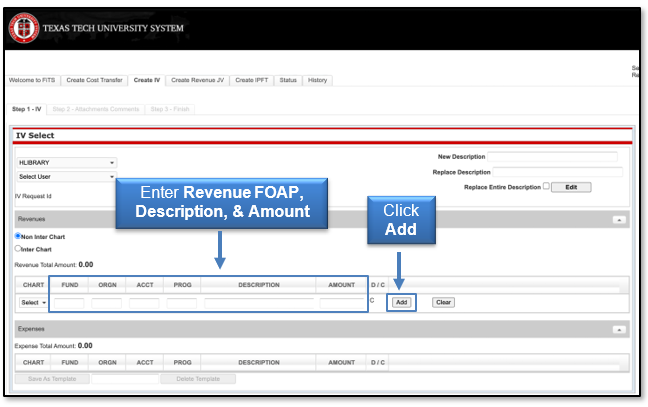
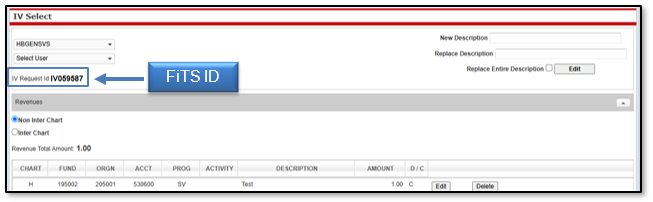
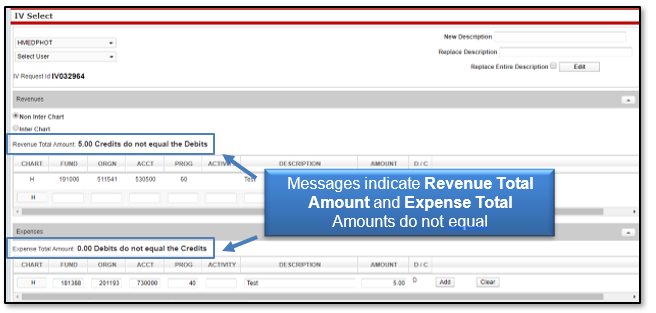
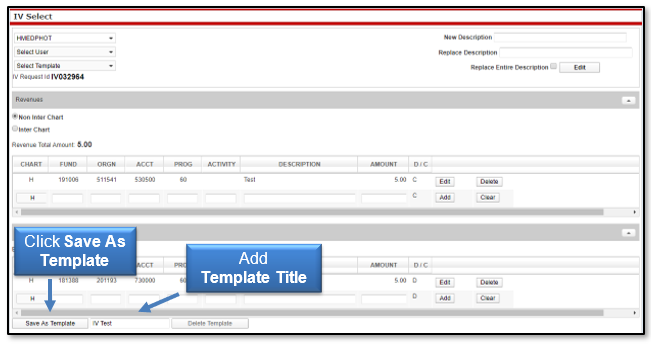
Once a System ID is selected, the screen displays the Revenues and Expenses sections where the service billing information can be entered. In the Revenues section, the Non-Inter Chart radio button indicates that all the expense lines will be on Chart H FOPs. The Inter Chart radio button indicates that at least one expense line will be on a chart other than H. If you do not have the Inter Chart radio button, please contact Financial Systems Management at fsm@ttuhsc.edu.
The Non-Inter Chart radio button is automatically selected by the system. Before this can be changed, a revenue line must be entered. Select the appropriate Chart and enter the Revenue FOAP, Description, and Amount.
Click Add to add the revenue line to your service billing.
After a revenue line is added, an IV Request ID (FiTS ID) is assigned. The FiTS ID can be used to track the IV in the Status and History tabs.
At this time, or at any time during the data entry, if your service billing needs to include Inter Chart expenses, the Inter Chart radio button can be selected.
After you have entered the revenue line for your billing, you can continue to the Expenses section of the IV. In this section, you will enter each department FOAP that you will be charging for goods or services provided. Enter the FOAP, description of expense, and amount to be billed in the respective fields.
Click Add to add the expense line to your billing service. Continue adding lines until all of the departmental FOAPs you are billing have been added.

When adding expense FOAPs to the billing, the system will present a notification for FOAPs that do not have an available budget to cover the amount requested to be billed by displaying an error when trying to add the line.
If a budget error appears, the pop-up message will indicate the FOAP with the error. Contact the department responsible for the FOAP and request that a Budget Revision (BR) be submitted through the online Budget Revision System to budget funds in the proper Budget Account Code (BAC) in order for the line to be added. The FOAP cannot be added to the IV until the BR has been processed and there is sufficient budget to cover the expenses.
Non-Inter Chart and Inter Chart expense FOAPs can be combined on one service billing IV.
To add Inter Chart expense lines to the billing, you must select the Inter Chart radio button.
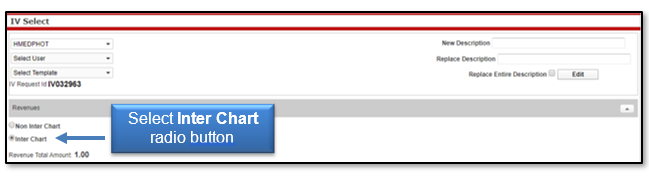
Once the Inter Chart radio button has been selected, the Inter Chart expense FOAPs can be entered. To add an Inter Chart expense line, select the chart that corresponds to the FOAP that is being billed. Then enter the Inter Chart Expense FOAP, Description, and Amount.
When an Inter Chart expense line is added, a revenue line will be automatically added to the Revenues section of the IV. This is done to apply the correct rule codes (HX6 or HX9) to the entry behind the scenes, depending on which chart(s) are being billed.
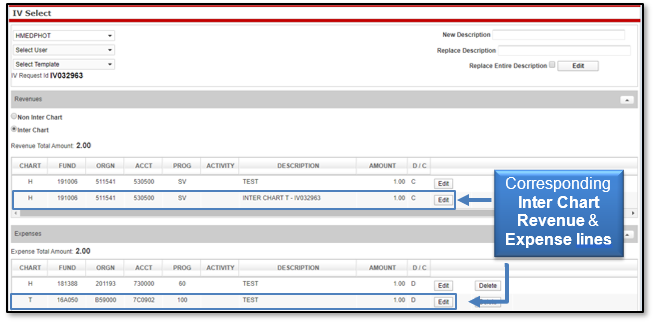
The revenue line(s) will be automatically adjusted when Inter Chart expense lines are added to the billing. This is done to ensure the total of the Inter Chart revenue lines equals the total amount of all the Inter Chart expense lines.
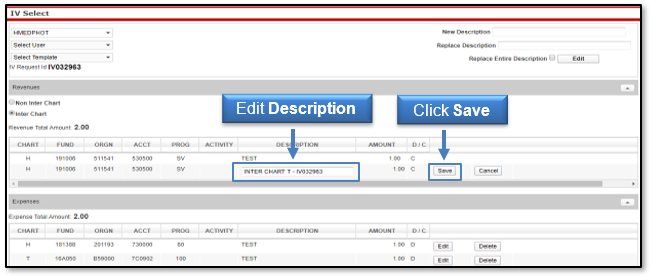
The Inter Chart revenue line(s) are automatically given a system-generated description referencing the chart that is being billed, along with the FiTS ID number of the IV. This description can easily be changed, if needed, using the Edit button to the right of the revenue line(s). Once you have edited the description, click Save.
After all of the necessary revenue and expense lines to complete the service billing have been entered, ensure the Revenue Total Amount (Credits) equals the Expense Total Amount (Debits). If they are not equal, the Revenue and Expense Total Amount will indicate the difference with a message.
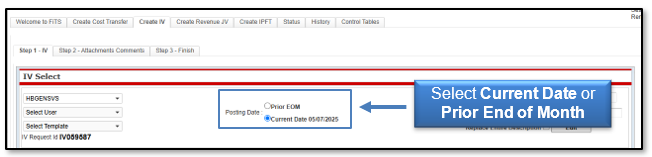
If the billing takes place during the 10 days at the beginning of a month, users have the option to backdate the billing in order for it to be posted in the prior month. Select either the Prior EOM (End of Month) or Current Date radio button.
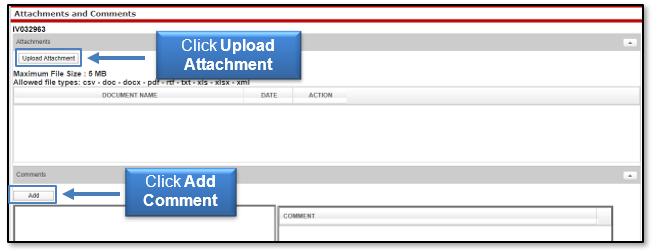
Once confirmation is made that the Revenue Total Amount is equal to the Expense Total Amount, continue to Step 2 - Attachments Comments tab. In this section, upload attachment(s) (in one of the allowed file types) to provide additional information regarding the IV, if needed.
To add a comment, type the text into the box, then click Add to save the comment.
After the optional attachments or comments have been added, move to the final tab, Step 3 - Finish. Step 3 - Finish tab allows you to perform a variety of different tasks. They are:
- Started (Started and will mark Complete later)
- Saves your progress but will not mark the IV as complete.
- Once clicked, it will take you back to a blank Step 1 - IV tab to begin a new IV, if desired.
- To mark the IV as Complete after clicking this option, search for the IV in the Status tab (instructions located below).
- Complete (Mark as Complete)
- Marks the IV as complete in the system but will not submit the IV for processing.
- To submit the IV for processing after clicking this option, search for the IV in the Status tab (instructions located below).
- Submit (Submit For Processing)
- Sends the IV for processing through Gateway.
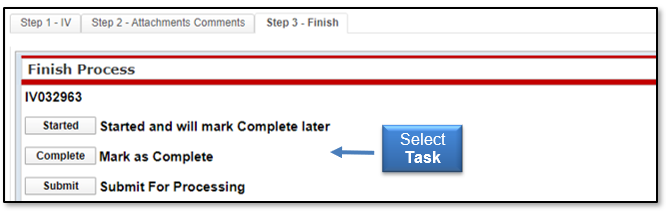
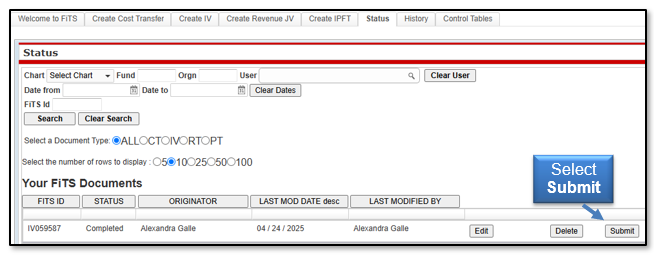
Selecting Complete (Mark as Complete) does not send the IV for processing. In order to send the IV for processing, navigate to the Status tab and locate your IV by the FiTS ID. Once located, select Submit.
Confirmation of Posting
After the IV has been submitted for processing, navigate to the Status tab to confirm the IV has posted with no errors.
If the IV remains in the Status tab, it will have an error message to the right stating Errors in Gateway - Review ePrint. Users may access the ePrint report for the respective System ID to determine the specific reason for the error.
If the IV is not present in the Status tab, the IV has successfully posted through Gateway. The ePrint report will also provide the Banner Document ID given for the service billing.
The ePrint reports may be accessed from the WebRaider Portal on the F&A Work Tools tab under Finance Systems Management. Sign in to ePrint using your Oracle User ID and password and select the GateWay TTUSPRD repository. Once in ePrint, locate your System ID and click the drill icon. All of the IVs loaded under this System ID will be displayed. Select the desired report(s).
The day after an IV is submitted, access Cognos from the WebRaider Portal on the F&A Work Tools tab. Click Finance Reporting (Cognos) in the Finance portlet. Once in Cognos, click the Team content folder on the left side of the screen. Go to HSC Finance > Transaction Detail > Operating Ledger Transaction Search Query.
Choose the Begin and End Fiscal Periods (FP) that include the transaction date of your billing. In the Document field, enter the Banner Document ID that was generated when the billing was uploaded. Each line of the document will be displayed for the date range queried after the report has run. The report will open as an Excel document.
Restrictions
FiTS currently has restrictions placed on all IV billings. Only IVs crediting (C) the Service Department (19XXXX) and debiting (D) the other funds to be charged will be allowed to load.
Any required reversals will need to be submitted to the Accounting Services department at hscacc@ttuhsc.edu. When requesting the reversal, the following documentation will need to be included in the request:
- A copy of the original ePrint report of the billing to be reversed
- If a partial reversal needs to be done, an indication must be made regarding the line(s) that needs to be reversed
- A detailed explanation of why the billing needs to be reversed
- A detailed explanation regarding the steps that have been implemented to avoid similar errors in future billings
Creating/Editing a Template
The IV module of FiTS offers the ability to save a current billing as a template for future billings. This option will allow departments that have similar billings each month to edit a prior billing as necessary in order to avoid creating a new billing each month from scratch.
In order to save a current IV as a template for future use, add all of the lines that you would like to include in the template. When this is complete, enter a Template Title into the text box next to the Save As Template button. Then click Save As Template. Saved templates can be used by anyone with access to the System ID.
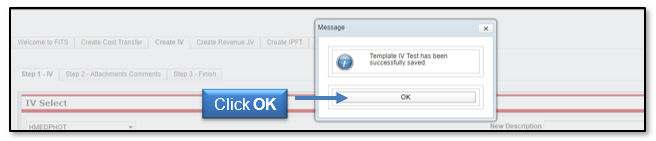
After clicking the Save As Template button, a pop-up message will appear with a notification that the template has been successfully saved.
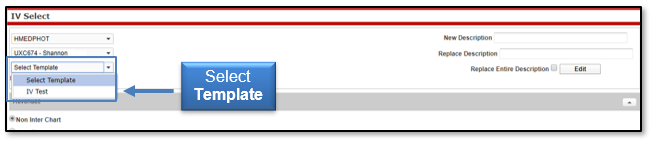
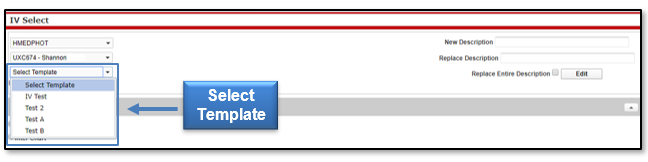
To find a saved template to start a new billing, click the drop-down box below the Select System ID box at the top of the Step 1 - IV tab. Then select a user of the template from the Select User drop-down box.
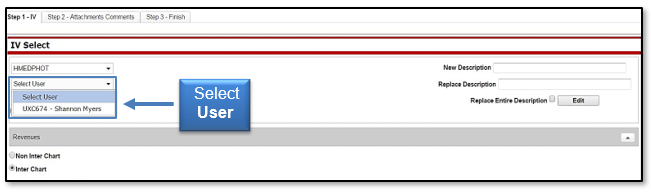
Next, select the template to use from the Select Template drop-down box.
Once a template has been selected, the IV will populate with the lines that were included when the template was saved, and a new FiTS ID number will be assigned.
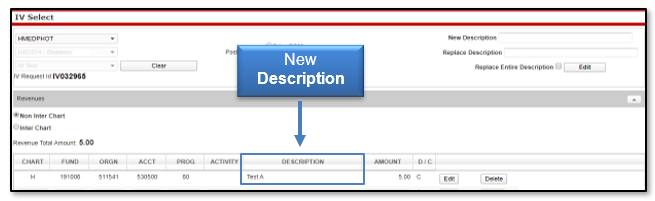
To edit the descriptions of the existing lines of the template selected, utilize the edit description feature at the top right corner of the IV. This feature allows users to replace all or part of the description line with a new description. A line's description may also be edited by clicking Edit to the right of a specific line.
In order to replace all of the line descriptions at once, enter the new description into the New Description text box and click the Replace Entire Description box. Click Edit for the description changes to go into effect.
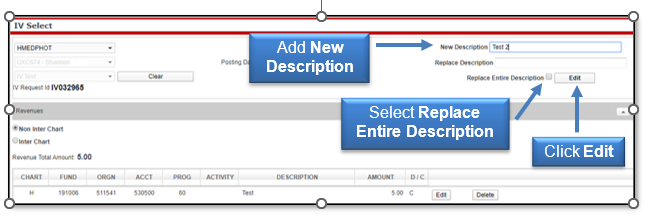
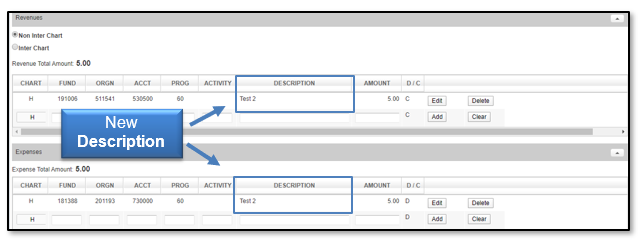
After clicking the Edit button, the new description will be reflected in the Description column of the IV.
To replace a portion of an existing description, enter the portion of the new description to replace it in the New Description text box. Also, enter the portion of the old description to replace it in the Replace Description text box. Click Edit for the description changes to go into effect.
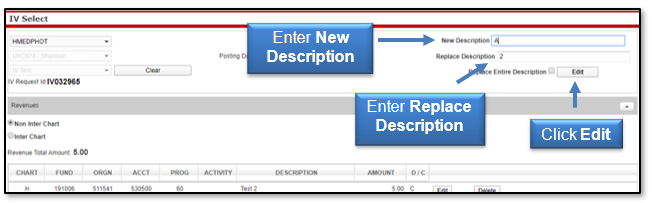
After clicking the Edit button, the new description will be reflected in the Description column of the IV.
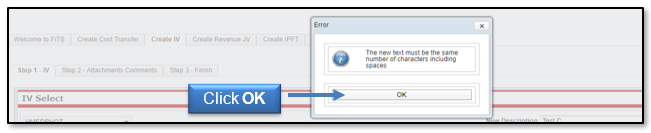
When replacing a portion of a description, the feature only allows the user to replace the part of the description with an equal number of characters. For example, replacing the letter "A" in the above screenshot with "AA" is not allowable. Users are only permitted to replace "A" with a single character. If the replacement description is unallowable, FiTS will show the following pop-up error after clicking Edit.
After editing your existing template, review the template name at the bottom of the screen and confirm that the template name to be saved is populated in the text box next to the Save Template button. Then click Save As Template.
Deleting a Template
To delete a saved template, click the drop-down box below the Select System ID box at the top of the Step 1 - IV tab. Then select your User ID from the Select User drop-down box.

Next, select the template to delete from the Select Template drop-down box.
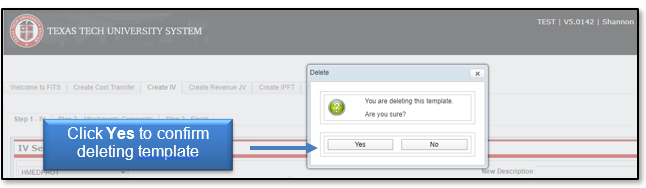
After selecting the template to be deleted, review the template name at the bottom of the screen and confirm that the template name to be deleted is populated in the text box next to the Save As Template button. Then click Delete Template.

After clicking the Delete Template button, a pop-up message will appear to confirm that you are sure you want to delete the template. If you are sure of your selection, click Yes. If not, click No.
Deleting an IV
Only the Originator of an IV has the ability to delete an IV from FiTS.
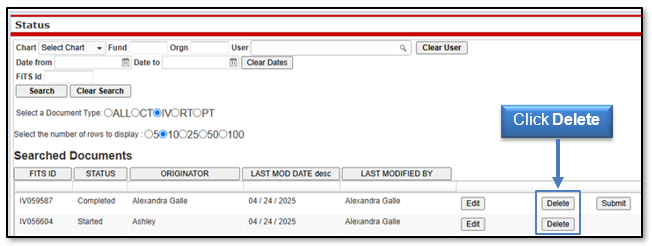
To delete an IV, select the Status tab. After selecting the Status tab, the screen will populate with all of the FiTS documents you originated and have not been submitted or processed.
Search for the IV you wish to delete by Fund, Orgn, a date range that the IV was last modified, and/or FiTS ID, or by using the forward and back buttons at the bottom of the page.
Once the IV to be deleted is located, click Delete on the line of the selected IV.
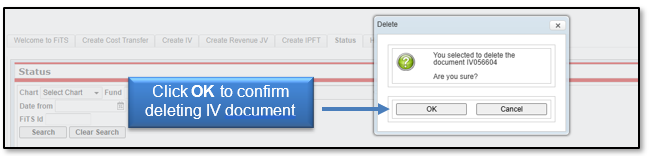
After clicking the Delete button, a pop-up message will appear to confirm the selected IV document should be deleted. If this selection is correct, click OK. If not, click Cancel.
Originators will receive an email from the ITIS Transaction Entry System for any IVs that remain in the Status tab and have not been modified for 7 days, informing them that the IV will be deleted the following Monday. To prevent the IV from being deleted, the Originator will need to make the necessary corrections before the following Monday.
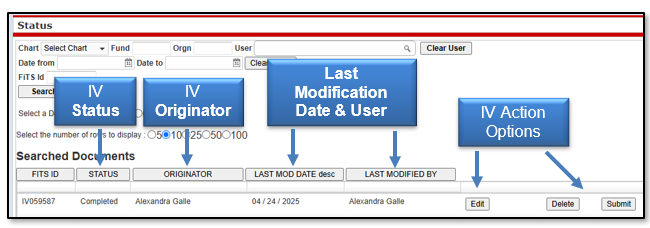
Searching the Status Tab
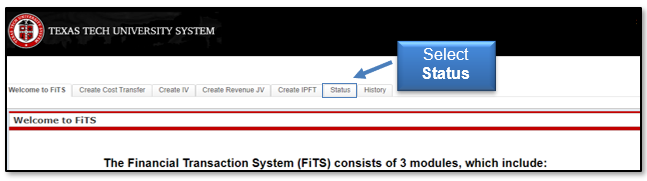
The Status tab can be used to search for any IV(s) that have not been completed or processed. To begin, click the Status tab on the home page.
The Status tab automatically populates with all FiTS transactions for which you are the Originator or a TEAM App Financial Manager or Approver.
Users can search for a specific IV in the following ways:
- Chart: Use "H" for Health Sciences Center
- Fund & Orgn: Search by either Fund or Orgn, or both
- User: Returns results for all FiTS transactions the user is involved in; use the magnifying glass to select the correct name
- Date Range: Search by the last date a transaction was modified using the Date from field or by a date range
- FiTS ID: Search by all or a portion of the ID
Users can search using multiple parameters from the list above. Depending on how many parameters are used, the search may have to be refined or expanded.
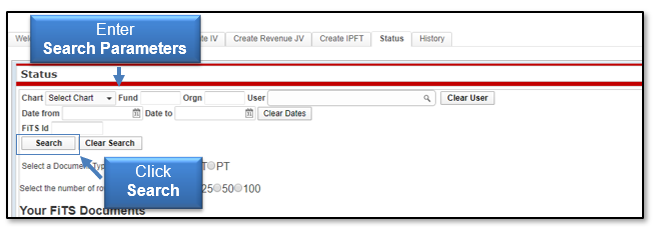
After entering the desired search parameters, click Search to perform the search. If you would like to perform a different search, click Clear Search to clear the search fields.
After entering the desired search parameters, click Search to perform the search. If you would like to perform a different search, click Clear Search to clear the search fields.
Depending on how many results are returned, the arrow buttons near the bottom of the page allow movement between the pages of results. You may select the number of rows displayed per page by using the radio buttons.
In addition to IVs, FiTS is used for Cost Transfers (CTs), Revenue JVs (RTs), and Internal Purchase Funding Transfers (PTs). Search results can be limited to only Interdepartmental Billings (IVs) by selecting the document type, IV, and the radio button.

The results will be sorted numerically by the FiTS ID. To sort by any of the other columnar fields, click the column header to sort by that field.
The search results will also display the following information:
- Status: Stage of the FiTS process for the IV
- Originator: Person who submitted the IV
- Last Mod Date: Date of the last modification to the IV
- Last Modified By: User who last modified the IV
The Status column of the search results will reflect the current stage in the FiTS process for a specific IV. These stages include:
- Started: IV has been started by the Originator, but not marked complete. If you are the Originator for an IV, you will have the option to Edit or Delete the IV from FiTS.
- Completed: IV has been marked complete but not submitted for processing. If you are an Originator for an IV, you will have the option to click Edit, Delete, or Submit the IV. Selecting Submit will send the IV for processing.
- Errors: IV has incurred an error while trying to post. Please contact Finance Systems Management at fsm@ttuhsc.edu for assistance.
The other 3 columns show the user who originated the IV, the date of the last modification of the IV, and the user who made the last modification.
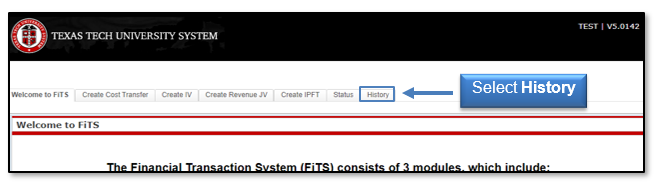
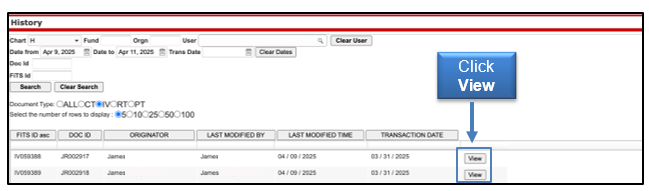
Searching the History Tab
The History tab can be used to search for any IV(s) that have been processed and posted. To begin, select the History tab from the home page of FiTS.
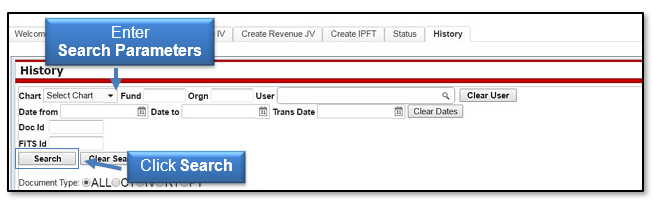
The History tab does not automatically populate with any IVs. Users can search for a specific IV in the following ways:
- Chart: Use “H” for Health Sciences Center
- Fund & Orgn: Search by either Fund or Orgn, or both
- User: Search for all FiTS documents a user is involved in and use the magnifying glass to select the correct name
- Date Range: Search by the last date a transaction was modified using the Date from field or by a date range
- Transaction Date: Search by the document's Banner transaction date
- Doc ID: Search by all or a portion of the Banner Document ID that the IV was assigned when it was fully processed and posted.
- FiTS ID: Search by all or a portion of the ID
Users can search using multiple parameters from the list above. Depending on how many parameters are used, a search may have to be refined or expanded.
After entering the desired search parameters, click Search to perform the search. To perform a different search, click Clear Search to clear the search fields.
Depending on how many results are returned, use the arrow buttons near the bottom of the page to move between the pages of results. Select the number of rows displayed per page by using the radio buttons.
In addition to Interdepartmental Billings (IV), FiTS is used for Cost Transfers (CT), Revenue JVs (RT), and Internal Purchase Funding Transfers (PT). Search results can be limited to only Interdepartmental Billings (IVs) by selecting the document type, IV, radio button.
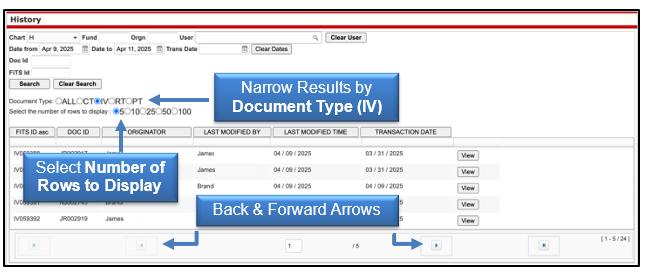
The results will be sorted numerically by the FiTS ID. To sort by any of the other columnar fields, click the column heading to sort by that field.
The search results will also display the following information:
- Doc ID: Banner document number assigned when processed
- Originator: Person who submitted the IV
- Last Modified By: User who last modified the IV
- Last Modified Time: Date of the last modification to the IV
- Transaction Date: Transaction date the IV posted to Banner
To view the details of the processed IV, click View.
If you have a policy question regarding the IV process, please contact Accounting Services at hscacc@ttuhsc.edu.
If you have a training question about FiTS or need access to a System ID, please contact Finance Systems Management at fsm@ttuhsc.edu.
Contact
Finance Systems Management
-
Address:
3601 4th Street STOP 6209 | Lubbock, Texas 79430-6209 -
Email:
fsm@ttuhsc.edu