
TEAM Financial Registration Help
The TEAM Application is the electronic registration/security process used for TTUHSC Financial processes. This registration process allows Fund Managers to register those in their departments who they deem necessary to use online financial applications. Only a Fund Manager will be able to grant access to specific Banner Funds and assign roles to their departmental users for finance applications such as TechBuy. The TEAM Application also provides a means for Orgn (Organization) Managers to assign Financial Alternates for Orgn Approval for Financial applications that use Orgn security for approval routing, such as the Budget Revision and Fund Maintenance System applications.
The system can be accessed from:
- TEAM Application
- WebRaider Portal > Business Affairs tab > Links to Financial Systems > TEAM Application
The TEAM Application Information link provides training documentation for the TEAM Application.
Home
The Team Application Home page allows you to select applications from the links in the menu bar on the left side of the page or by selecting the applications in the Quick Links section.
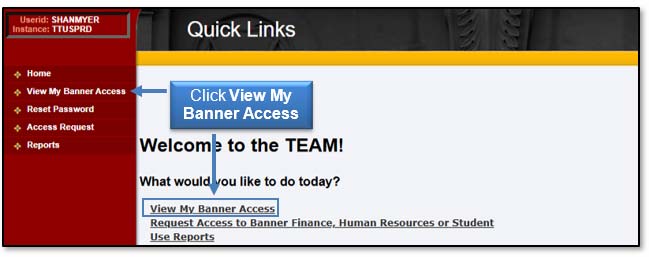
View My Banner Access
To view your Banner access information, from the Home page, click the View My Banner Access link in the menu bar on the left side of the page or the link in the Quick Links section.
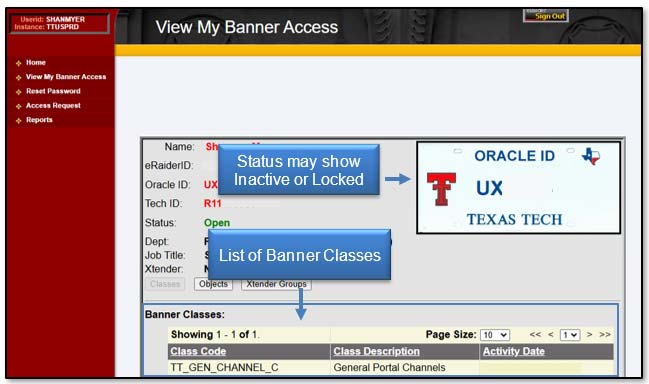
The TEAM application, View My Banner Access, displays the following information:
- Your Name
- eRaider ID
- Oracle ID (often referred to as your Banner "License Plate")
- Tech ID ("R" Number)
- Oracle ID Status (if you do not use ePrint, FiTS, or Banner, you will not be assigned to any Banner Classes, and the "Status" of your Oracle ID may show as "Inactive" or "Locked")
- Banner Classes (most Departmental users will have very few, if any, Banner Classes as these relate only to ePrint Security, FiTS Security, and Banner Security Classes)
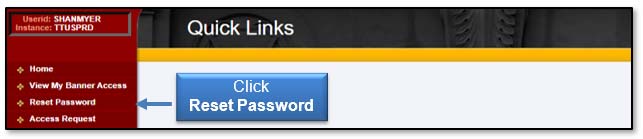
Reset Password
To set or reset your Banner password, select the Reset Password link from the menu bar on the left side of the page.
The OracleID Password Reset page will open. This page features your Oracle ID and provides a text box to provide and submit a new password by following the requirements and guidelines.
Please read the Disclaimer and know that by logging into the Banner application, you are indicating that you have received, understand, and agree to abide by the policies relating to Banner security. The Password Guidelines provide a list of rules that must be adhered to when entering your new password.
Enter a new password in the Password text box and click Confirm Reset.
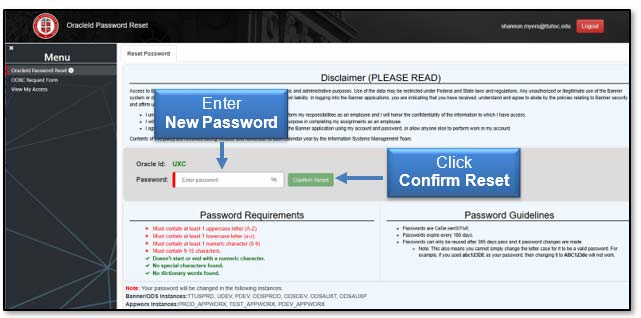
Your password will only be changed in TTUSPRD and will expire every 180 days. You will not receive an email reminder notification to change your password, so it is recommended that you set a reminder in your Outlook Calendar.

TechBuy User Access
To request TechBuy user access, click Access Request from the menu bar on the left side of the page. You can also use the Request Access to Banner Finance, Human Resources, or Student link from the Home page Quick Links.
The Select Application page provides a list of various applications depending on your role assignments. For TechBuy, Financial Managers will automatically be registered as "Approvers" and "Requesters" with full authority to shop and submit orders. Persons with these authorities will not have to register.
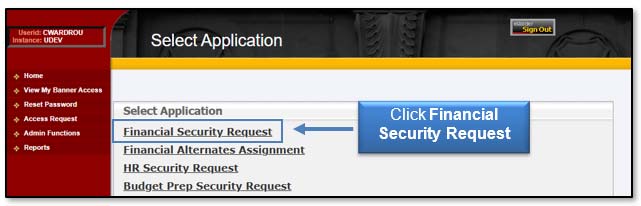
From the Select Application page, click Financial Security Request.
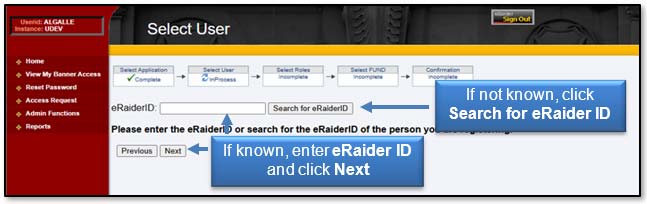
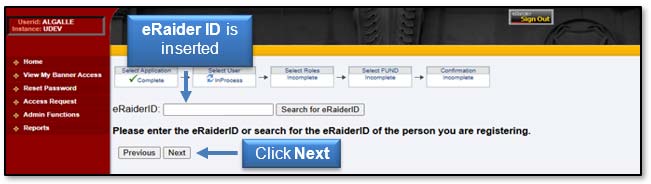
If known, enter the eRaider ID of the employee you wish to register and click Next. If you do not know the eRaider ID, click the Search for eRaider ID button.
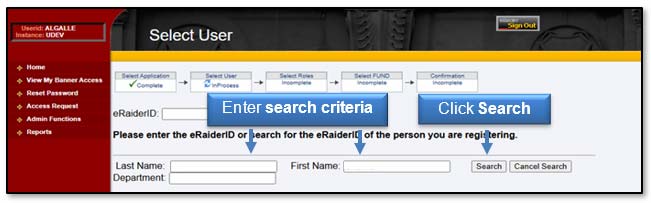
You must enter at least the last name of the employee you wish to register. Enter a first name and/or department to reduce the number of results from the search. Once you have entered your search criteria, click Search.
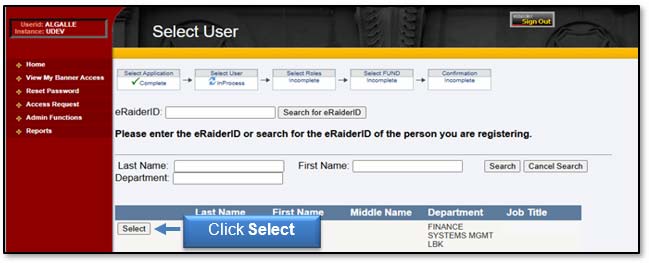
The results of the search should appear below the search parameters. Locate the appropriate employee and click the Select button to the left of their name. Please make sure the employee you are selecting is in the correct department as there could be other employees with matching names.
The eRaider ID of the selected employee will now be inserted into the eRaider ID field. Click Next.
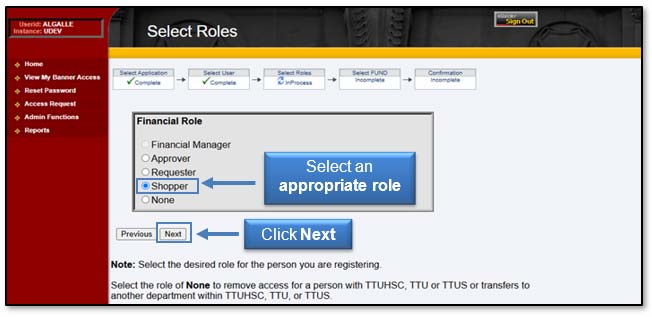
There are three roles available to assign to a TechBuy user: Approver, Requestor, or Shopper. If a user is granted different roles on different funds through the TEAM application, the highest role assigned to the user will apply to all authorized funds in TechBuy.
The Approver role should be assigned to the employee who has the authority to approve:
- All non-catalog orders submitted by Requesters and Shoppers are charged to Banner Funds, to which the Approver has been granted authority to approve
- All catalog orders from Shoppers
- Catalog orders of $5,000.00 and above from Requesters.
The Requester role should be assigned to those employees who have the authority to assign accounting information to a requisition and to submit orders to vendors. Please note that orders of $5,000.00 or greater will be forwarded to a department approver before going out to the vendor.
The Shopper role should be assigned to those employees who have the authority to shop and submit a cart to a requisition, but do not have the authority to place the order with the vendor.
The None role should be used to deactivate a user. It is important to complete this step for those in your department who were registered but have terminated or transferred to another department within TTUHSC, TTU, or TTUS. If the employee is to have access to TechBuy in the new department, then the appropriate role will have to be applied by the new Financial Manager or delegated Fund Manager.
Select the appropriate role for the person you are registering and click Next.
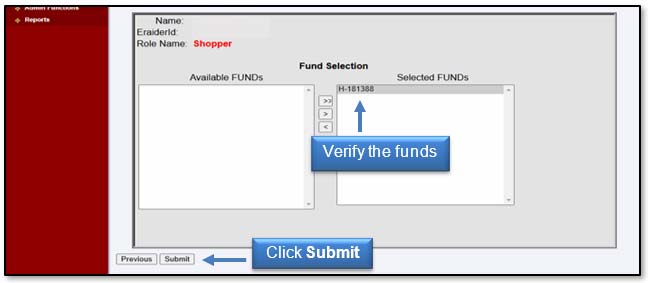
The Financial Manager's list of fund(s) will populate in the Available FUNDs section. Select the fund(s) that the employee should have access to spend against by highlighting the appropriate fund(s) and selecting the arrow to move the fund(s) to the Selected FUNDs section.
If a fund is not granted to the employee, that employee will not be able to select that fund when submitting a requisition.

Verify all appropriate funds are listed in the Selected FUNDs section and click Submit.
Once you submit the request, you will receive a Confirmation screen. It will provide a one-page summary of the access request that displays the name of the person, the Profile Selected (the role assigned as a TechBuy user), and the FUNDs Added (the fund(s) the employee should have access to spend against).

An automatic email verification will be sent to the person who set up the access and the employee who was set up.
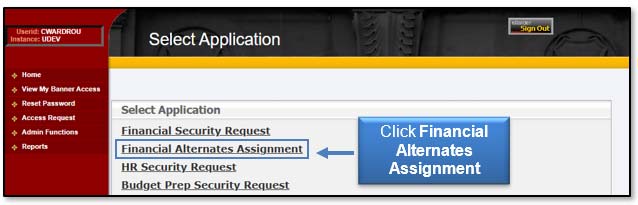
Financial Alternates Assignment
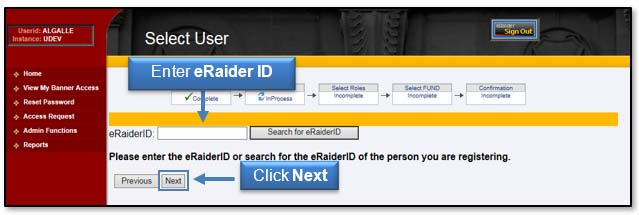
To register a Financial Alternate to serve as a backup for the Orgn Manager for a New Fund Request Approval, click the Financial Alternates Assignment link from the Select Application page.
If known, enter the eRaider ID of the employee you wish to register and click Next. If you do not know the eRaider ID, click the Search for eRaider ID button.
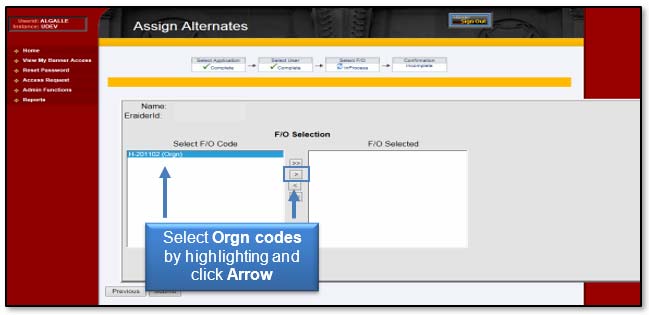
The Financial Manager's list of Orgn code(s) will populate in the Select F/O Code section. Select the Orgn code(s) that the employee should be assigned as the Financial Alternate by highlighting the appropriate Orgn code(s) and selecting the arrow to move the Orgn code(s) to the F/O Selected section.
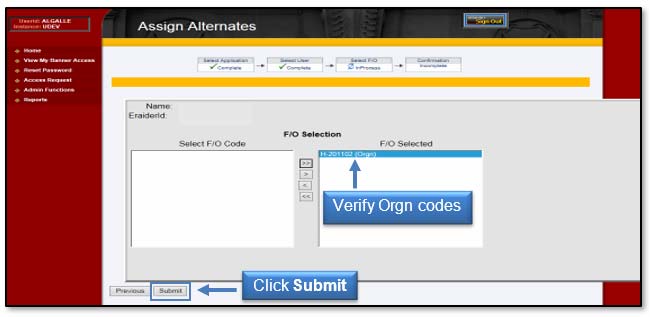
Verify that all appropriate Orgn code(s) are listed in the F/O Selected section and click Submit.
Once you submit the request, you will receive a Confirmation screen. It will provide a one-page summary that displays the name of the person granted the alternate approver role and the associated Orgn code(s).
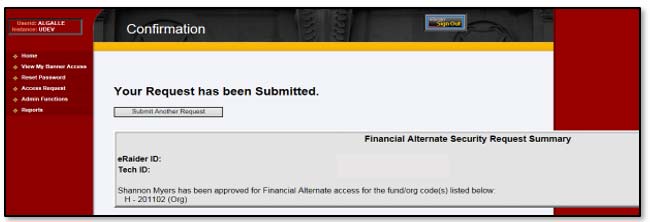
An automatic email verification will be sent to the person who set up the access and the employee who was set up.
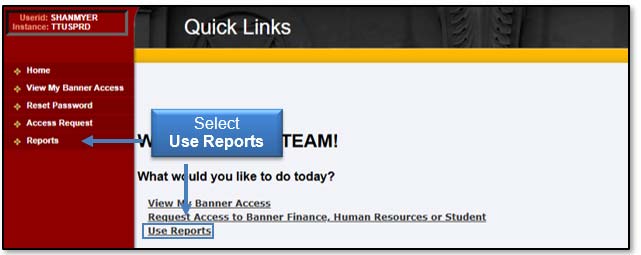
Reports
To access the reports that are available in the TEAM Application, select the Reports link in the menu bar on the left side of the page, or from the Home page, select Use Reports from the Quick Links section.
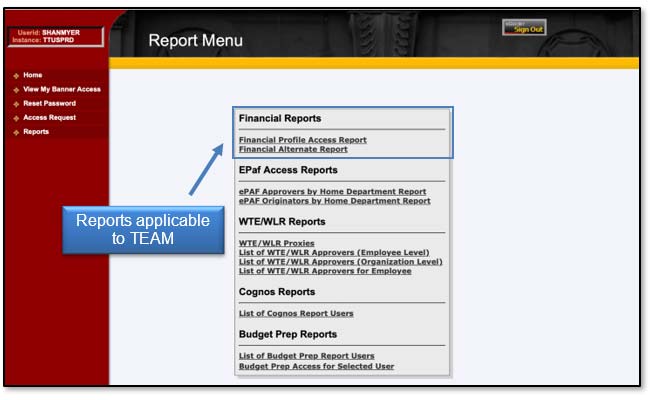
The Financial Reports section of the Report Menu contains links to the two reports that apply to the TEAM financial registration process:
- Financial Profile Access Report
- Financial Alternate Report
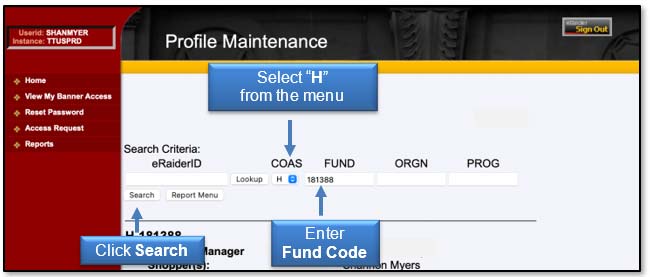
Financial Profile Access Report
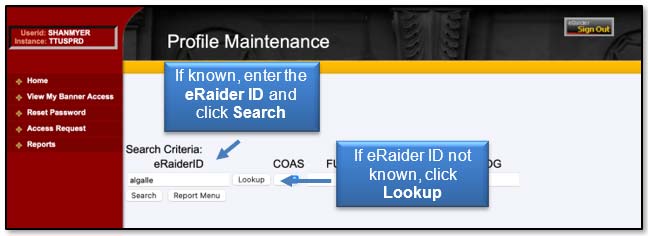
If known, enter the eRaider ID of the employee you wish to query and click Search. If you do not know the eRaider ID, click the Lookup button to access the eRaider Lookup function.
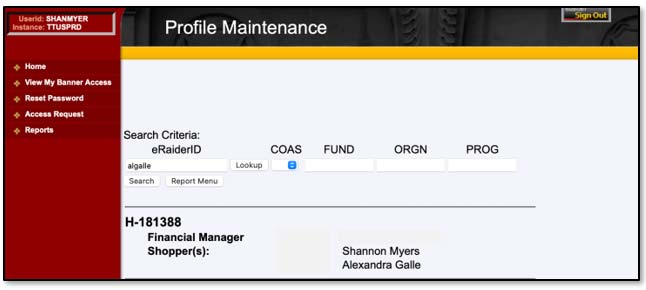
The result of the search displays the Fund, the Financial Manager for the Fund, and the security role for users of TechBuy or Direct Pay applications.
You can also search by Fund. Select the "H" (designation for HSC) from the drop-down menu in the COAS (Chart of Accounts) field. Enter the Fund code in the Fund text box and click Search. The Financial Manager and security roles for users assigned to this fund will be displayed.
Financial Alternate Report
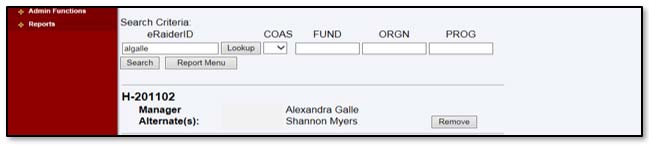
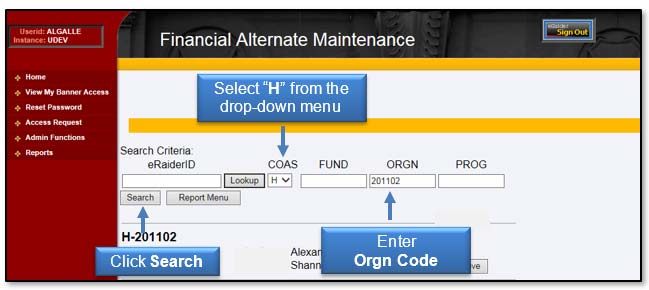
The Financial Alternate Report is used to query Orgn security and Orgn Manager Alternate Approver(s) for the New Fund Request Application. If known, enter the eRaider ID of the employee you wish to query and click Search. If you do not know the eRaider ID, click the Lookup button to access the eRaider Lookup function.

The result of the search displays the Orgn Manager and the Financial Alternate(s) for the Orgn.
You can also search by Orgn. Select the "H" from the drop-down menu in the COAS (Chart of Accounts) field. Enter the Orgn code in the ORGN text box and click Search. The Financial Manager and Alternate(s) for this Orgn will be displayed.
If you have additional questions, please contact Finance Systems Management at fsm@ttuhsc.edu.
Contact
Finance Systems Management
-
Address:
3601 4th Street STOP 6209 | Lubbock, Texas 79430-6209 -
Email:
fsm@ttuhsc.edu