
TechBuy - User Profile
Each TechBuy user has a unique profile which contains information specific to them. Elements of the profile are required for system access, while other elements are not required but will make submission of the cart simpler. For example, by setting up a user's ship to address, the information will be defaulted into an order and will not require selection with each purchase. This document will walk you through the basics of updating and managing your profile.
Access Your User Profile
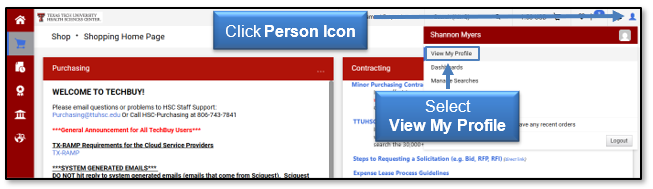
You can access your User Profile by clicking the Person Icon then View My Profile link in the upper right-hand corner.
User Settings
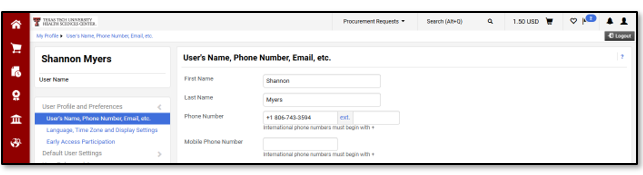
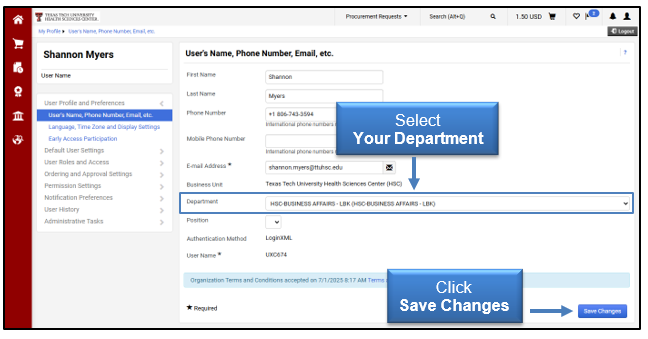
Your profile should open to the User Profile and Preferences tab and the User's Name, Phone Number, Email, etc. sub-tab. This sub-tab houses your basic contact and log in information. Review the populated information and make any necessary changes.
You must select your Department from the drop-down list. It should begin with HSC followed by the title of the department. Select Save Changes.
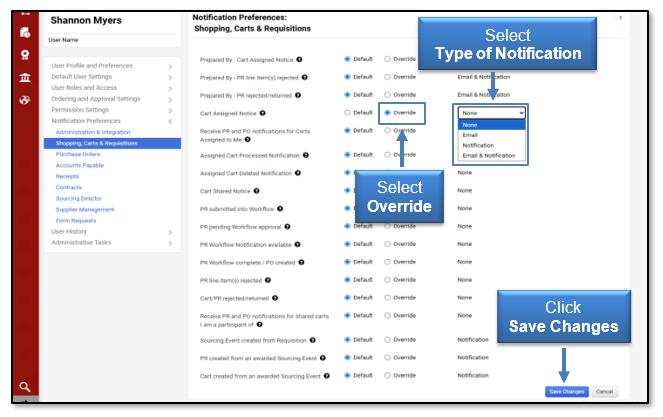
Notification Preferences
The Notification Preferences screen allows users to select which TechBuy notifications they prefer to receive. There are no required notices; however, it will be important to receive minimal notices such as line item rejection. We suggest signing up for several notifications and tapering back once you determine your business needs.
You can access these options under the Notification Preferences tab and the document type sub-tabs.
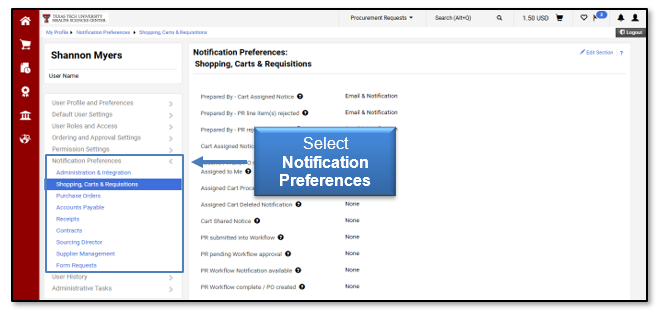
Determine which notifications you wish to receive. You can click the question mark to the right of the name of the notification to display a full explanation.

You will receive the notifications marked with email, notification or email & notification. To enable or disable a notification, click Edit Section located near the top right.

Select Override for the items you want to update. This will allow you to select the type of notification you want to receive from the drop-down menu. When you have finished changing your preferences, click Save Changes.
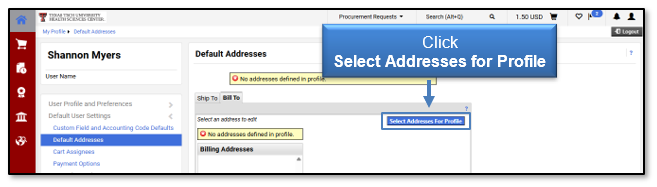
Default Addresses
Billing and shipping information is required to place orders in TechBuy. It is highly recommended that you default a Billing and Ship To address into your profile. If you do not default addresses, you may receive an error when punching-out to a vendor's website. Select the Default User Settings tab and the Default Addresses sub-tab.
Bill To Address
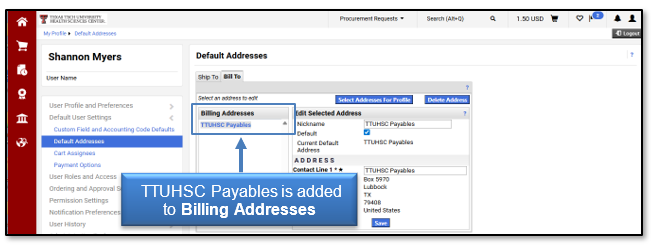
Select the Bill To tab. There are several billing addresses but only one to select for the Health Sciences Center. Click the Select Addresses for Profile icon.
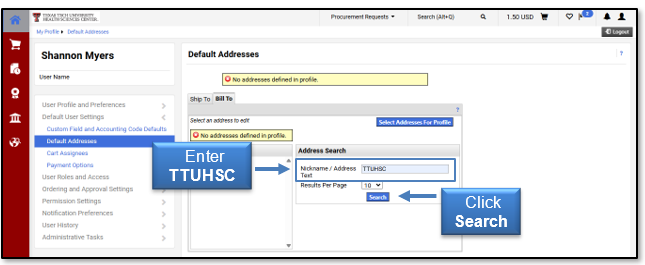
Enter TTUHSC in the Nickname/Address Text field and click Search.
Select the TTUHSC Payables radio button. Verify the Default box is marked and click Save.
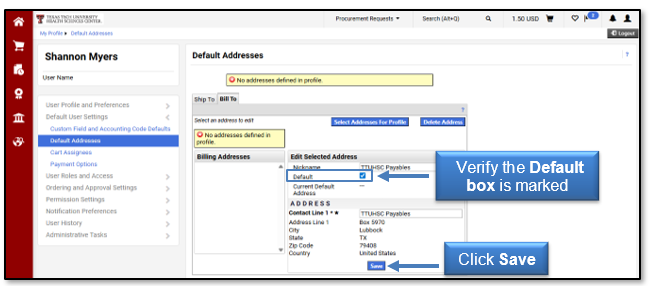
Notice that the address is now added to the Billing Addresses on the left.
Shipping Address
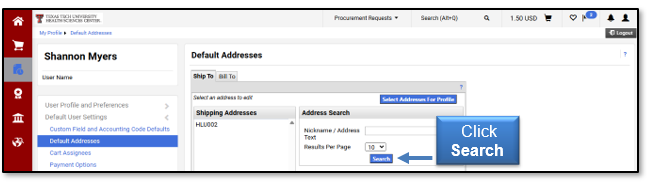
Once you have verified your billing address, select the Ship To tab. The shipping address identifies where the supplier should ship the item(s). Click the Select Addresses for Profile button.

This will open an Address Search window. You can enter search criteria or simply select the Search button to bring in all shipping addresses.
When entering search criteria, you can enter the first characters of the Ship To Code or use a % as a wildcard and enter the last characters of the Ship To Code.
Example 1: Search using no criteria. Click the Search button.
This example returned several pages of addresses. Using no criteria in the search produced a list of all ship to codes listed in alphabetical order.
Example 2: Search using HLU as the criteria. Enter HLU in the Nickname/Address Text field and click Search.
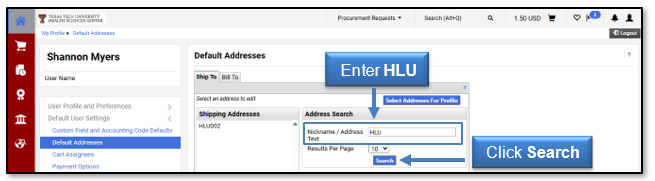
This example only returned four pages of addresses. Using HLU for the Ship To Code criteria searched for all addresses that start with HLU.
Example 3: Search using a % as a wildcard (%001). Enter a percentage followed by a number, such as 001 in this example, in the Nickname/Address Text field and select Search.
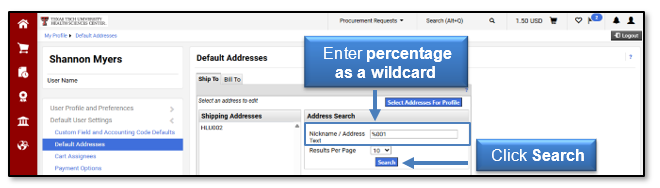
The search results using a %001 returned anything that ended in 001. This search found five pages of addresses. If you do not locate the correct shipping address in the list, please contact purchasing@ttuhsc.edu.
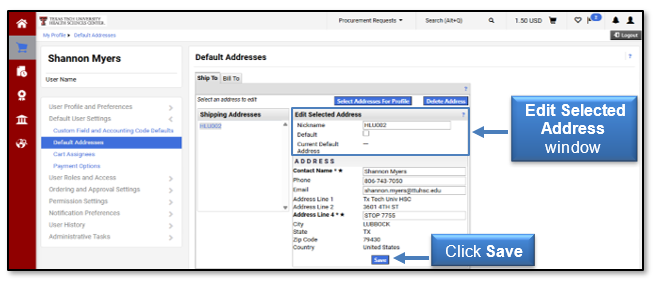
Once you locate the Ship To address you would like to default on your orders, use the radio button to the left to select the correct Ship To address. This will open the Edit Selected Address window.
The Nickname field allows you to title the shipping address with a name that will be more meaningful to you. For example, HLU002 is the main Lubbock HSC building. The Contact Name, Phone, and Email fields should all default from your user settings.
If this information is incorrect, please correct the information in your user settings. You can follow the instructions found above in the User Settings section.
The Rm/Building field is a required field on all requisitions and purchase orders. This should be populated with your mail stop (if located in Lubbock), room number, or specific building name.
Once your shipping address is correct, click Save.
Adding Accounting Information
In your profile, click the Default User Settings tab, Custom Fields and Accounting Code Defaults sub-tab and select Codes.
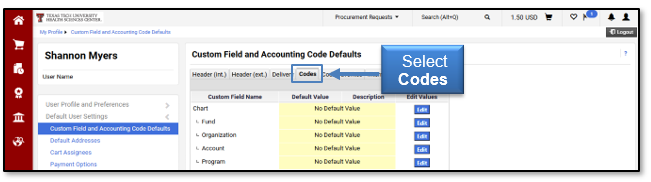
In order to streamline your purchasing process, you can add Chart, Fund, Organization and Program (FOP) codes to your profile. This will populate a drop-down list on the requisition screen for all the elements added to your profile and will allow you to easily select the appropriate FOP code.
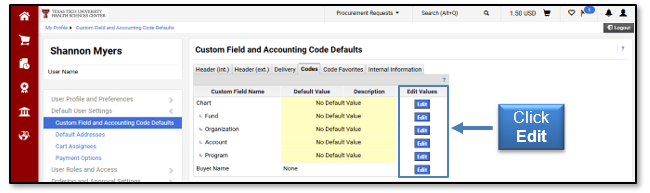
Additionally, you can select one of the values to default automatically into the requisition. This is only recommended if you only shop using one FOP. Furthermore, it is important to make sure your default for Fund and the default for Organization create a valid and budgeted combination.
We do not recommend selecting a default value for the Account code. The Account code should be driven by the item(s) purchased and, therefore, should be selected at the time of purchase.
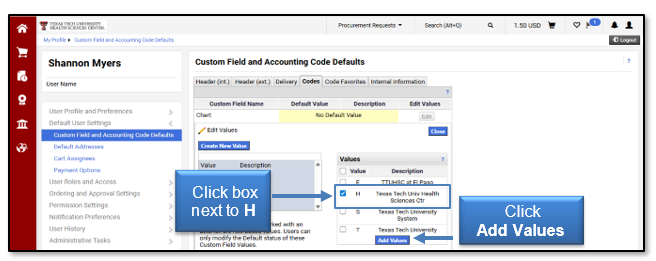
Click Edit on the right side of the screen associated with Chart.
Select the Create New Value icon.
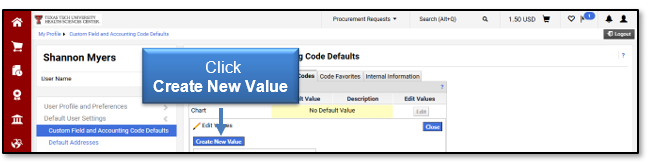
Click the box to the left of the value H for Texas Tech University Health Sciences Center. Select Add Values.
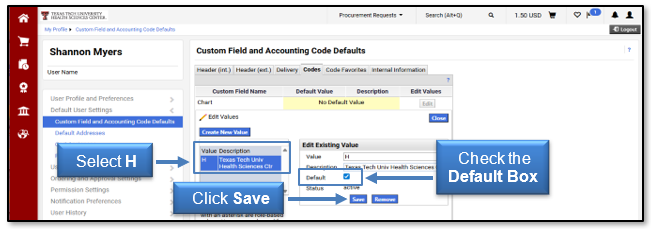
The selected chart will populate in the left-hand box. If you want Chart H to default on all purchases, you must mark it as a default. Click H and/or the description name from the values in the left-hand box.
The Edit Existing Value box will open. To make the value a default, check the Default Box. Click Save.
The value will populate in the top portion of the screen under Default Value. Click the Close button on the right side of the page.
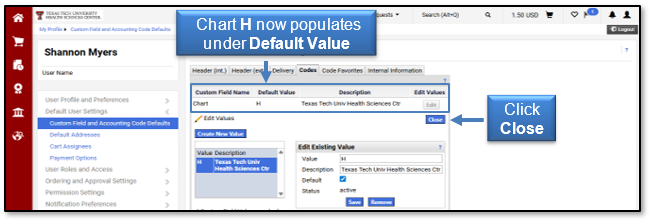
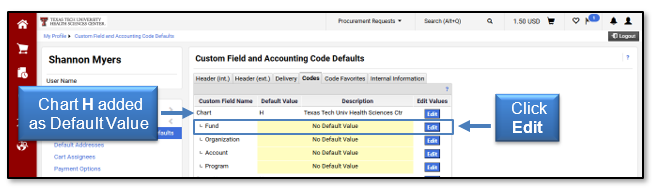
You will notice Chart H has been added as a default value under the Codes tab.
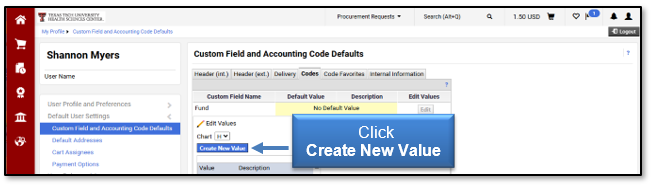
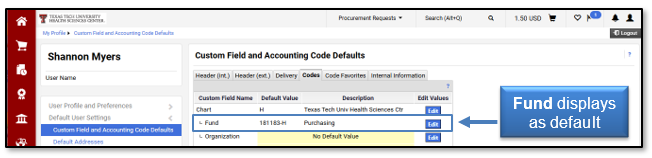
The next value to add to your profile is Fund. Click the Edit button associated with the Fund field.
Click Create New Value.
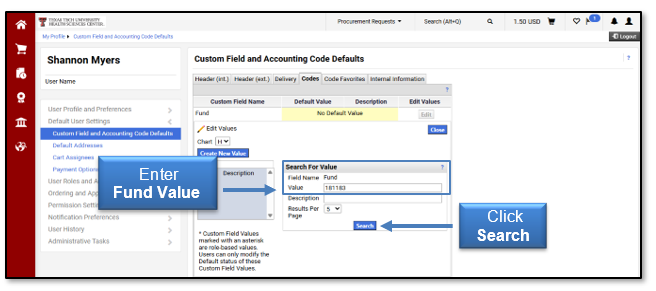
Enter the Fund code you wish to add to your profile values and click Search or you can search for a value. If you search for a value, you will be given a list from which to choose.
Check the box beside the value you wish to add and click Add Values.
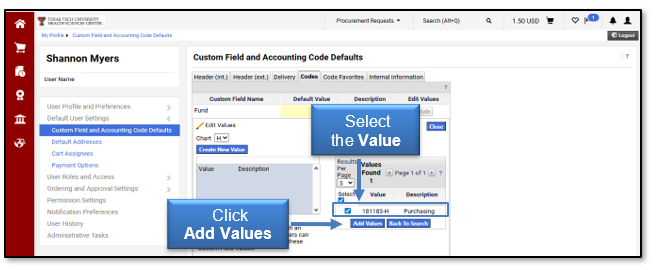
You will see the value appear in the box on the left. To add the value as a default, click the value and/or description.
When the Edit Existing Value box opens on the right side, check the Default box and click Save.
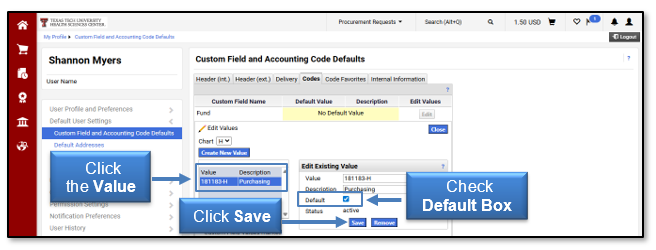
After you select Close on the right side of the screen, you will see that the fund displays as a default.
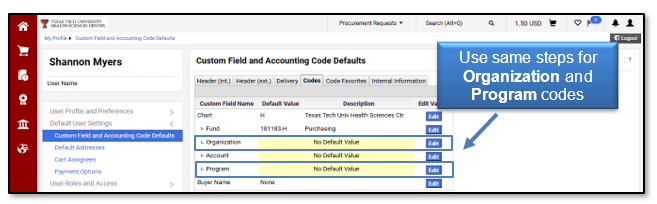
Follow the same steps for Organization and Program.
Reminder: We do not recommend selecting a default for the Account code. The Account code should be driven by the item(s) purchased and, therefore, should be selected at the time of purchase.
Once you have set up defaults for your Ship To, Billing Address, Fund, Organization and Program, you have completed the recommended default set up. This information will populate into every order you submit and will save you time when ordering.
Contact
Finance Systems Management
-
Address:
3601 4th Street STOP 6209 | Lubbock, Texas 79430-6209 -
Email:
fsm@ttuhsc.edu