
Cash Receipts - Help
All Departments must use the Cash Receipts system to record receipt of all cash, checks, wires and credit card payments. Cash receipts for revenue contracts interface to the Contract Database and Contract AR system where you can track payment on those contracts.
The Cash Receipts system allows for departmental deposit information entry, electronic routing and approval. The system also has the capability of returning an online cash receipt for correction. Reports are available to help you monitor the cash receipting process.
The system can be accessed from:
- Cash Receipts
- WebRaider portal > Business Affairs tab > Links to Financial Systems > Cash Receipts
The Cash Receipts system is also available from the Contracting website by using Contract AR/Billing via the External Links at the top of the banner page.
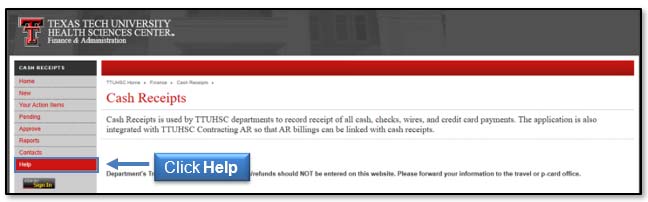
This document, containing details about the Cash Receipts system, and an online video tutorial are available by clicking Help in the menu bar on the left side of the Cash Receipts page.
Document Index:
Process Outline - Information necessary to process all types of cash receipts
Deposit Types - Information necessary to process the following eight deposit types:
- Clinical Trial
- Contract Revenue
- Expense Reimbursement
- Gift
- Other
- GE Patient Billing
- Sales and Service
- Sponsored Programs
Features - Information describing features of the Cash Receipts System
Process Outline (click link to return to table of contents)
Enter Cash Receipt (click link to return to table of contents)
To enter a cash receipt, click New in the menu bar on the left side of the Cash Receipts page. You will be asked to sign in using your eRaider name and password.

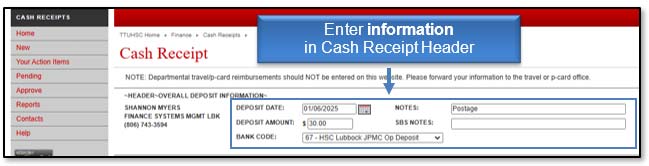
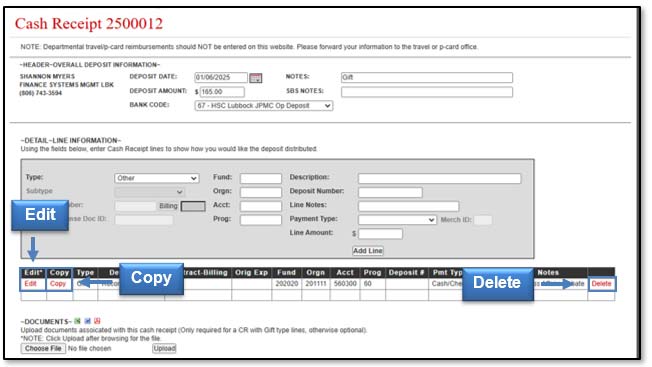
Your name and department information will populate in the cash receipt based on your eRaider ID. Enter the information in the Cash Receipt Header-Overall Deposit section.
- Deposit Date: The Deposit Date will default to the current date. This date will feed to Banner as the Transaction Date. The deposit date must reflect the actual date the deposit posted to the bank. You may change this date to match the actual date of the deposit otherwise, if this date does not match the actual deposit date, Student Business Services (SBS) may change the date.
- Deposit Amount: Enter the Deposit Amount. This amount must match the total of all deposit lines in the detail section.
- Bank Code: Enter the appropriate Bank Code from the drop-down menu provided. The Lubbock deposits that are not MPIP should be coded to 67 - HSC Lubbock JPMC Op (Operational) Deposit.
- Notes: Notes are not required. They may be useful to the intermediate approver or for queries.
- SBS Notes: This field is reserved for SBS to communicate with you in the event a CR is returned.
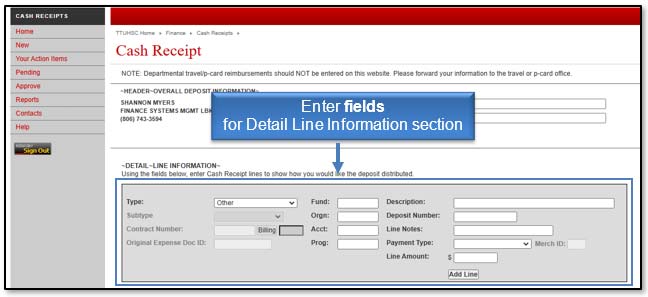
Using the fields in the Detail Line Information section, you will enter the Cash Receipt lines to show how you want the deposit distributed. Not all fields are used for each deposit type.
When entering the Detail Line Information, the following general requirements will apply.
Enter a description for each line that contains the following information in the standardized format shown:
- Date of deposit, entered as MM/DD
- Type of payment received, entered as "Cash" for currency and checks, "Wire" for wire transfers, and "MC/V/DISC", "AMEX", or "Phreesia" for credit card payments
- For credit card payments, enter the last four digits of the merchant ID
- Other payer information as space allows up to 30 characters in total
For cash receipts to record credit card payments, enter each card type and batch settlement total on a separate line.
For cash receipts to record wire transfers, enter each wire transfer on a separate line.
- Wire Transfers: EVERY TIME you submit a cash receipt for a wire transfer in the Cash Receipts System, you will need to send a copy of the cash receipt and copies of any supporting documents to SBS for processing/approval to the SBS email at SBSCashReceipts@ttuhsc.edu.
- Note: Cash Receipts will not be process/approved unless an email or physical cash receipt and supporting documents are received by SBS.
- Supporting documents: need to include a copy of the wire and deposit number which can be found in the email sent from Accounting Services. See the example below.
- Deposit number: needs to be added to your cash receipt under the deposit number. The cash receipt cannot be approved without one. The deposit number is usually 10 numbers with two letters at the end - Example: 0000000000TC. This number will be found in the email sent from Accounting Services. See the example below.
- Per HSC OP 50.07, Deposit Procedures: "State law requires timely deposit of funds into TTUHSC Depository Bank Accounts. Funds received must be deposited within three (3) business days with no exceptions. Receipts totaling $100 or more must be deposited by the following business day."
- Additional assistance: view TTUHSC: Cash Receipts or contact Student Business Services at SBSCashReceipts@ttuhsc.edu.

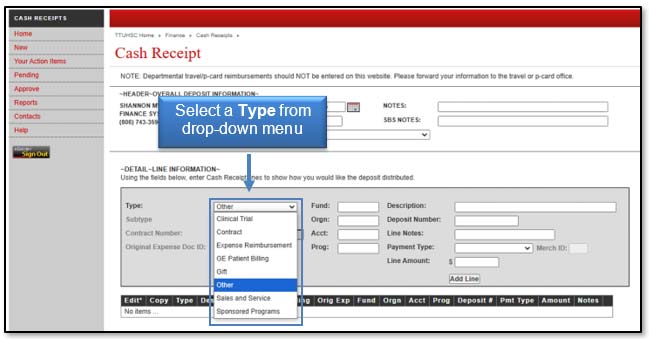
Deposit Types (click link to return to table of contents)
There are eight deposit types to select from in the Type drop-down menu:
- Clinical Trial
- Contract Revenue
- Expense Reimbursement
- Gift
- Other
- GE Patient Billing
- Sales and Service
- Sponsored Programs
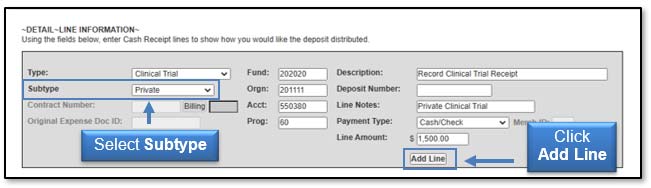
1) Clinical Trial (click link to return to table of contents)
- FOP information is required. The Account code will default based on the subtype entered.
- Select Subtype from the drop-down list. The subtype will determine the appropriate account code.
- Description is required and will feed to Banner and be reflected in Cognos reports.
- Deposit Number is added by Student Business Services (SBS), so leave this field blank.
- Line Notes is not required but provides an additional data field for queries or reports. This information will not feed to Banner or your ledger reports.
- Payment Type is required for every line. Select the Payment Type from the drop-down menu. The Merchant ID is required for MasterCard/Visa/Disc, American Express or Phreesia. The last four digits of the Merchant ID should be entered for the chosen card type.
- Line Amount is the total amount for this detail line.
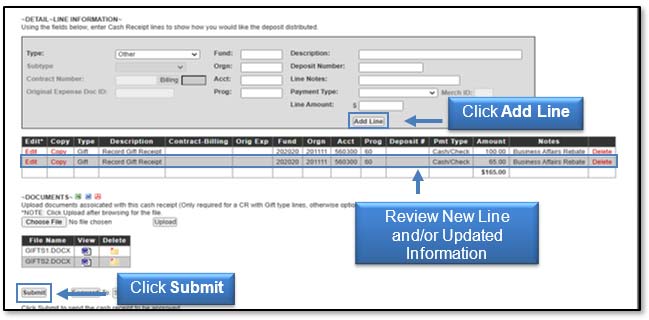
- After you enter each detail line of the deposit, click Add Line.
Note: The information regarding the Deposit Number and Line Notes will not be repeated for each deposit type presented in this training document.
2) Contract Revenue (click link to return to table of contents)
- Contract Number is required. You may use the Search feature if you do not know the contract number. Click Search and the Search and View Contracts page will display.
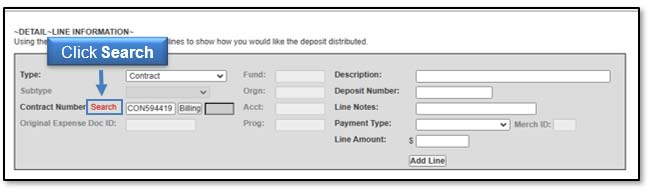
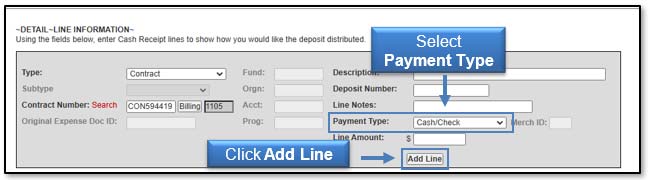
- You must select an AR Billing from the choices available when you click the Billing button.

- FOAP information is defaulted from the contract accounts receivable (billing) in the Contract Database and Contract AR systems.
- Description is required and will feed to Banner and be reflected in Cognos reports.
- Payment Type is required for every line. Select the Payment Type from the drop-down menu. The Merchant ID is required for MasterCard/Visa/Disc, American Express or Phreesia. The last four digits of the Merchant ID should be entered for the chosen card type.
- Line Amount is the total amount for this detail line.
- After you enter each detail line of the deposit, click Add Line.
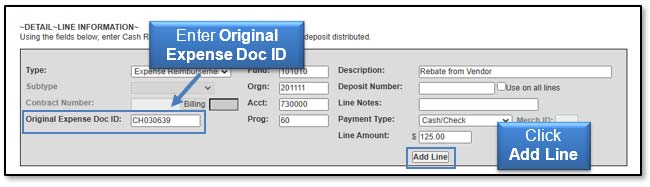
3) Expense Reimbursement (click link to return to table of contents)
- FOAP information is required and should match the FOAP information of the original expense that is being reimbursed.
- Original Expense Doc ID is required.
- Description is required and will feed to Banner and be reflected in Cognos reports.
- Payment Type is required for every line. Select the Payment Type from the drop-down menu. The Merchant ID is required for MasterCard/Visa/Disc, American Express or Phreesia. The last four digits of the Merchant ID should be entered for the chosen card type.
- Line Amount is the total amount for this detail line.
- After you enter each detail line of the deposit, click Add Line.
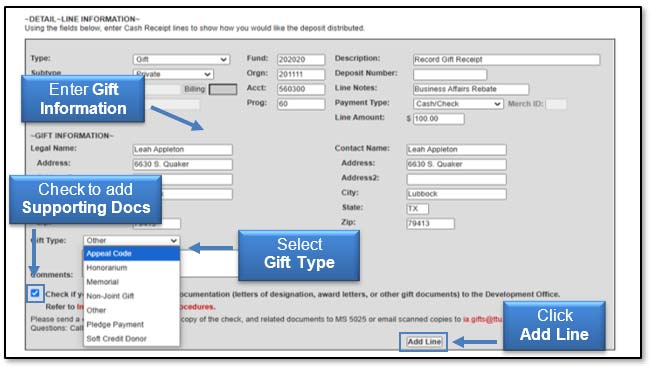
4) Gift (click link to return to table of contents)
- FOP information is required. The Account code will default based on the subtype entered.
- Select Subtype from the drop-down list. Subtype will determine the appropriate account code.
- Description is required and will feed to Banner and be reflected in Cognos reports.
- Payment Type is required for every line. Select the Payment Type from the drop-down menu. The Merchant ID is required for MasterCard/Visa/Disc, American Express or Phreesia. The last four digits of the Merchant ID should be entered for the chosen card type.
- Line Amount is the total amount for this detail line.
- Gift Information including legal name, address, and contact name is required.
- Select Gift Type from the drop-down menu.
- After you enter each detail line of the deposit, click Add Line.
Supporting documentation is required to be included with a cash receipt with Gift type lines. For funds to be properly posted to the system, the following supporting documents are required:
- Proposal request made to the donor for the funds
- Award letter
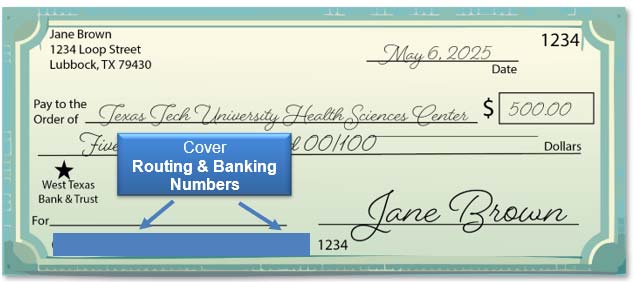
- Copy of the check with the routing number redacted (blacked out) on the check copy.
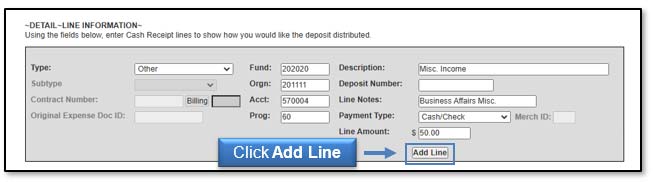
5) Other (click link to return to table of contents)
- FOAP information is required.
- Description is required and will feed to Banner and be reflected in Cognos reports.
- Payment Type is required for every line. Select the Payment Type from the drop-down menu. The Merchant ID is required for MasterCard/Visa/Disc, American Express or Phreesia. The last four digits of the Merchant ID should be entered for the chosen card type.
- Line Amount is the total amount for this detail line.
- After you enter each detail line of the deposit, click Add Line.
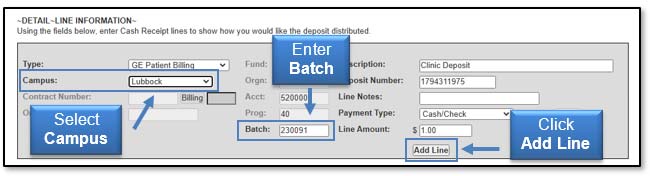
6) GE Patient Billing (click link to return to table of contents)
- You must select a Campus from the drop-down menu.
- The FOAP information will automatically default based on Campus selection.
- Enter in your Batch number into the Batch field, if there is one.
- Description is required and will feed to Banner and be reflected in Cognos reports.
- Payment Type is required for every line. Select the Payment Type from the drop-down menu. The Merchant ID is required for MasterCard/Visa/Disc, American Express or Phreesia. The last four digits of the Merchant ID should be entered for the chosen card type.
- Line Amount is the total amount for this detail line.
- After you enter each detail line of the deposit, click Add Line.
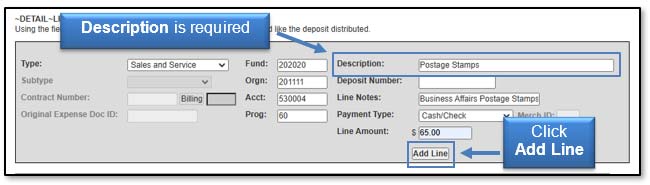
7) Sales and Service (click link to return to table of contents)
- FOAP information is required.
- Description is required and will feed to Banner and be reflected in Cognos reports.
- Payment Type is required for every line. Select the Payment Type from the drop-down menu. The Merchant ID is required for MasterCard/Visa/Disc, American Express or Phreesia. The last four digits of the Merchant ID should be entered for the chosen card type.
- Enter sales tax collected, if any, on a separate line. Enter the appropriate fund and enter 210013 in the Account field.
- Line Amount is the total amount for this detail line.
- After you enter each detail line of the deposit, click Add Line.
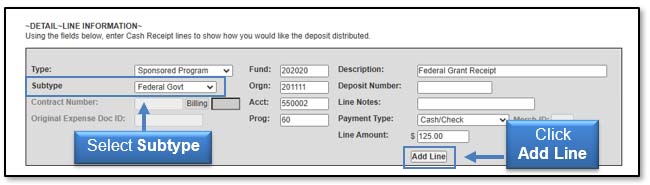
8) Sponsored Program (click link to return to table of contents)
- FOP information is required. The Account code will default based on the subtype entered.
- Select Subtype from the drop-down list. Subtype will determine the appropriate account type.
- Description is required and will feed to Banner and be reflected in Cognos reports.
- Payment Type is required for every line. Select the Payment Type from the drop-down menu. The Merchant ID is required for MasterCard/Visa/Disc, American Express or Phreesia. The last four digits of the Merchant ID should be entered for the chosen card type.
- Line Amount is the total amount for this detail line.
- After you enter each detail line of the deposit, click Add Line.
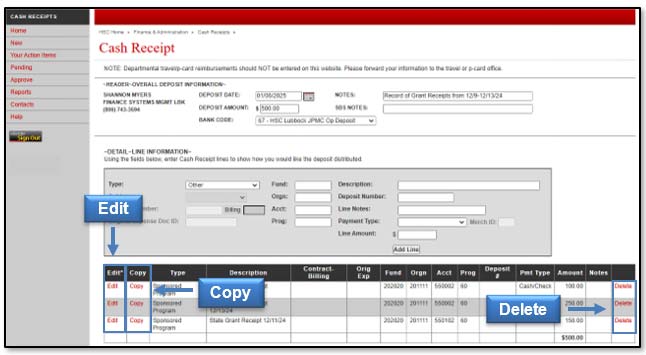
After you have completed entering each detail line of the deposit, review all added lines and check for accuracy. You can Delete, Edit, or Copy detail lines of the deposit, if needed.
Upload Supporting Documentation (click link to return to table of contents)
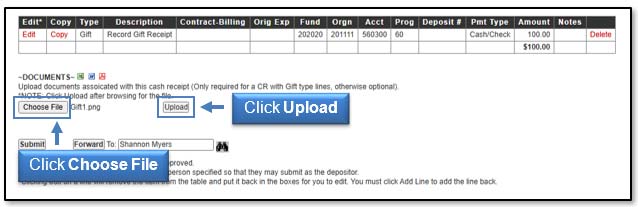
You can include supporting documentation saved on your computer by using the Upload feature of this application. Click Choose File to locate and select the document(s) from your computer, and then click Upload. Document types that can be used with the Upload feature include Excel, Word, and PDF.
Please note any checks scanned for upload need to have the banking information redacted for security protection. This example check indicates the areas to redact.
Note: the Upload feature may also be used for a cash receipt with all other deposit type lines, however supporting documentation is optional and only required for a cash receipt with Gift type lines.
Complete Cash Receipt (click link to return to table of contents)
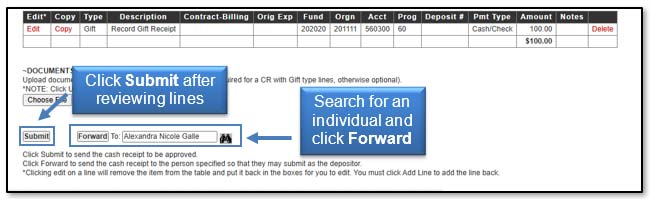
After all lines are correct, you have two options:
- Click Forward - This allows you to forward the cash receipt to another individual using a search feature. When you forward the cash receipt, it has not been submitted for approval. The individual receiving the forwarded cash receipt must submit it. They will be considered the depositor.
- Click Submit - This will complete your cash receipt and submit it to be approved by the intermediate approver or Student Business Services.
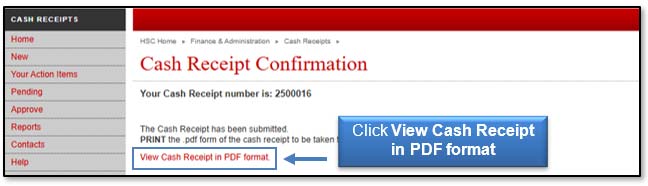
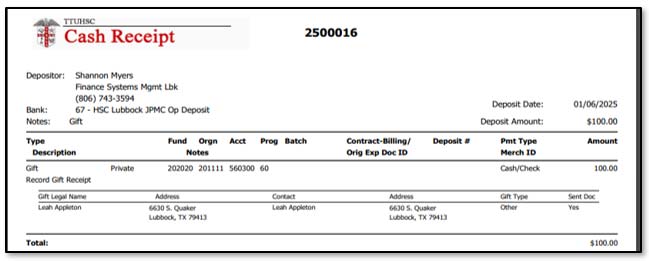
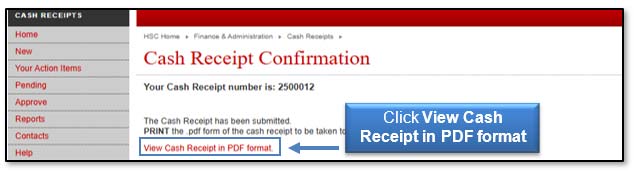
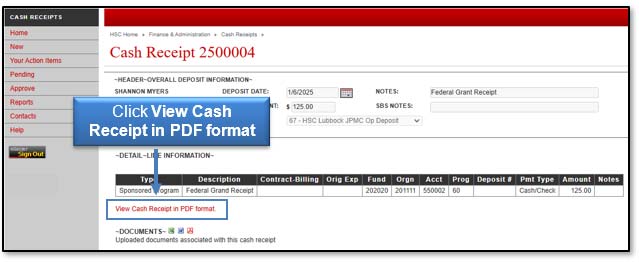
When the cash receipt is submitted, the depositor will receive the Cash Receipt Confirmation screen. You can view the cash receipt by clicking View Cash Receipt in PDF format.
Print the cash receipt and take to your intermediate approver or to the Student Business Services (SBS) office along with your bank deposit of cash, checks, wire transfers and credit card batch settlement reports.
Cash Receipts will not be approved unless an email or physical cash receipt and backup have been received by SBS.
Student Business Services is located off South Loop 289 at 6630 Quaker Avenue, Suite H. Cash Receipts may also be delivered to the secure drop box located at 1B429 on the first floor, just west of the TTUHSC Pharmacy, at the TTUHSC 4th street location.
Wire Transfers and Credit Card cash receipts can be emailed to SBSCashReceipts@ttuhsc.edu. Please attach cash receipt and back-up to the emails.
Features (click link to return to table of contents)
Your Action Items (click link to return to table of contents)
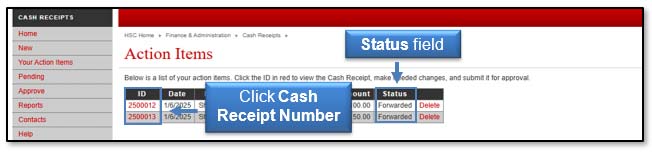
The Your Action Items section located in the menu bar on the left side of the Cash Receipts page, lists the cash receipts waiting for your submission. These receipts are not considered completed and cannot be approved until submitted. Cash receipts fall into Your Action Items if they are either Returned or Forwarded for your submission. To view these items, click Your Action Items in the menu bar on the left side of the Cash Receipts main page.

The lists of cash receipts in Your Action Items will display. The Status field will indicate if the cash receipts have been Returned or Forwarded.
Returned Cash Receipts - Intermediate approvers and the SBS office have the ability to return a cash receipt to the person who originated the cash receipt for corrections or more information. If a cash receipt that you entered is returned, you will receive an email notification.
Forwarded Cash Receipts - Users have the ability to forward a cash receipt to you for submission. When a cash receipt is forwarded to you, you become the depositor. The cash receipt will not be approved until you successfully submit it. If a cash receipt is forwarded to you, you will receive an email notification.
Click the red ID number for the cash receipt that you wish to correct and submit.
To correct or add additional information to a line in a Returned or Forwarded cash receipt, click the red Edit link for the cash receipt line you need to correct or add additional information. To duplicate the cash receipt, click Copy. To remove the cash receipt from the system, click Delete.
Correct or add any additional information for this line of the cash receipt and click Add Line. After the line is added, review the edited information for accuracy and click Submit. The cash receipt will go back through the original approval process.
After you submit the cash receipt, you will see a Cash Receipt Confirmation screen and receive an email confirmation that the cash receipt has been modified. Click View Cash Receipt in PDF format to review your cash receipt.
For a Returned cash receipt, you may print a copy of the corrected version for your records. For a Forwarded cash receipt, print the corrected cash receipt and take it to your intermediate approver or Student Business Services (SBS) office along with your bank deposit of cash, checks, wire transfers, and credit card batch settlement reports. You may print a copy of the corrected version for your records.
Note: When reviewing cash receipts in Cognos reports processed from Banner and you notice a cash receipt needing a reversal, please contact Accounting Services at
hscacc@ttuhsc.edu.
Pending Cash Receipts (click link to return to table of contents)
To view Pending Approval cash receipts, click Pending in the menu bar on the left side of the Cash Receipts page.

You will see a list of all cash receipts waiting for intermediate approval or approval from the Student Business Services office. To view the details of a pending cash receipt, click the red ID number.
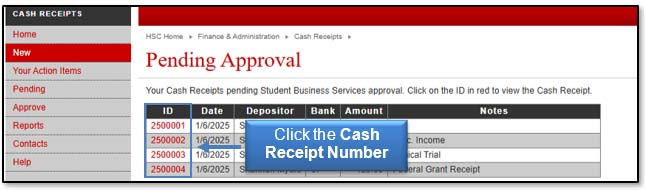
The Pending Approval cash receipt will display. To view and print the cash receipt, click View Cash Receipt in PDF format.
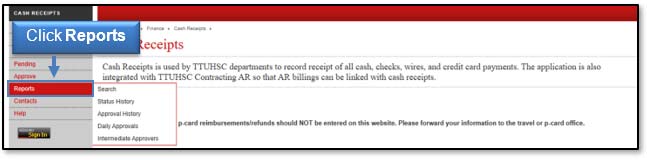
Reports (click link to return to table of contents)
There are five report options available to help you manage your cash receipts:
- Search - Allows you to search for any cash receipt in the system regardless of status and permissions.
- Status History - Displays a table with the status history of the cash receipt. The last status in the Status column indicates the current status.
- Approval History - Displays a list of all approved and posted cash receipts that you have permission to view. You can click on the cash receipt ID to view the cash receipt details (CRs must have been approved by Student Business Services).
- Daily Approvals - Provides a list of the CRs that Student Business Services has approved based on a given date.
- Intermediate Approvers - Provides a list of all Intermediate Approvers. You can sort the list by bank code by selecting the bank code from the drop-down list.
Click Reports in the menu bar on the left side of the Cash Receipts page to view the available report options.
Questions (click link to return to table of contents)
If you have questions about the Cash Receipts system, please contact Student Business Services at (806) 743-7867 or email Student Business Services at SBSCashReceipts@ttuhsc.edu.
For additional information, refer to these related HSC OPs:
- 50.07 Deposit Procedures
- 50.10 Endorsement Stamps and Endorsement of Checks
- 50.26 Use of Cash Receipts Systems
- 50.35 Unidentified Receipts and Holding Account Maintenance
- 50.36 Sales Tax Collection
- 50.37 Payment Card Processing by TTUHSC Departments
Contact
Finance Systems Management
-
Address:
3601 4th Street STOP 6209 | Lubbock, Texas 79430-6209 -
Email:
fsm@ttuhsc.edu