
Emburse Enterprise - Travel Cash Advance Expense Reports
Cash advance travel reimbursement requests will be processed on a General Travel expense report and will be approved by the Travel Office no more than 5 days before the trip start date.
Cash advance requests are only allowed for employees who have applied for and been denied a State Travel Card by US Bank. Cash Advance requests for travelers who do not qualify will be rejected by Travel Admin.
Before submitting a cash advance reimbursement request, a Pre-Approval expense report must be completed for the trip. The Pre-Approval Report ID will be required for Travel Advance Expense Report submission.
For more information on Travel Pre-Approval Reports and how to submit them, reference the Travel Training Center.
Travel Expense Report - Cash Advance
To submit a Travel Expense Report for a cash advance reimbursement request, complete the following:
- Confirm traveler dashboard.
- Create a new expense report.
- Verify report type on expense report header = general travel.
- Verify basic trip information on the expense report header.
- Add cash expense advance line item request to report.
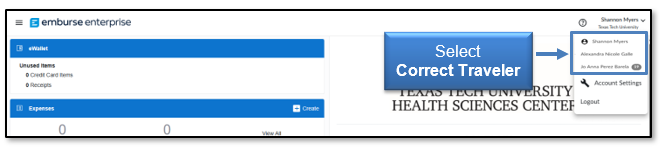
Confirm Traveler Dashboard
If you are an employee submitting your pre-approval report, signing into Emburse Enterprise via SSO will automatically place you on your dashboard for report submissions.
If you are a delegate for another employee and need to submit a pre-approval report on their behalf, click your account name in the top right corner. This will populate a drop-down menu that will list other employee accounts that have granted you delegate rights. Click the correct traveler to switch to their dashboard.
Create New Expense Report
Click the Create button in the top right corner of the Expenses bar.
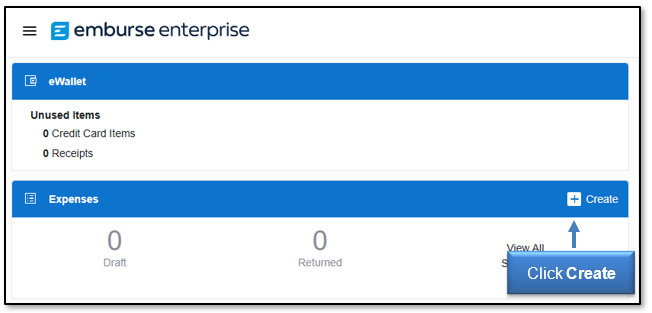
The Create button will populate a report header in the right-side panel.
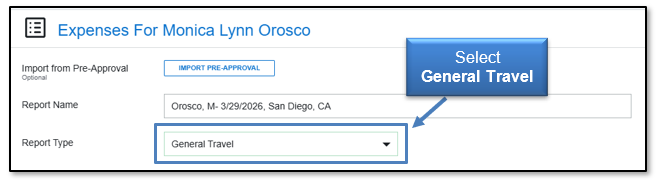
Verify Report Type on Expense Report Header = General Travel
PCard transaction reconciliations are also completed via Emburse Enterprise expense reports. Ensure the report type displayed is General Travel.
Verify Basic Trip Information on Expense Report Header
Expense Report Header information can be manually input in the report header. Verify the report type as Advance Request.
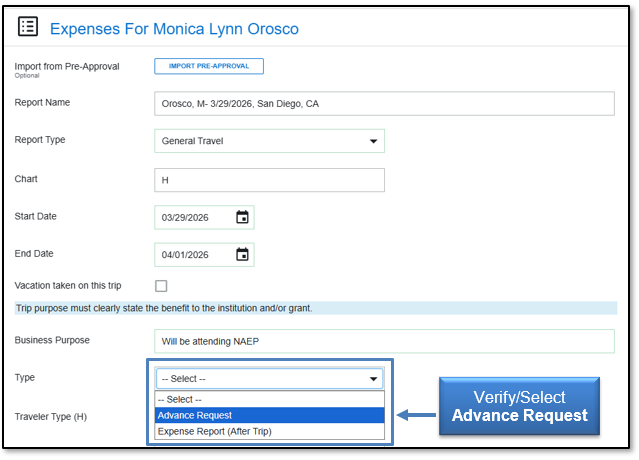
Scroll to the bottom of the report header, enter the Pre-Approval Report ID and remove the imported Pre-Approval by clicking the X to the left of the report name.
The imported PA can only remain on expense reports that are submitted after trip completion. The import PA option is being used for the convenience of auto-filling basic trip information.
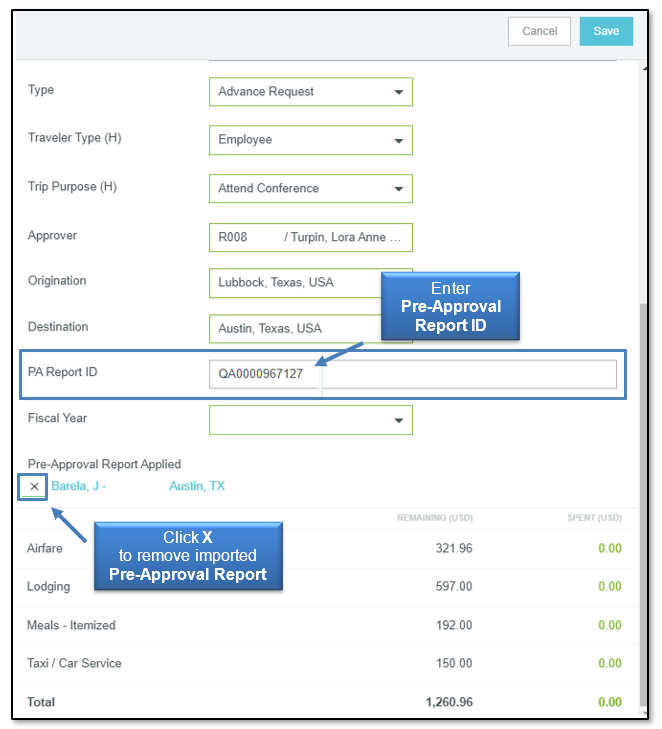
Once the Pre-Approval Report is removed, click the Save button at the top right corner of the expense report header.

Add Cash Expense Advance Line-Item Request to Report
After saving your expense report header, the system will display the empty expense report in the left-hand panel and the traveler's eWallet in the right-hand panel.
Click Create New in the eWallet panel to add a cash expense advance line-item request to the report.

Different expense tiles will become viewable.Select the Cash Advance Request tile
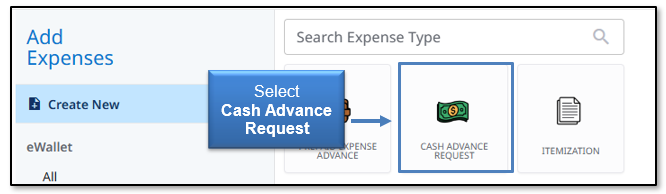
The Cash Advance Request form will be displayed in the left-hand panel after selection.
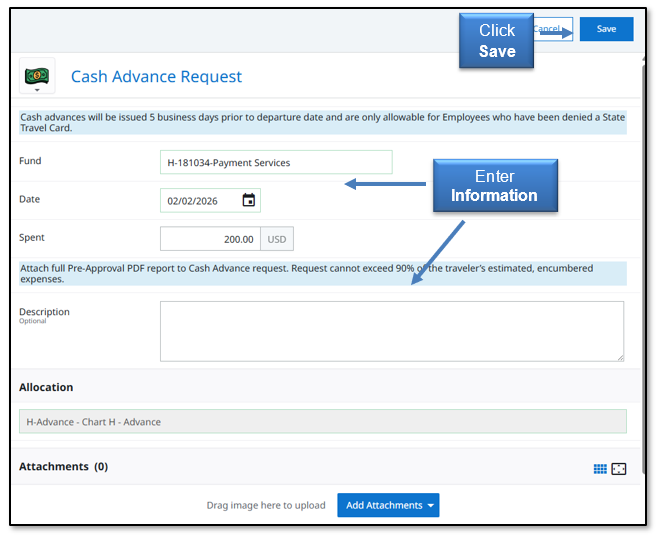
Provide the following information on the form:
- Fund: Search and select the main fund being utilized for the trip. The fund must match the Chart chosen on the expense report header.
- Date: Enter today's date.
- Spent: Enter the requested advance amount.
- Description: Optional field to provide any additional information you believe may be note-worthy or necessary for Travel Admin's review.
- Allocation: This is a locked field that will validate the expense as an advance. Do not attempt to alter. Advance expenses upload to a balance account in Banner, therefore a full FOP is not required.
- Attachments: The traveler's related Pre-Approval PDF report must be attached in order to ensure the requested advance amount is realistic to the actual expenses that will be incurred.
Up to 90% of the estimated expenses is allowed, but travelers should only request what is needed and should cover a small amount of their travel expenses personally to ensure funds are not owed back to the institution.
Advances will be denied if an employee owes reimbursement back to the institution due to an excessive advance received more than once.
After completing the Cash Advance expense form, click Save at the top right corner to add the line item to the report.
Note: A Travel Expense Report for Advances should not include both a Prepaid Expense and Cash Advance request. Cash Advance requests for qualified employees cannot be approved more than 5 days before the trip start date and including both advance types on the same report will substantially delay reimbursement of a Prepaid Expense Advance request. If a Prepaid Expense Advance is also needed, submit an additional Travel Advance Expense Report.
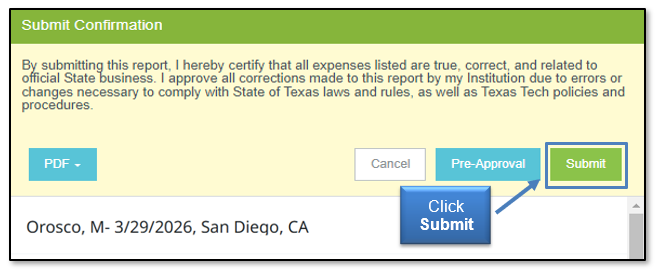
Click Submit at the bottom of the left panel to submit the cash advance request.
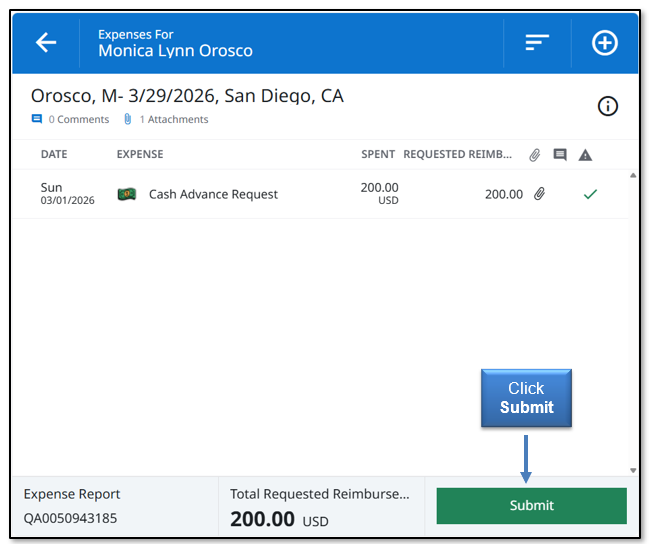
Submission confirmation and report summary will be displayed in the right-hand panel. Click Submit again to verify the report submission.
Travel Expense Report - Cash Advance Routing
Submitted Cash Advance Reports will electronically route as follows:
- Supervisor Approval - Individual chosen in Report Header
- Travel Office Approval
- Export to Banner for Invoice Creation - Reimbursement to traveler will process the following business day
Travel Expense Report - Tracking & Recall
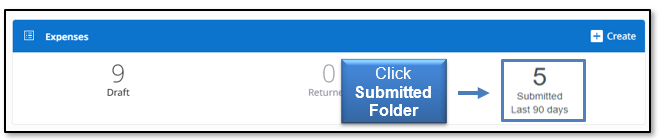
Submitted reports can be viewed in the Submitted folder of the Expense bar. Click the Submitted folder (3rd option) to view all Expense Reports that have been submitted in the current dashboard.
Select the appropriate report for review from the list of submitted expense reports.
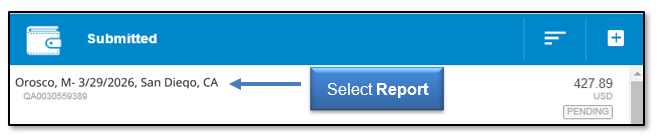
A summary of the report will open in the right-hand panel with the following options:
- Open - Open the report and review the expense report line items.
- PDF - Generate a PDF version of the expense report.
- Tracking - View the status of the expense report line items.
- Recall - Return any expense report to a Draft Status as long as none of the line items have been fully approved. All line items must be in a pending status in order to recall the expense report.

Note: The buttons will disappear if your browser window is too narrow to display them. If the buttons do not appear, click the ellipsis to display the options or widen the browser window.
Fully Approved Cash Advances
After a cash advance report has been fully approved and exported to Banner for reimbursement to the traveler, the Chrome River system will generate an Advance tile in the traveler's eWallet.
The Advance tile identifies the expense as already being paid by the institution and should be added to the final expense report after the trip has been completed.
For more information on Travel Expense Reports after trip completion and how to submit them, reference the Travel Training Center.
If you have questions, email travel@ttuhsc.edu.
Contact
Finance Systems Management
-
Address:
3601 4th Street STOP 6209 | Lubbock, Texas 79430-6209 -
Email:
fsm@ttuhsc.edu