
Contract AR/Billing
The Contract AR (Accounts Receivable)/Billing system is a component of the Contracting System. The systems noted below are interfaced, functionality, and reporting are integrated across the three systems.
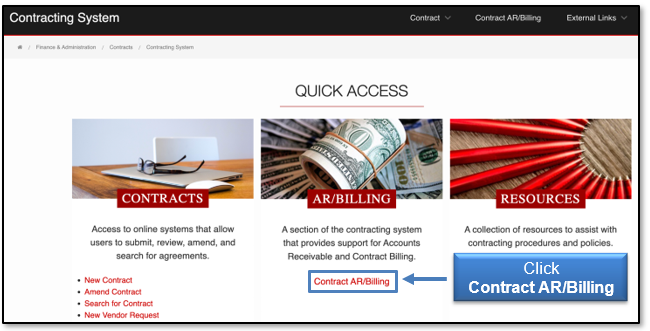
All revenue contracts must first be entered in the Contracting System. Once contracts have been entered, contract accounts receivable/revenue entry is required for all revenue contracts. The Contract AR/Billing system provides aging and reporting information to help you with contract revenue management.
The Contract AR/Billing system is available from:
- Contracting System
- WebRaider portal > Business Affairs tab > Links to Financial Systems > System Links > Contract AR/Billing
Process Outline
Enter Accounts Receivable and Record Revenue
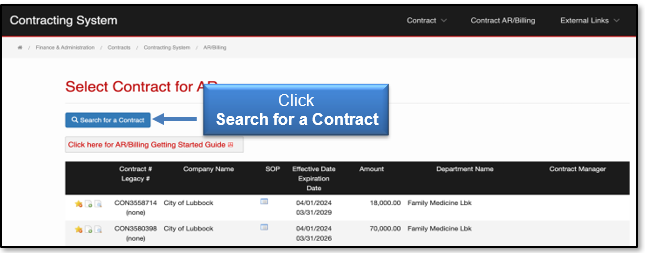
To search for a specific contract, click the Search for a Contract button.
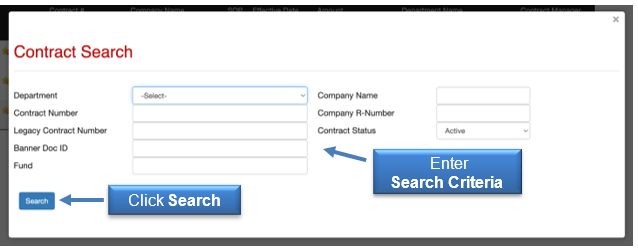
Searching can be done by Department, Contract Number, Legacy Contract Number, Company Name, Company R Number, and Contract Status. After selecting your search criteria, click Search and all contracts meeting the search criteria will populate.
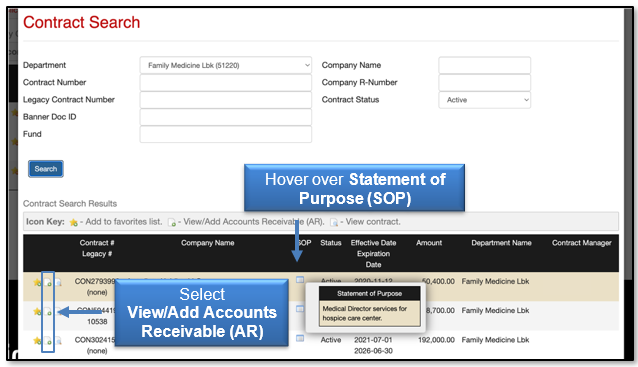
Three options will be available for each contract:
 Add to favorites list - allows you to add the contract to the favorites list within the system for easier access.
 View/Add Accounts Receivable (AR) - allows you to add Accounts Receivable to the contract and submit the contract.
 View Contract - allows you to view the contract only and download the information.
View the Statement of Purpose (SOP) by hovering over the icon  on each contract. The SOP is a brief description of the purpose or intent of the contract.
To record an accounts receivable for a contract, select the View/Add Accounts Receivable (AR) icon next to the contract.
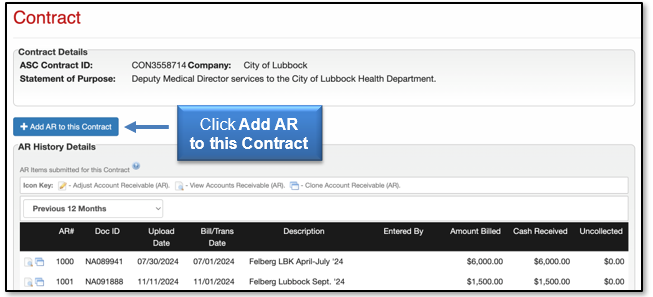
To create a new accounts receivable item, click Add AR to this Contract.
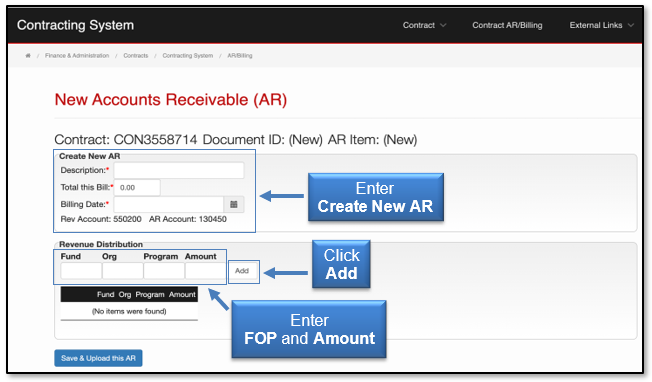
All required fields must be completed to create a new AR. Enter the Accounts Receivable Description, which is limited to 35 characters. Enter the accounts receivable amount in the Total this Bill field. Also, enter the Billing Date, which is the transaction date in Banner.
In the Revenue Distribution area, add the FOP (Fund, Organization, and Program) information. The Account code is not needed since it will default based on the type of contract that was entered in the Contracting System. More than one FOP can be entered. The sum of all FOP amounts entered should equal the amount that you entered in the Total this Bill field. After entering all fields, click Add.
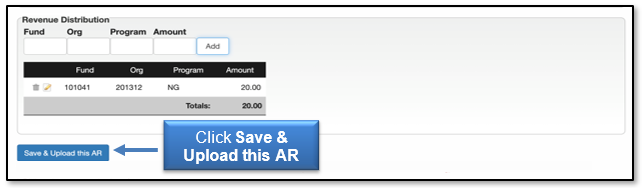
Verify the information entered is correct. Then perform these necessary actions, if needed:
 Click the paper and pencil icon to make any necessary changes.
 Click the trash can icon to remove the accounts receivable.
When you have determined the information is correct, click Save & Upload this AR.
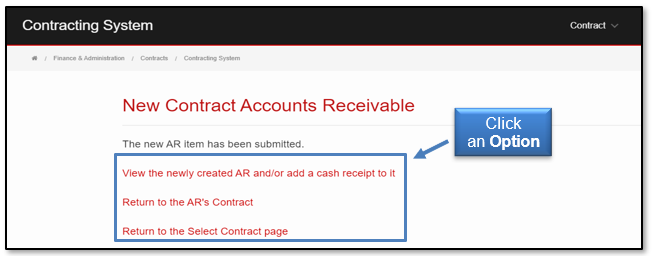
After the new AR has been submitted, the transaction will be uploaded to Banner. You will see the revenue reflected in your Cognos reports the next day. The Contract AR/Billing system entries will post with an NA document prefix and will reference the contract number in the document reference field.
This will direct to the New Contract Accounts Receivable page with three options:
- View the newly created AR and/or add a cash receipt to it - allows you to view the Accounts Receivable Detail
- Return to the AR's Contract - allows you to go to the Contract summary.
- Return to the Select Contract page - allows you to go to the Select Contract AR page
Contract Accounts Receivable Detail
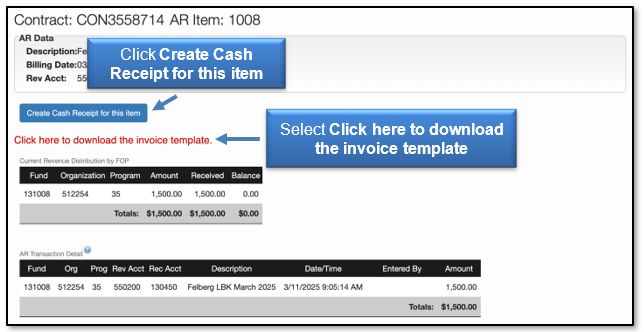
The Contract Accounts Receivable Detail page will show you a summary of the AR Data (the Amount recorded), the Current Revenue Distribution by FOP (the Balance of the Accounts Receivable for this contract), the AR Transaction Detail, and the Cash Receipts to Date. It is from this page that a Cash Receipt can be recorded for the selected AR or an invoice can be generated for the billing.
If a deposit needs to recorded for the AR, click the Create Cash Receipt for this item button to access the Cash Receipts site. See Cash Receipts Help for information about the Cash Receipts system. You can generate and print a physical invoice by selecting Click here to download the invoice template.
The Contracts Accounts Receivable Detail can be accessed from:
- Select the Contract for AR page by selecting the View/Add Accounts Receivable (AR) to this contract
 icon, then selecting the View this Accounts Receivable (AR)
  icon from the Contract page.
 - New Contract Accounts Receivable page by selecting View the newly created AR and/or add a cash receipt to it.
Increasing a Contract AR Amount
To increase a contract AR amount, you will need to enter a new AR for the adjusted amount only. When the cash receipt for this AR is prepared, the cash receipt will need to be applied to both AR #s.
Reversing or Reducing a Contract AR Amount
To reverse or reduce a contract AR amount, send an email to hscacc@ttuhsc.edu with the contract number, AR#, amount of the reduction, and reason for reversal or reduction.
Using the Contract AR Search Features
To view the Accounts Receivable for any contract, click Contract AR/Billing from the top navigation menu bar. Use the Search for a Contract feature to search for the contract. Click the View/Add Accounts Receivable (AR) icon beside the contract that you wish to view.
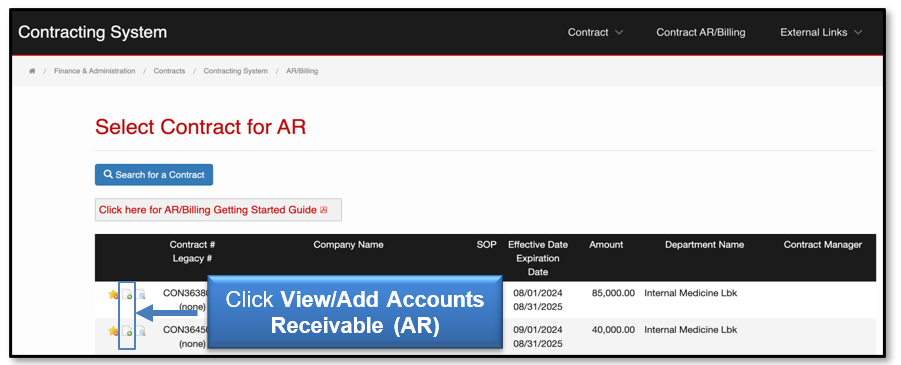
All of the Accounts Receivable Items for this contract will be displayed.
There are several ways to view receivable items in the AR History Details:
 View this Accounts Receivable (AR) - allows you to see the details of the receivable item.
 Clone this Accounts Receivable (Add an AR to this Contract) - gives you the option to clone the AR item and add to that contract.
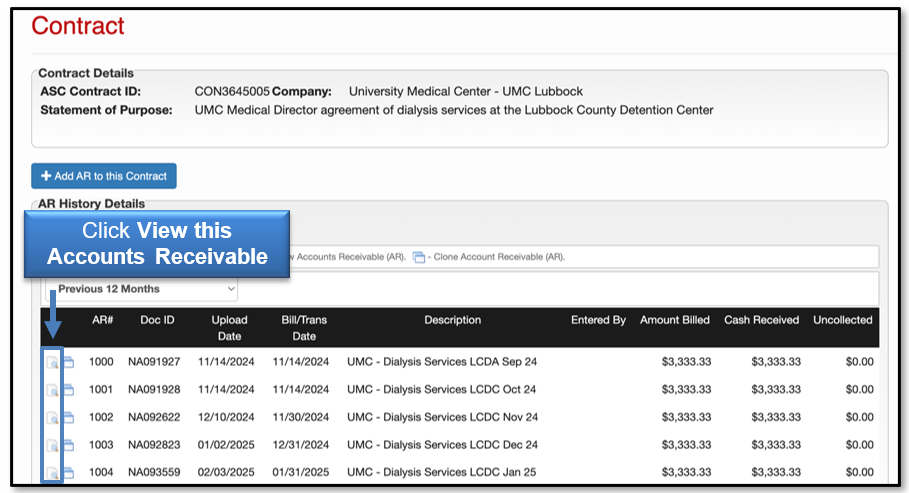
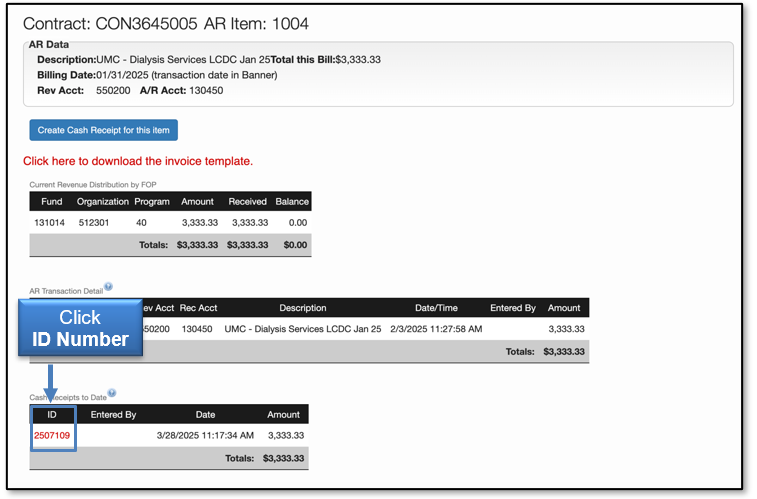
Selecting the View this Accounts Receivable icon will direct you to the Contract Accounts Receivable Detail page. This page shows a summary of the AR Data, the Revenue Distribution by FOP, the AR Transaction Detail and the Cash Receipts to Date (since the Contract AR/Billing system interfaces with the Cash Receipts system, any receipts recorded for this contract will also be displayed in the Cash Received column).
To see the details of a Cash Receipt, click the red ID number in the ID column.
For questions regarding the Contract AR/Billing system, please contact Accounting Services at hscacc@ttuhsc.edu.
Contact
Finance Systems Management
-
Address:
3601 4th Street STOP 6209 | Lubbock, Texas 79430-6209 -
Email:
fsm@ttuhsc.edu