
TechBuy - Saving and Managing Searches
Creating a Saved Search
You can save your search criteria from a search results page including any keywords, date ranges, and post-search filters. Perform a Simple or Advanced Search using the desired search criteria. Saved Searches are created from a search results page by saving the search criteria you executed to get to that results page. For example, if you execute a search for all Requisitions for the last 30 days and save this search, the criteria saved in the search will be the same. The last 30 days would be from the date of report execution and not from the date that the report was saved.
To save a search, click the Save As button.
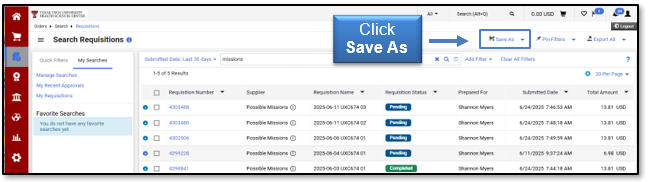
This will begin a two-step process to save your search.
Step 1: Save Search Details
- Enter a Nickname for the search in the Document Search Nickname field.
- To add a description, click the Add Description button. The description is not required to save the search.
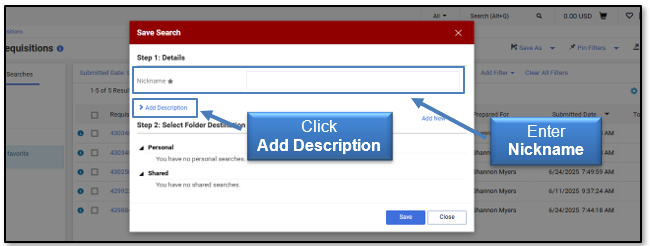
Step 2: Select Destination Folder
- Choose from any of the Personal Folders you have already created from the left side.
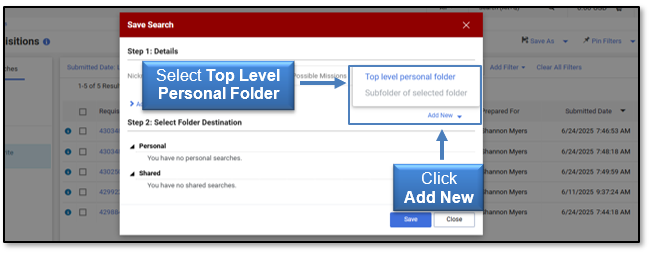
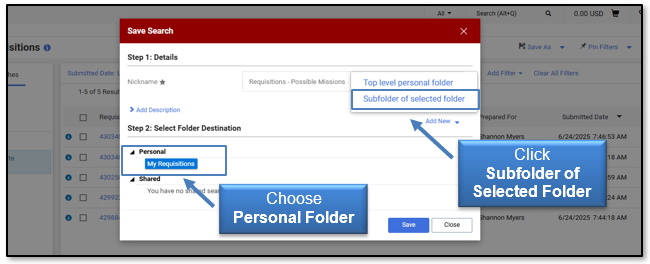
- Create a new folder by clicking the Add New drop-down menu.
- Top level personal folder - these folders are only available to you.
- Subfolder of selected folder - create a subfolder from a folder by selecting that folder, then click the option from the Add New drop-down menu to begin the process. When subfolders are created for a folder, a drop-down arrow will appear next to the main folder to provide access to the subfolders.
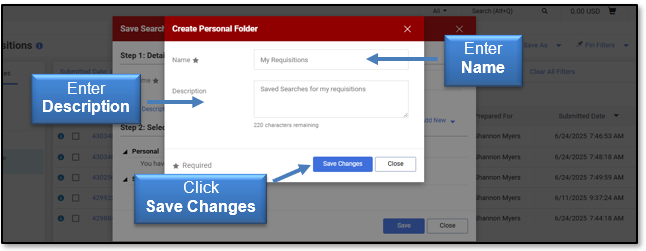
Create New Personal Folder
- Enter a Folder Name (required field) for the new top level personal folder in the Name field.
- Enter any details about the folder in the Description field, if needed.
- Click Save Changes.
Create New Subfolder of Selected Folder
- Choose from any of the Personal Folders you have already created. Then, click Subfolder of selected folder.
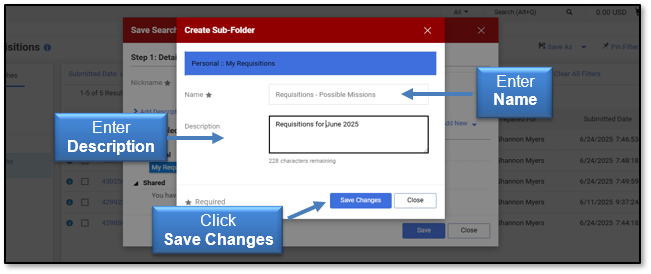
- Select a Folder Name (required field) for the Personal Subfolder in the Name field.
- Enter any details about the subfolder in the Description field, if needed.
- Click Save Changes.
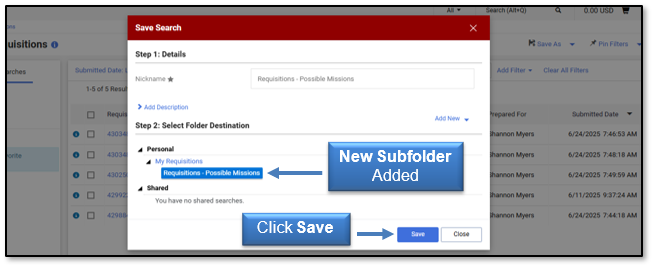
A new folder or subfolder will be added in the area you selected under Personal Folders. To complete the process and create a Favorites Shortcut, click Save.
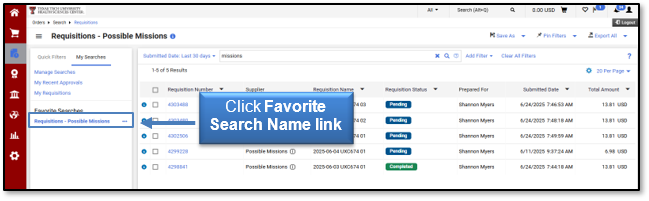
The Saved Search will appear in the My Searches tab under Favorite Searches for the specific type of document. Click the Favorite Search Name link to open the search.
Manage Searches
You can view, run and manage your Saved Searches from the Manage Searches section. Folders can be created when saving a search or in the Manage Searches section. Storing your Saved Searches in folders makes them easier to locate and manage. In the Manage Searches section, searches can be edited, deleted, moved, and copied to another folder; search names and descriptions can be edited; and Saved Searches may be added as shortcuts to your home page.
There are several ways to access the Manage Searches section ways including through the Manage Searches link listed on your User Profile; the Manage Searches link in the My Searches tab on the left side of a search result page; or Manage Searches listed on the Save As button.
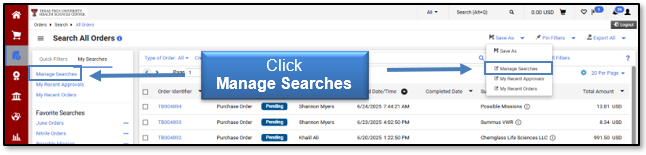
You will have a filtered view of your Saved Searches through two types of folders:
- Personal - Folders that contain document searches you have saved.
- Shared - Folders that contain documents searches being shared with you.
Select a folder to open and view searches.
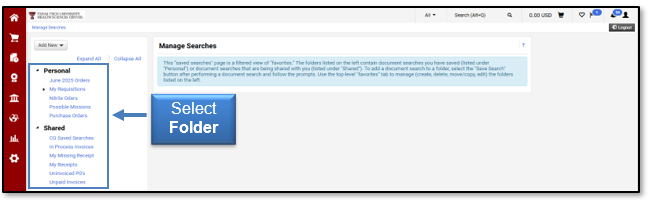
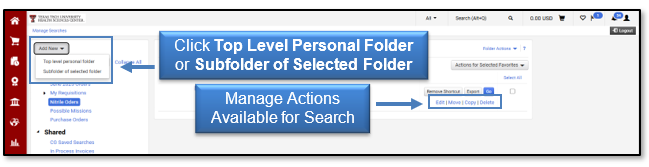
After you open a folder, you may choose a specific Saved Search and manage the search by either moving the search to another folder, copying it to another folder, editing the search or deleting the search.
You may also create new folders from this page. Click the Add New drop-down menu and then choose either Top Level Personal Folder or Subfolder of Selected Folder and follow the brief instructions.
Edit a Saved Search
You will be able to change your saved search criteria then re-save the search or save it as a new search. From the Manage Searches page, select the search that you want to edit, and click the Saved Search Name link to view the results.
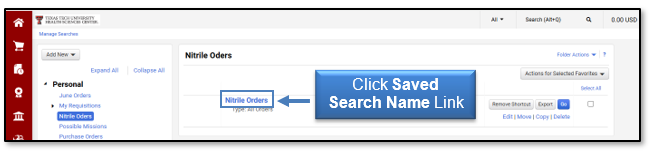
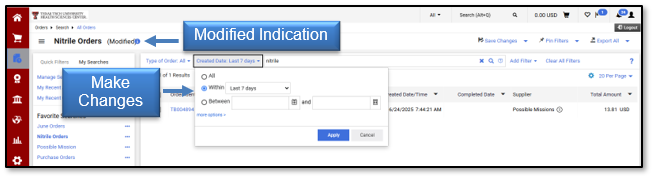
When viewing the search results, the saved search name appears at the top. Select additional criteria to further filter results.
A (Modified) indication displays next to the saved search name once changes have been made to the search.
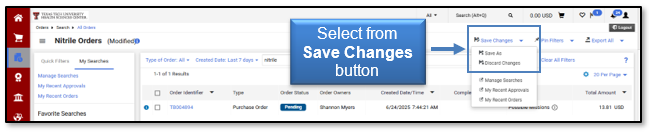
When you select the Save Changes drop-down button, you are presented with three options for your search:
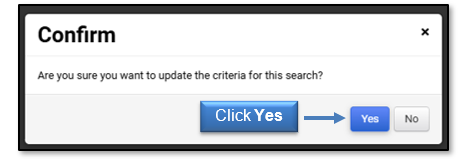
- Save Changes - This option will save the existing saved search with the updated criteria. You will be asked to confirm your selection by selecting Yes to save the search with the updated criteria.
- Save As - This option will save the criteria as a new search. Follow the directions for Create a New Saved Search. The original saved search you selected will be unchanged.
- Discard Changes - This option will remove the additional options applied since the last save.
Confirm the updated changes to the search by clicking Yes.
The system will briefly display a message that the changes were successfully updated.
Edit a Saved Search Name and Description
On the Manage Searches page, locate the Saved Search name and/or description that you want to edit and click Edit.
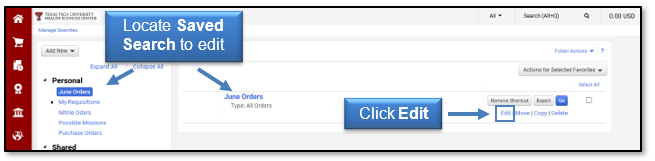
Enter a new Nickname for the search in the Nickname field and provide a new Description, if needed. Click Save Changes.
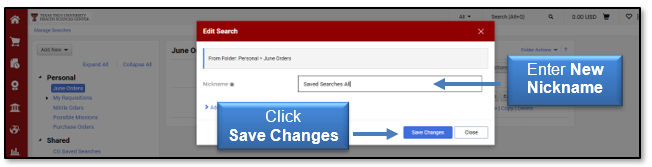
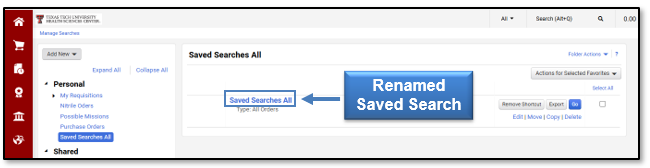
The system will briefly display a message that the changes were successfully updated. The renamed saved search will appear in the selected saved folder.
Move or Copy a Saved Search to Another Folder
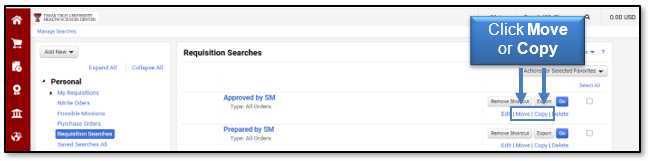
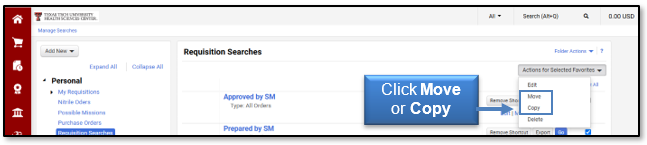
On the Manage Searches page, select the destination folder by clicking the Move or Copy button.
- Move - The Move button will move the search to a new destination folder. The search will no longer be available in the original folder.
- Copy - The Copy button will copy the search to the selected folder. The search will be available in both the original and selected folders.
To move or copy Saved Searches to another folder select the checkboxes to the right of the appropriate searches. Click Select All to move or copy all the Saved Searches listed.
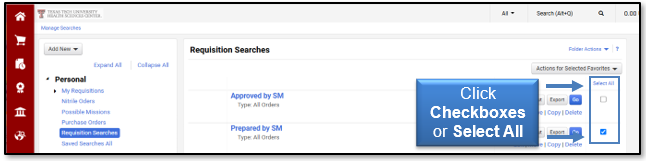
From the Actions for Selected Favorites drop-down menu, select Move or Copy. Then, Move or Copy the selected searches to the desired folder.
Delete a Saved Search
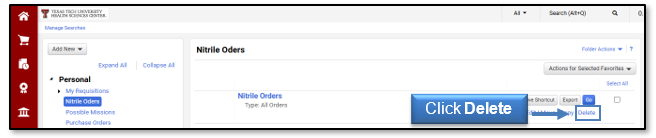
In the Manage Searches section, locate the Saved Search you want to delete and click the Delete link.
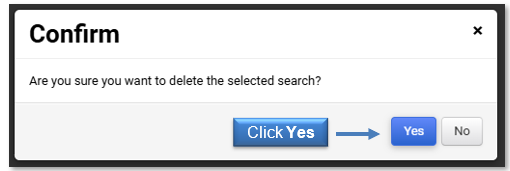
Click Yes to delete the search.
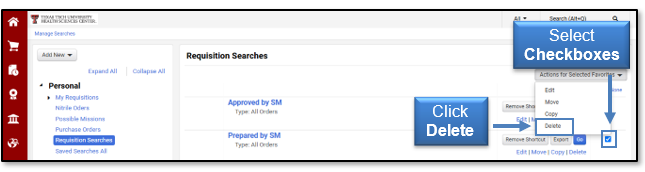
To delete multiple Saved Searches, select the checkboxes to the right of the appropriate searches or click Select All, then select Delete from the Actions for Selected Favorites drop-down menu. All selected searches will be deleted.
Run a Saved Search
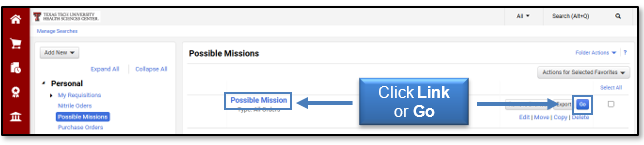
In the Manage Searches section, locate a folder to view your Saved Searches and select the link. Click a Saved Search Name link or the Go button to run your search.
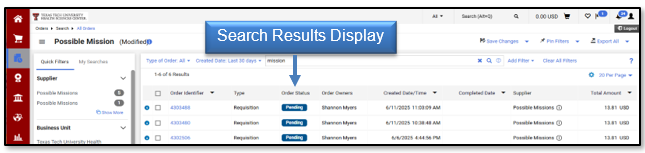
The search results will display.
Create Shortcuts to Add to Favorites
You will have the option to add shortcuts for Saved Searches so they will show as Favorites on a search results page.
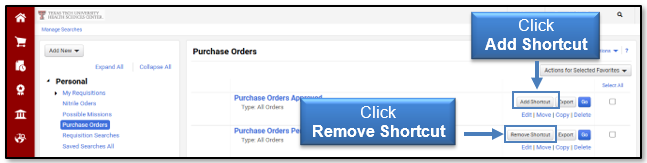
From the Manage Searches section, locate a Saved Search from your Personal Folders that you would like to create a shortcut and click the Add Shortcut button. If you need to delete a shortcut, select the Remove Shortcut button.
When adding a new shortcut, it will appear as a Favorite Search to run from the My Searches tab for that type of document. Select a Favorite Search Name link from Favorites Searches to view, manage, or export the search.
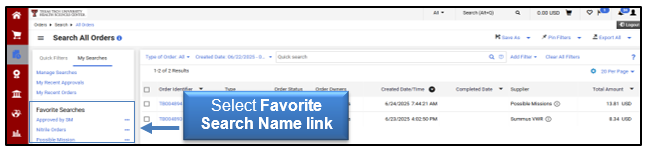
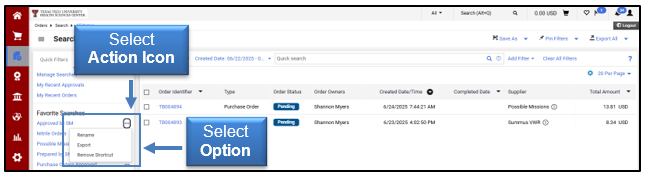
From the Action icon menu next to the Favorite Search Name link, choose from the options to Rename, Export, or Remove the Shortcut the search.
Actions for Purchase Order Search Results
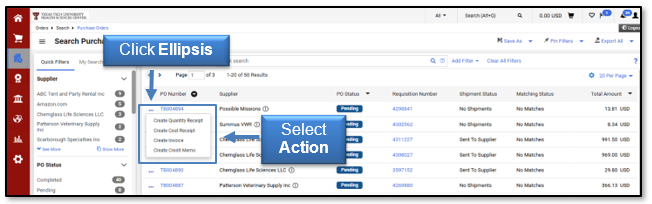
You may choose appropriate actions for purchase order search results using the action ellipses at the beginning of each search result or at the header row for multiple results. The actions for each document and process for completing these actions are unchanged from the previous search capabilities. More options may appear depending on your role in TechBuy.
To perform an action with a single row, click the ellipsis at the beginning of the row. The appropriate actions for the document will display as hover text. Select an action.
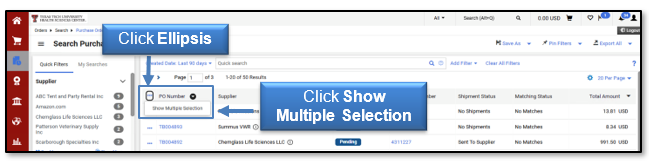
To perform an action with multiple rows, click the ellipsis at the beginning of the header row and then click Show Multiple Selection.
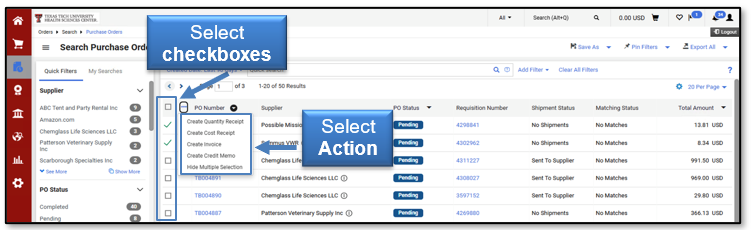
You may select the appropriate boxes to apply actions. If the header row checkbox is selected, all results on the page are selected.
Once selections are made, click the ellipsis in the header row again. The appropriate actions for the document will display as hover text. Select an action.
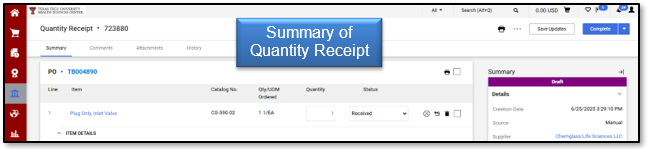
Once you have selected an appropriate action for either a single row or multiple rows, you will either view a new screen with the new option created (i.e., summary of Quantity Receipt is displayed) or follow the instructions for the requested action.
If you have additional questions, please contact Procurement Services at purchasing@ttuhsc.edu.
Contact
Finance Systems Management
-
Address:
3601 4th Street STOP 6209 | Lubbock, Texas 79430-6209 -
Email:
fsm@ttuhsc.edu