
TechBuy - Receiving
The receiving receipt feature allows you to enter receiving in TechBuy. All receiving information for TechBuy purchase orders must be submitted through the TechBuy receiving process. All orders must be received, no matter the vendor or type of order, except Direct Pay Orders. For additional information on required receiving, please review HSC OP 72.09.
As a general rule, the correct method of Receiving in TechBuy can be determined by the lines on the Purchase Order. If a Purchase Order is set up as each (EA), month (MON), or itemized at a fixed amount, a Quantity Receipt should be completed. If a Purchase Order is set up as a lot (LOT), job (JA), or Standing Order and the number of items or cost is not defined, or if the Purchase Order is a Standing Order that will be invoiced as items or services are provided, a Cost Receipt should be completed.
To create a receiving receipt, first, locate the purchase order.
There are several ways to search for the Purchase Order (PO) using Document Search from the Orders menu navigation located on the TechBuy shopping home page:
- View your purchase orders from My Orders listed under My Purchase Orders.
- Search by requisition number from My Orders, then My Requisitions.
- Search for the purchase order or requisition number from the Search icon.
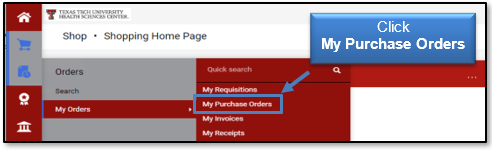
For this example, click My Orders and My Purchase Orders.
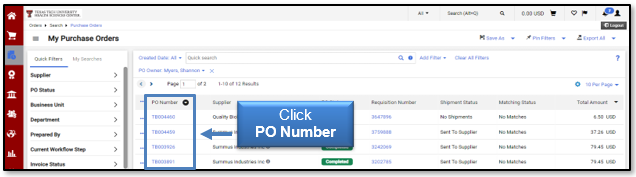
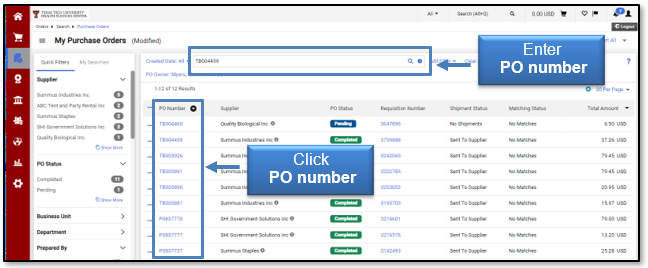
The My Purchase Orders page displays. Once you have located the appropriate Purchase Order, click the PO Number link in the PO Number column to display the PO.
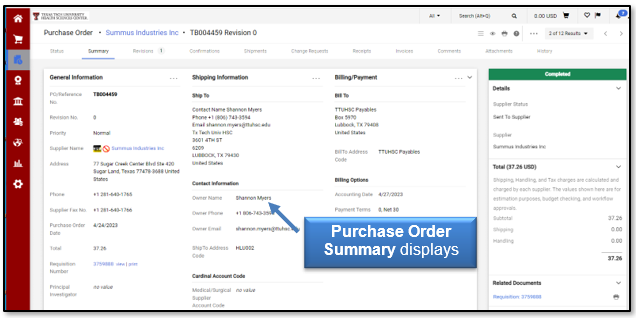
The PO Summary page will display.
Creating a Quantity Receipt
To document the receipt of specific items or goods from the PO Summary page, select the Create Receipt option from the ellipsis drop-down list at the top right in the header options.
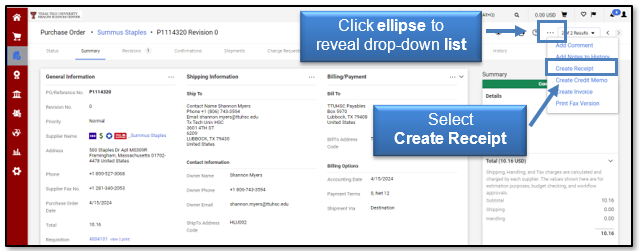
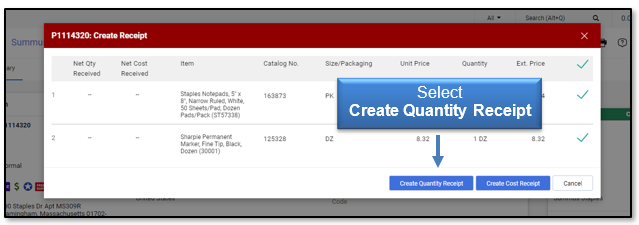
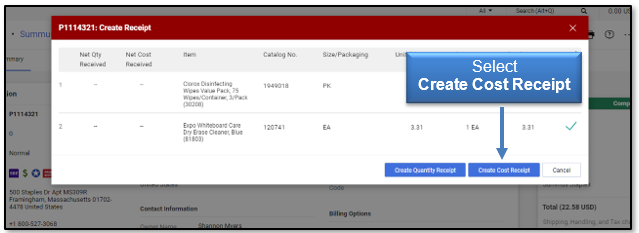
Select Create Quantity Receipt.
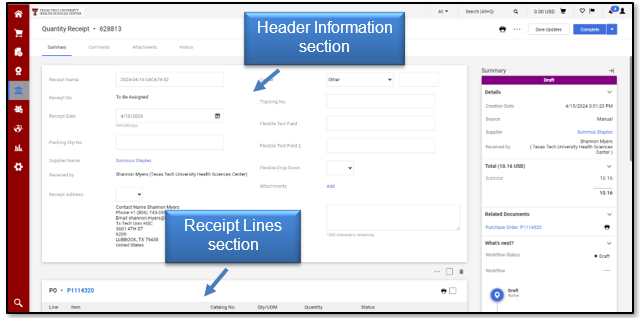
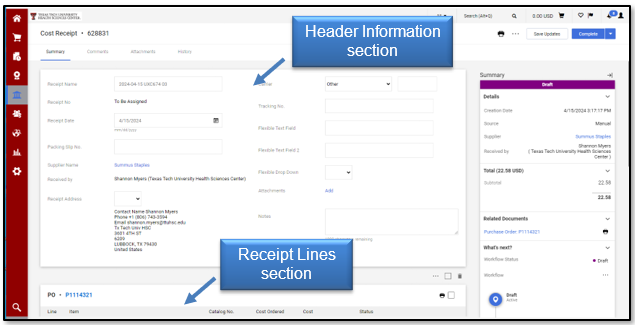
A draft receipt is created utilizing the information from the purchase order. It includes a Header Information section that contains basic receiving information and a Receipt Lines section to enter the actual quantities received.
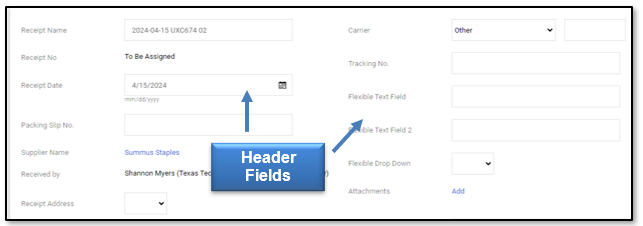
The following fields are available in the Header Information section:
- Receipt Name - The receipt name is automatically generated.
- Receipt No. - Once the receipt is completed, the system will assign a numerical document ID. This receipt number can be located from the purchase order to track the total received by PO.
- Receipt Date - As a general rule, the Receipt Date must be entered as the actual date you physically received the items or goods or the last date of the service provided.
- Packing Slip No. - Enter the packing slip number if it is available.
- Supplier Name - The vendor will automatically default from the purchase order.
- Received By - This field will automatically default based on your eRaider credentials.
- Receipt Address - The Ship To Address entered on the purchase order will automatically default. You can only change the receipt address if you have additional Ship To Addresses entered into your user profile.
- Carrier - Select the appropriate carrier from the drop-down list.
- Tracking No. - Enter a tracking number if it is available.
- Flexible Field 2 - This field can be used for additional information. We recommend entering the vendor's invoice number if it is available.
- Attachments - This field allows you to add documentation to your receiving receipt, such as a scanned copy of the packing slip and/or the vendor's invoice. Note: you must still attach and submit all invoices in the Invoice Management System (IMS).
- Notes - This is an additional field to enter information that will help Accounts Payable or your department. We suggest entering information such as the invoice number.
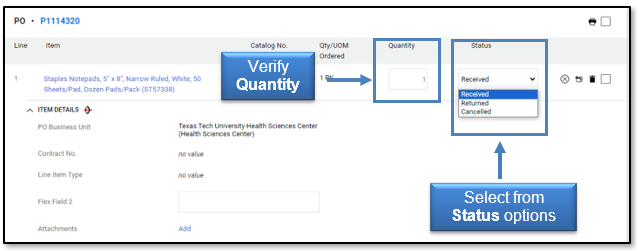
The Receipt Lines section is where you enter the receipt details. The Quantity field is required. Enter a valid quantity amount received for goods or services.
If you have goods or services on the order that have not been physically received, you must remove the items from the receipt. Select the items that should not be included in the receipt by checking the box to the right of the item(s). Once all items that need to be removed have been chosen, select the Trash Can icon.
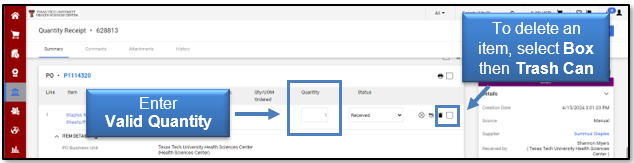
The marked items will no longer appear on the receiving receipt. This should leave only items you wish to mark as Received, Returned, or Cancelled in the status column. To receive the remaining items on the receipt, verify the quantity is correct for each line item.
The Comments tab will allow you to add comments to the receipt. From the receipt, you can see all the comments related to the receipt and its associated requisition, purchase order, and invoice.
Before completing the receipt, verify you have entered all information correctly. Once the receipt is accurate, return to the summary tab of the receipt and click Complete.
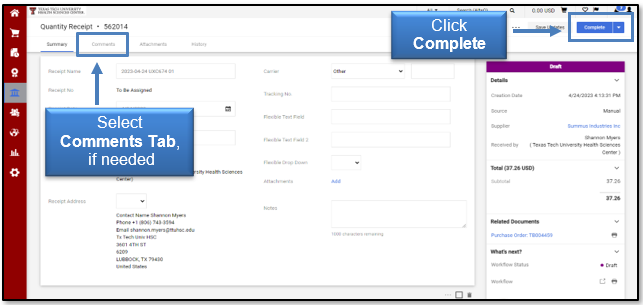
Note: Do not complete a receipt with a “0” (zero) quantity for any line. The quantity must be changed or the line removed to complete the receipt. If receiving is entered with a zero line, the system determines that the item has been received and will process the invoice for payment.
The system will assign a receipt number to the completed receipt document. Click the Receipt Number link to view or print the receipt.
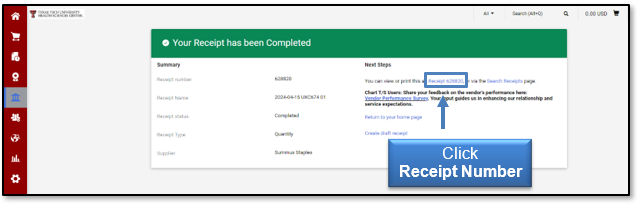
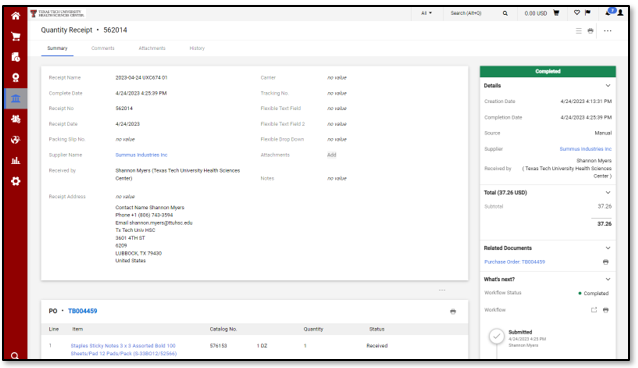
The receipt displays.
Creating a Cost Receipt
To document the receipt of services from the PO Summary page, select the Create Receipt option from the ellipsis drop-down list at the top right in the header options.
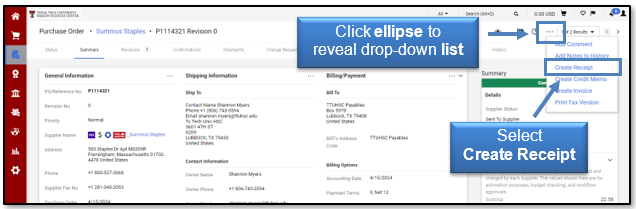
Select Create Cost Receipt.
A draft receipt is created utilizing the information from the purchase order. It includes a Header Information section that contains basic receiving information and a Receipt Lines section to enter the amount of services received.
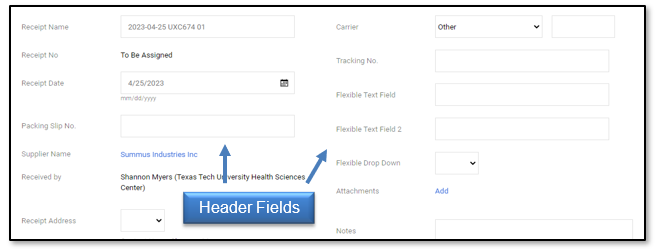
The following fields are available in the Header Information section:
- Receipt Name - The receipt name is automatically generated.
- Receipt No. - Once the receipt is completed, the system will assign a numerical document ID. This receipt number can be located from the purchase order to track the total received by PO.
- Receipt Date - The Receipt Date must be entered as the actual date the services were completed. If services are for a week or a month, enter the last day of the week or month. If services are for a year, enter the first day of the service year.
- Packing Slip No. - Enter the packing slip number if it is available.
- Supplier Name - The vendor will automatically default from the purchase order.
- Received By - This field will automatically default based on your eRaider credentials.
- Receipt Address - The Ship To Address entered on the purchase order will automatically default. You can only change the receipt address if you have additional Ship To Addresses entered into your user profile.
- Carrier - Select the appropriate carrier from the drop-down list.
- Tracking No. - Enter a tracking number if it is available.
- Flexible Field 2 - This field can be used for additional information. We recommend entering the vendor's invoice number if it is available.
- Attachments - This field allows you to add documentation to your receiving receipt, such as a scanned copy of the packing slip and/or the vendor's invoice. Note: you must still attach and submit all invoices in the Invoice Management System (IMS).
- Notes - This is an additional field to enter information that will help Accounts Payable or your department. We suggest entering information such as the invoice number.
The Receipt Lines section is where you enter the receipt details. The Cost field requires a valid cost to be entered or verified for each line item.
If you have services on the order that have not been completed, you will need to remove the items from the receipt. Select the items that should not be included in the receipt by checking the box to the right of the item(s) and then select the Trash Can icon.
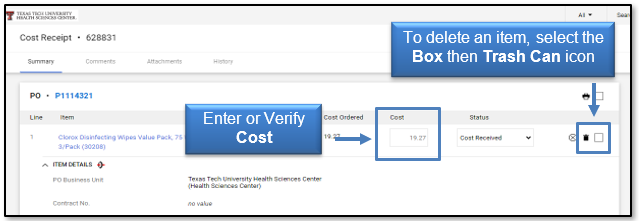
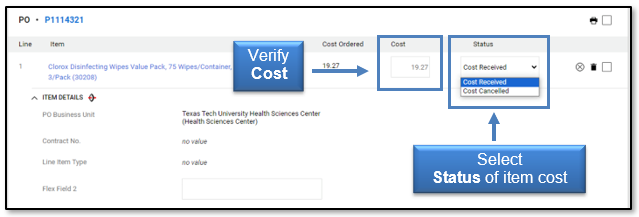
The marked items will no longer appear on the receiving receipt. This should leave only the items you wish to mark as cost received or cost canceled in the status column. To receive the remaining items on the Receipt, verify the cost is correct for each line item.
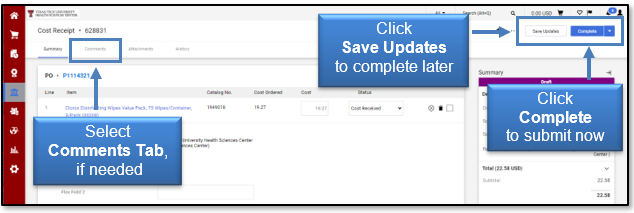
The Comments tab will allow you to add any comments to the receipt. From the receipt, you can see all the comments related to the receipt and its associated requisition, purchase order, and invoice.
Before completing the receipt, verify you have entered all information correctly. You may Save Updates and complete the receiving later, or verify the receipt is accurate and click Complete.
The system will assign a receipt number to the completed receipt document. Click the Receipt Number to view or print the receipt.
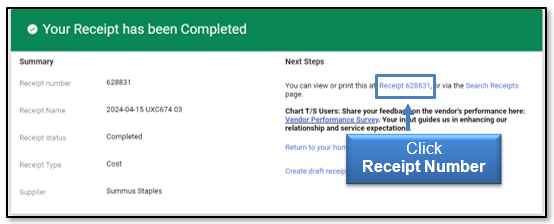
The receipt displays.
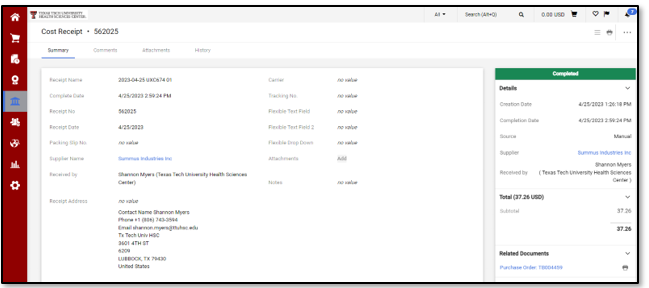
Now that a Receiving Receipt has been created for the PO, review the submitted Receipt by using the document search feature under My Orders.
Select Orders, My Orders, and My Purchase Orders from the Navigation menu. Select the PO number link from the Document Number column, if visible, or enter the PO number in the search textbox.
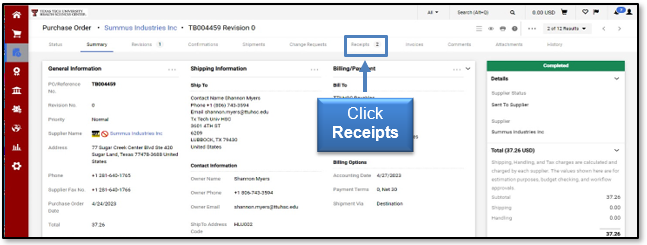
The Purchase Order Summary page will display. Click the Receipts tab to view details about the receipts created for this PO.
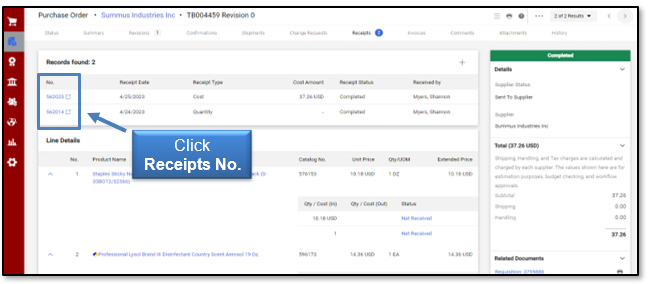
The Receipts page displays. The Receipts page contains two sections. The top section will list all receiving receipts submitted against this PO. You can click a Receipt No. to view the receipt details. The bottom section of the page will provide a summary of the receiving for each item. It will show the quantities or cost received and will also provide the Open amounts, which have not yet been received.
Cancel a Receipt
Sometimes mistakes are made when creating a receipt. You might key in the wrong quantity or the wrong dollar amount, or you might create a receipt against the wrong PO. If you need to cancel a receipt, please contact Accounts Payable at Accounts.Payable@ttuhsc.edu. You will have to provide justification or the reason you are requesting the receipt to be cancelled.
Once a receipt is cancelled, you will need to create a new receipt if one is needed.
When attaching invoices or other documents, use the invoice number as the file name. Remember to select Accounts.Payable@ttuhsc.edu as an email recipient of any comment.
For additional information about TechBuy Receiving, contact Accounts Payable at Accounts.Payable@ttuhsc.edu.
Contact
Finance Systems Management
-
Address:
3601 4th Street STOP 6209 | Lubbock, Texas 79430-6209 -
Email:
fsm@ttuhsc.edu