
TechBuy - Creating Comments, Notes and Attachments
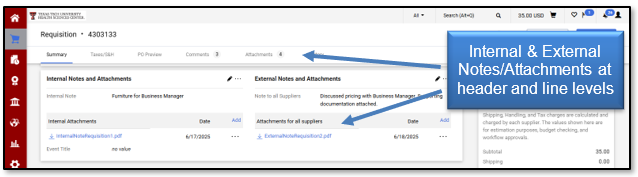
TechBuy provides comments, internal and external notes, and attachments for additional information and communication. The comments, internal notes, and attachments are only available within TechBuy and are not sent to the supplier. External notes and attachments allow you to send information to the vendor. This document will review internal and external notes and attachments at the header and line levels.
Comments
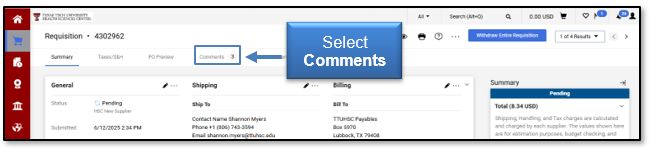
You can add comments to a cart or requisition at any point during the Review or Approval process. The comments will stay in the order history and can be accessed at any time. To add a comment to a cart, select Comments.
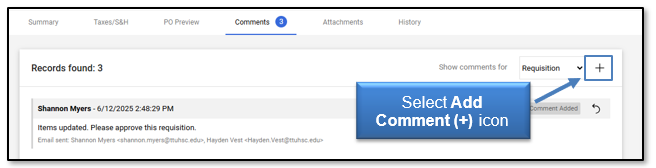
Any previous comments will populate. Select the Add Comment (+) icon.
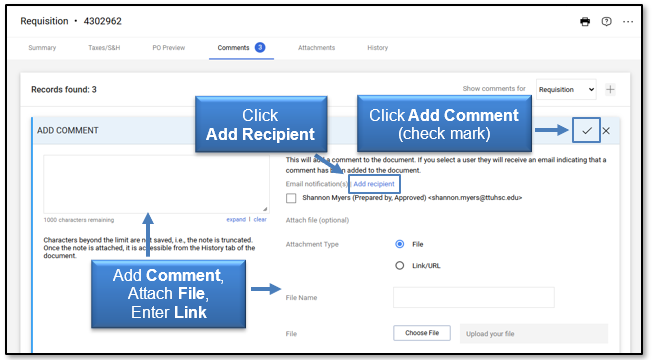
The Add Comment box will appear. Add a comment to the cart in the comment box, attach a file, or enter a link. Select Add Recipient to search for a user to receive an email notification indicating a comment has been added to the document. Once you have entered the information, click Add Comment (checkmark).
The number of comments in the Comments heading will increase every time a new comment is added.
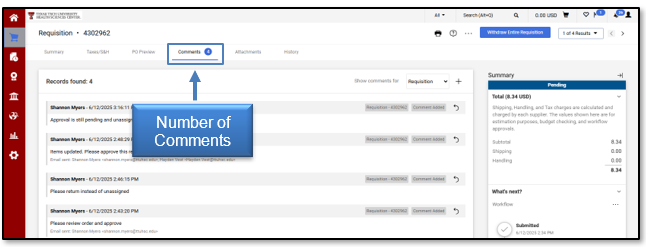
Reviewing the comments on an order is a common way to track the status. You can select to view all comments, or you can select to view the comments for a requisition, purchase order, invoice, or receipt. The comments will default to the document that you are currently reviewing.
From a requisition, you can see the comments for the purchase order, invoice, and receipts that pertain to that requisition. From an invoice, you can see all the comments for the requisition, purchase order, and receipts that correspond to that invoice. From the receipt, you can see all comments for that receipt and its associated requisition, purchase order, and invoice.
To view the comments from a requisition, select Comments.

The Comments page will appear.
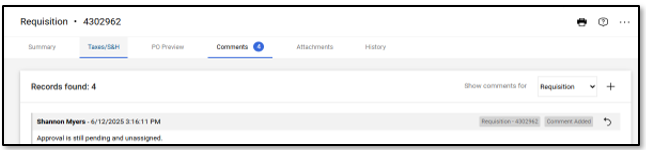
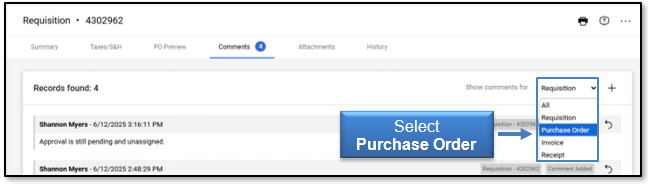
To view the comments for a different document, use the Show comments for drop-down menu and select a type of document. By selecting Purchase Order as the document type, you can view the comments of the purchase order that pertains to that requisition.
Internal Header Level Notes
Internal notes allow users to add detailed notes or information to the cart and are available to all roles as the requisition goes through the workflow process. These notes are not sent to the supplier.
Internal notes entered at the header level are intended to apply to all items in the cart. To add an internal note to the header, select Edit at the top right-hand corner of the Internal Notes and Attachments header section.
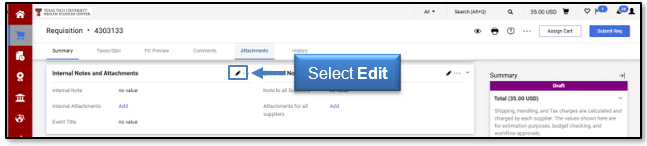
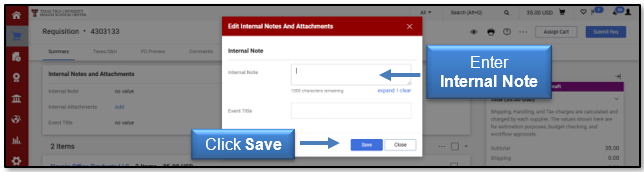
An additional window titled Edit Internal Notes and Attachments will open. Enter the information in the text box. If you need additional space, select Expand. When you have completed the note, click Save.
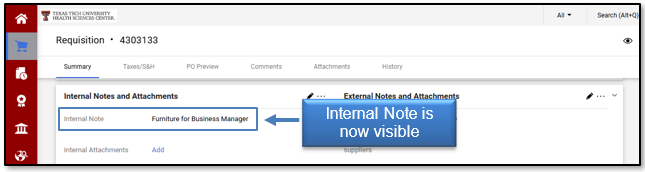
Once you save the note, the additional window will close. You will notice that the Internal Notes and Attachments header information will now be updated with the note.
Internal Line Item Level Notes
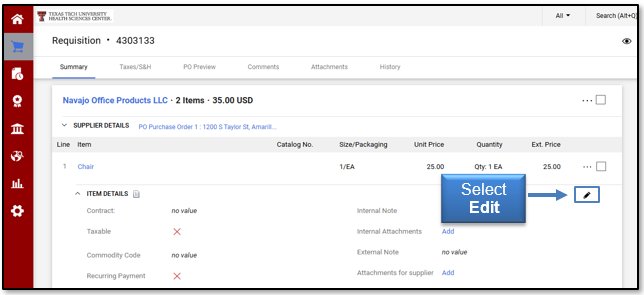
Internal line-item notes are similar to internal header notes except that they contain information specifically relating to a particular item in the cart. To enter a line-item note, select Edit to the right of the item in the cart.
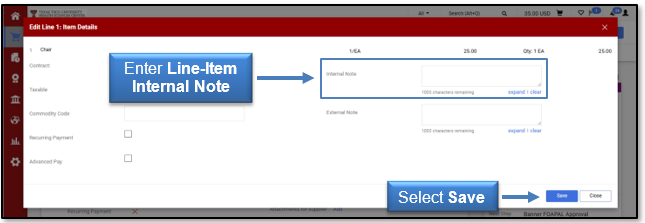
This will open an additional window titled Edit Line. Enter the information in the Internal Note text box. When you have completed the note, select Save.
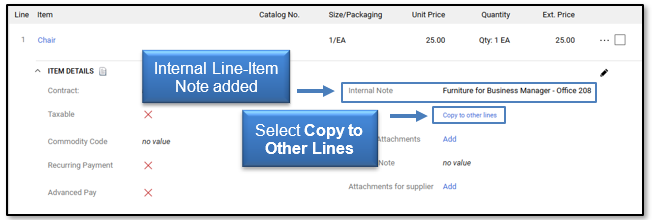
The Edit Line-Item Note will now be populated in the cart. The Copy to Other Lines feature allows you to add the same internal note to other items in the cart. Select Copy to Other Lines if you would like to include the line-item internal note to other commodities.
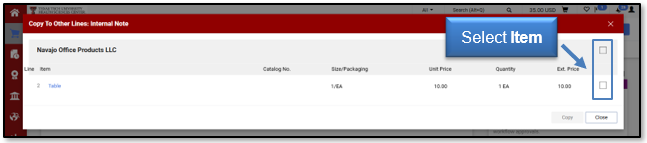
The Copy To Other Lines: Internal Note window will open and provide a list of the remaining commodities on the order. Select each item that should include the note.
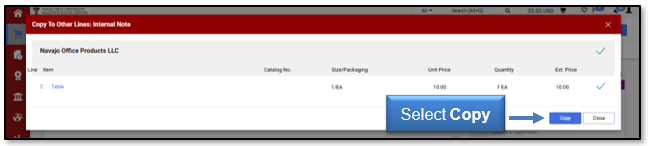
Once an item is selected, a green check mark will appear in the box. Select Copy.
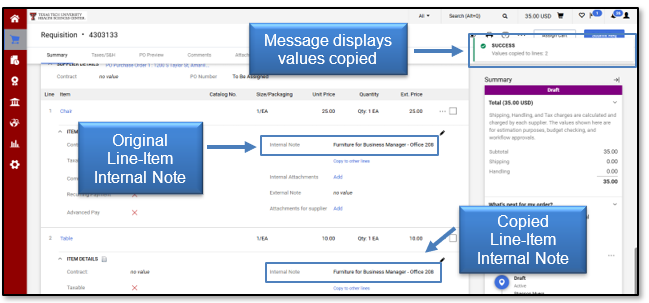
The system will display a message to indicate whether the line(s) copied successfully. The line-item note will now be included for each selected item.
Internal Header Attachments
When you add an internal attachment, it is not sent to the supplier. Internal attachments added at the header level apply to all items in the requisition.
To add a header-level attachment, select Add located in the Internal Notes and Attachments section.
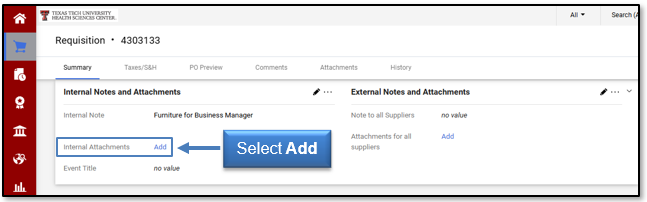
This will open an additional window titled Add Attachments. Insert the file to attach by dropping the file or browsing your computer.
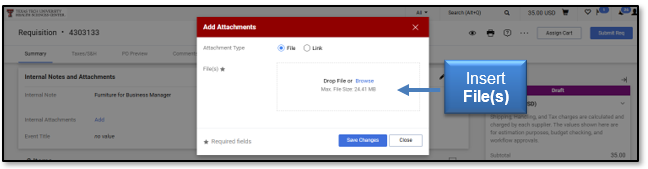
The document name will populate below the File field. Click Save Changes.
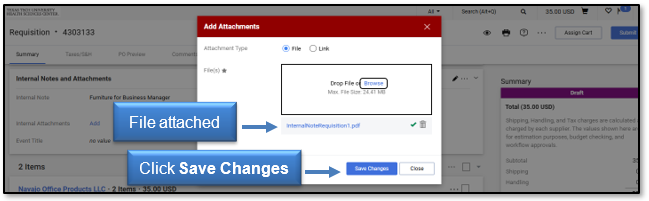
The file will now be listed under Internal Attachments at the header level. If you need to remove the attachment, select Remove from the Actions icon drop-down list to the right of the attachment. You can also attach additional documents by following the same steps.
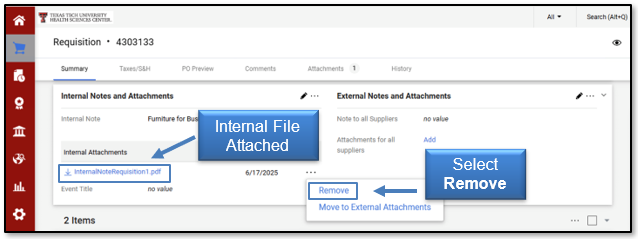
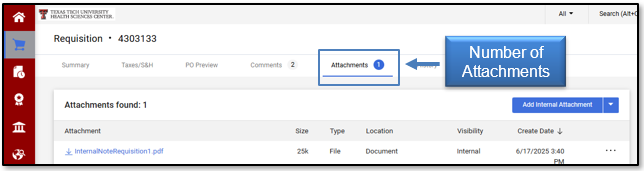
The number of attachments that are added/removed will be reflected in the count located in the Attachments heading.
Internal Line Level Attachments
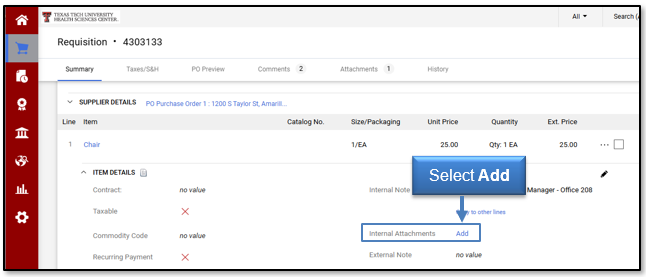
Internal attachments added at the line item level are intended to apply only to the specific item. To add a line item level attachment, select Add located next to Internal Attachments.
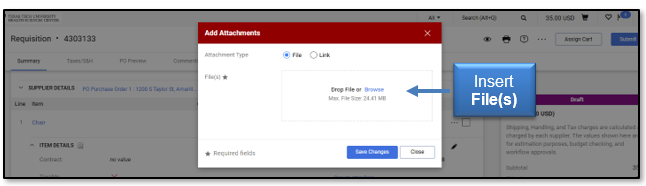
This will open an additional window titled Add attachments. Insert the file to attach by dropping the file or browsing your computer.
The file path will populate below the File field. Click Save Changes.
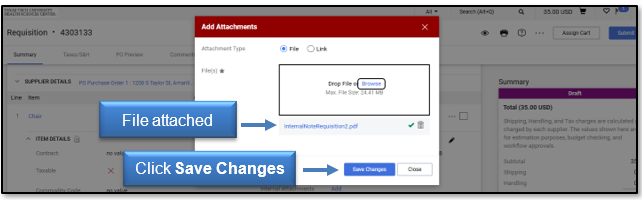
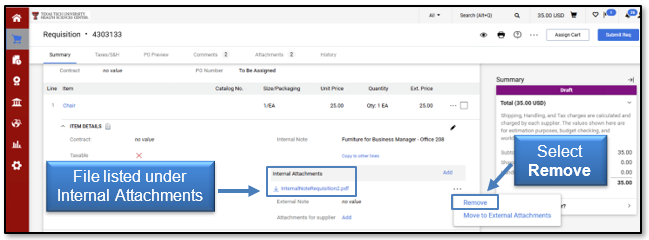
The file will now be listed under Internal Attachments at the line-item level. If you need to remove the attachment, select Remove from the Actions icon drop-down list to the right of the attachment. You can also attach additional documents by following the same steps.
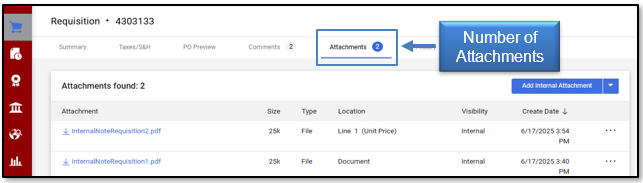
The number of attachments that are added/removed will be reflected in the count located in the Attachments heading.
External Header Level Notes
External notes allow users to send information with the purchase order to the supplier. You can add external notes at the header level, which apply to the entire cart, or at the line-item level. If you add external notes to the cart, verify that your cart only contains items from one vendor.
Because most punch-out vendors currently cannot receive this information electronically, we discourage users from entering or attaching any external notes to punch-out vendors unless specifically told to do so by the vendor. Doing so could cause the order to be delayed or rejected in the vendor's system.
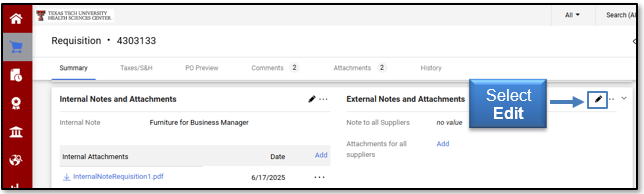
To add an external note to the header, select Edit at the top right-hand corner of the External Notes and Attachments header section.
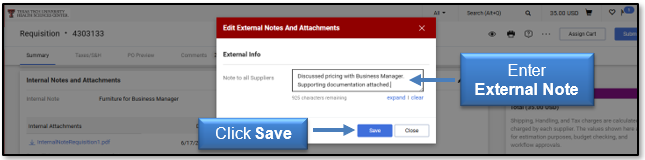
An additional window titled Edit External Notes and Attachments will open. Enter the Note to all Suppliers information in the text box. If you need additional space, select Expand. When you have completed the External Note, click Save.
Once you save the note, the window will close. You will notice the External Notes and Attachments header information will now be updated with the note.
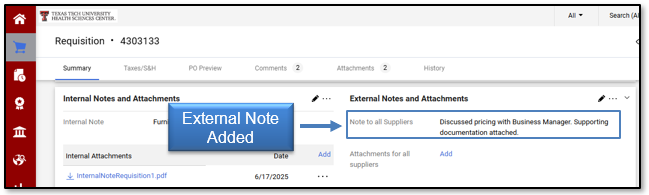
External Line Item Level Notes
External line item notes are similar to external header notes except that they contain information specifically related to a particular item in the requisition. To enter an external, line item note, select Edit to the right of the item in the cart.
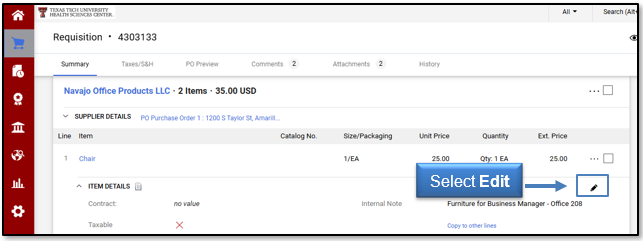
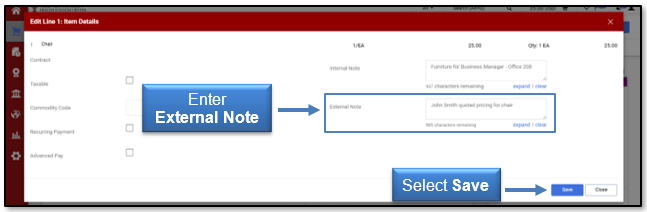
This will open an additional window titled Edit Line. Enter the information in the External Note text box. When you have completed the note, select Save.
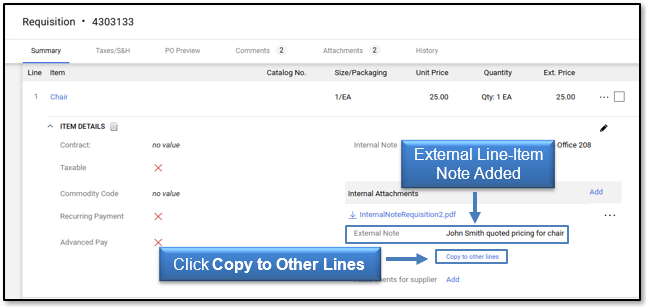
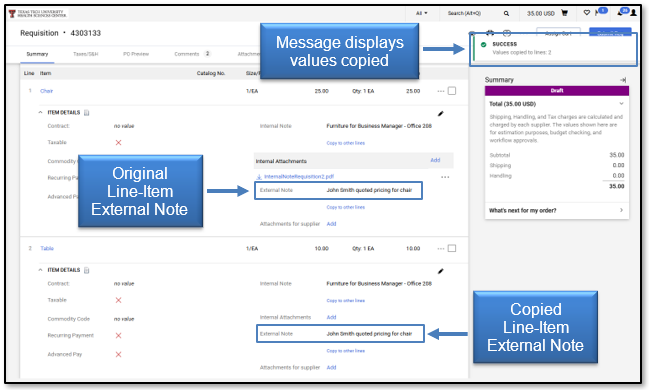
The Edit Line Item Note will now be populated in the requisition. The Copy to Other Lines feature allows you to add the same external note to other items on the requisition. Click Copy to Other Lines if you would like to add the line-item external note to other commodities.
The Copy To Other Lines: External Note window will open and provide a list of the remaining commodities for the order. Select each item that should include the note.
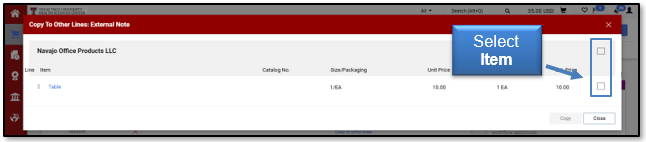
Once an item is selected, a green checkmark will appear in the box. Select Copy.
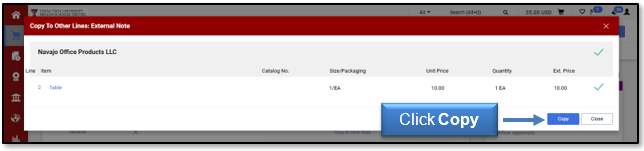
The system will display a message to indicate whether the line(s) copied successfully. The line item note will now be included for each selected item.
External Header Attachments
External attachments allow users to send documents with the purchase order to the supplier. You can add external attachments at the header level, which apply to the entire cart, or at the line-item level. If you add external attachments to the cart, verify that your cart only contains items from one vendor.
Because most punch-out vendors currently cannot receive this information electronically, we discourage users from adding any external attachments to punch-out vendors unless specifically told to do so. Doing so could cause the order to be delayed or rejected in the vendor's system.
To add a header-level attachment, select Add located in the External Notes and Attachments section.
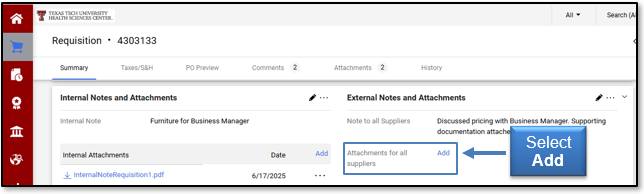
This will open an additional window titled Add Attachments. Insert the file to attach by dropping the file or browsing your computer.
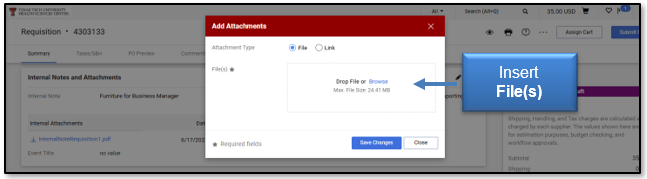
The file path will populate below the File field. Click Save Changes.
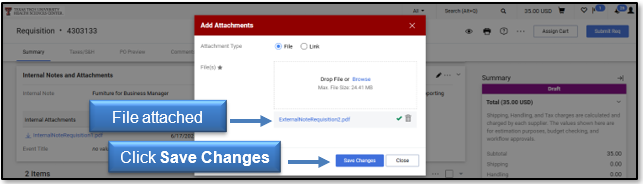
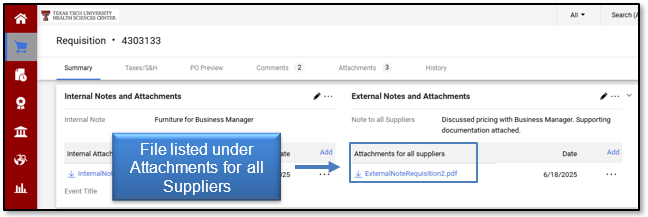
The file will now be listed under Attachments for All Suppliers at the header level.
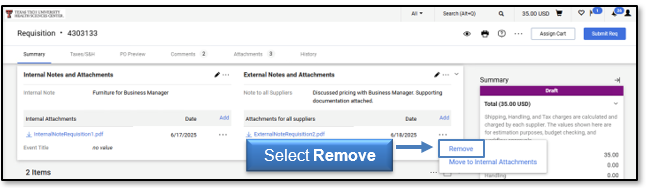
If you need to remove the attachment, select Remove from the Actions icon drop-down list to the right of the attachment. You can also attach additional documents by following the same steps.
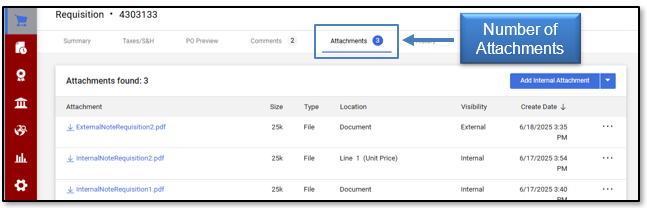
The number of attachments that are added/removed will be reflected in the count located in the Attachments heading.
External Line Level Attachments
External attachments added at the line-item level are intended to apply only to the specific item. To add a line-item level attachment, select Add located under Attachments for Supplier.
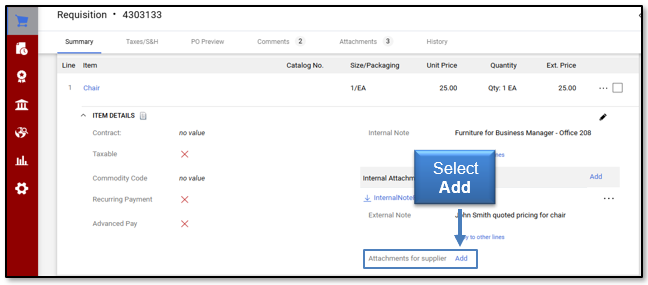
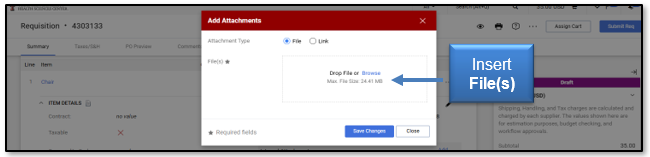
This will open an additional window titled Add Attachments. Insert the file to attach by dropping the file or browsing your computer.
The file path will populate below the File field. Click Save Changes.
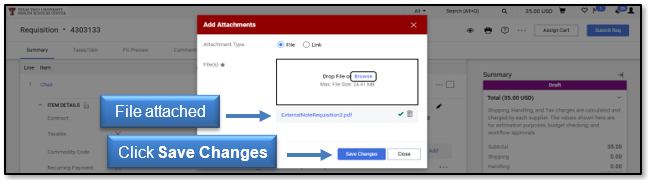
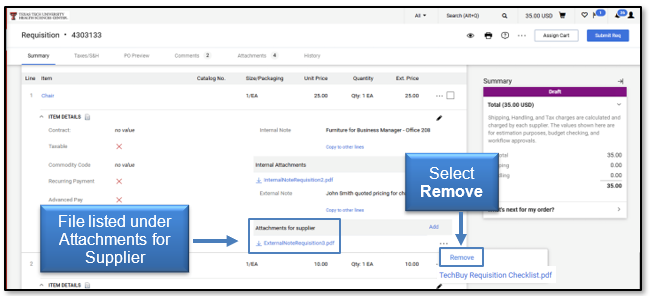
The file will now be listed under Attachments for Supplier at the line-item level. If you need to remove the attachment, select Remove from the Actions icon drop-down list to the right of the attachment. You can also attach additional documents by following the same steps.
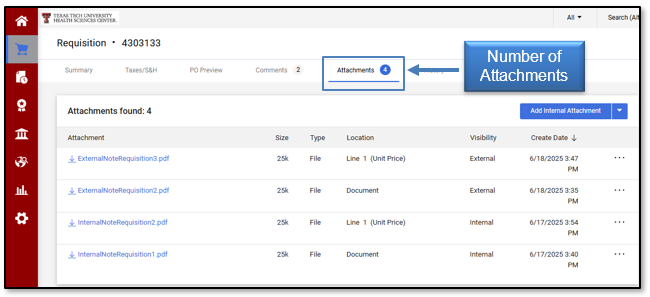
The number of attachments that are added/removed will be reflected in the count located in the Attachments heading.
For additional questions about TechBuy, email purchasing@ttuhsc.edu.
Contact
Finance Systems Management
-
Address:
3601 4th Street STOP 6209 | Lubbock, Texas 79430-6209 -
Email:
fsm@ttuhsc.edu