
TechBuy - Reviewing the Cart
Once the items you wish to add to your requisition are in the active cart, you are ready to review. During the cart review, you can edit the shipping address, edit the fulfillment address, name the cart, verify the accounting date, enter accounting information, and include any external or internal notes and attachments.
Documentation for entering accounting information and adding notes or attachments is located in another training document.
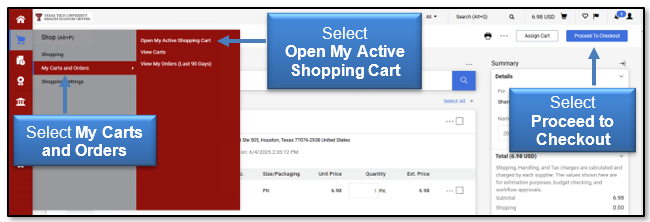
To access the cart review, select Shop, My Carts and Orders, Open My Active Shopping Cart, and select Proceed to Checkout.
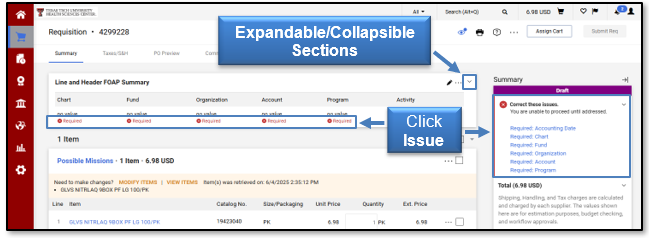
The checkout page is a mirror of what the requisition will look like once submitted. The sections are expandable/collapsible. The shipping and billing information will automatically populate from your user profile.
Some of the sections included on the checkout page include:
- General
- Shipping
- Billing
- Line and Header FOAP Summary
- Internal Notes and Attachments
- External Notes and Attachments
If any of the sections have issues, select an issue from the list that needs to be addressed in the message box or a specific corresponding section. The cart cannot be submitted for requisition until all errors are corrected, but you can Assign Cart without correcting the errors.
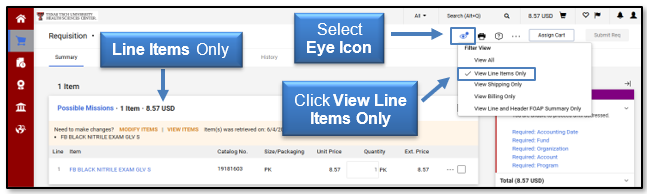
If you want to view specific information, select the eye icon at the top of the screen to reveal the Filter View menu and select View Line Items Only.
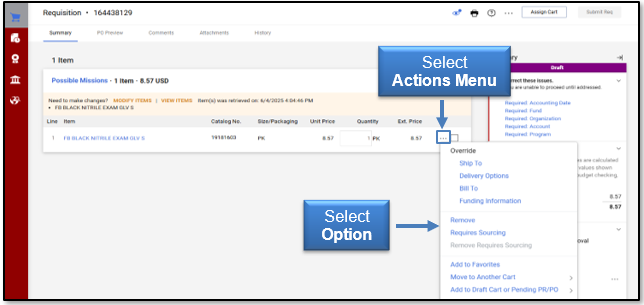
Select the Actions menu (ellipsis icon) to view available tasks for selected line items.
General Section
To edit the General section, select an item from the correct issues list in the message box or in the corresponding section. You can also select Edit (pencil icon) to update the section information, if available in the Summary area.
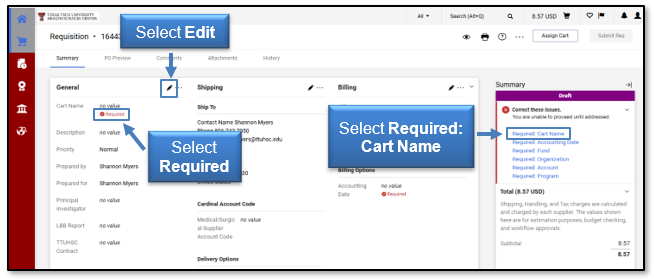
The General section contains the following fields:
- Cart Name - This field automatically populates with the current date, the user id, and a sequential number. TechBuy allows you to rename your cart. Many users find that renaming the cart with specific information (date, vendor, items, etc.) provides an easier means for tracking orders and searching history.
- Description - This field allows you to enter additional information for future reference.
- Priority - If urgent is selected, the order is flagged in the system. This priority should only be selected for truly urgent orders. If all orders are marked as urgent, the flag will no longer have its intended significance.
- Prepared by - This field will identify the user who prepared the cart. This field cannot be modified.
- Prepared for - If a cart has been assigned to you for completion, you will need to identify yourself in this field. TechBuy sends the name of the person in the Prepared for field to Banner to verify fund security.
- Principal Investigator - This field may berequired for some grant purchases. If your purchase does not include grant funds, a name is not necessary in this field.
- Texas Smart Buy PO # - Purchase Order generated by the state for Term Contract orders. This field will be edited by Purchasing.
After you have edited the General section, click Save.
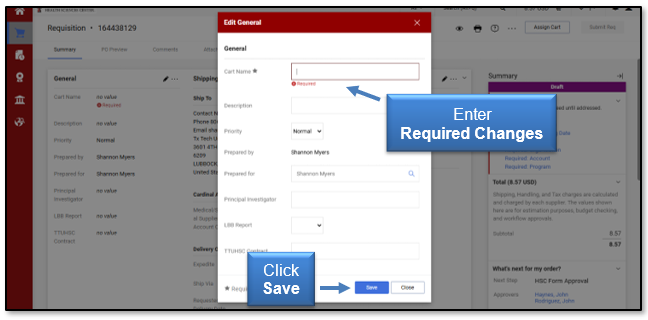
Once you have completed the necessary field(s), the error list will clear for the section.
Shipping Section
The Shipping section has two blocks that may require changes: Ship To and Delivery Options. If you have access to shop with Henry Schein, you will have a third block titled Cardinal Account Code. Review the Henry Schein Purchases document for information on populating this field. The Buyer Information area is used only by the buyer to add necessary information. Users will not edit this information.
The Ship To field should populate automatically based on your profile settings. If a ship-to-code does not automatically populate, refer to the TechBuy User Profile document. Failure to enter a ship to code and save as a default could result in an error.
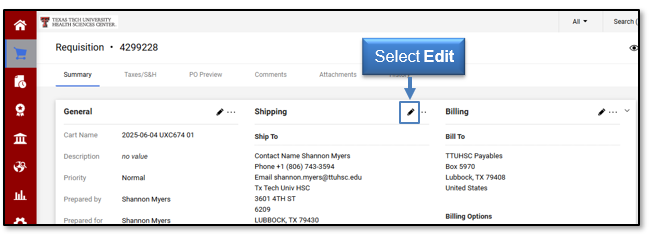
To edit the Ship To in the Shipping section, select the item from the list in the right message box or in the corresponding section that needs to be addressed before submitting the request. You can also select Edit (pencil icon) to update the information.
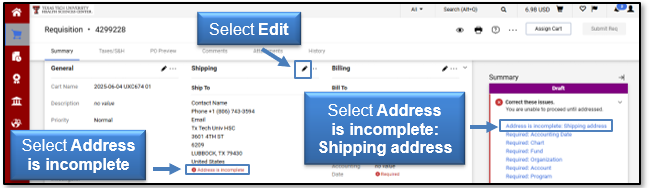
This will open an additional window that will allow the user to perform three actions on the shipping address:
- Edit the Current Address - allows you to edit the current address on the document.
- Choose From Your Addresses - allows you to select an address from your personal list of profile addresses (this section is hidden if you do not have addresses in your profile).
- Select a New Address - allows you to search and select an address from TTUHSC's list of available addresses.
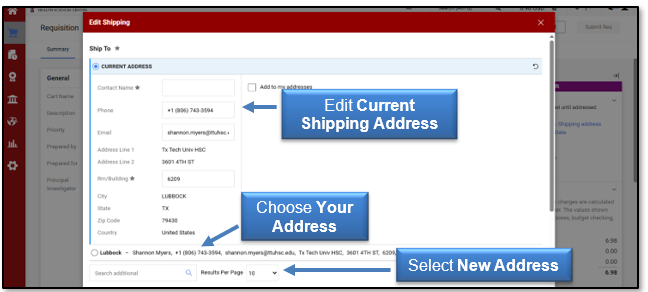
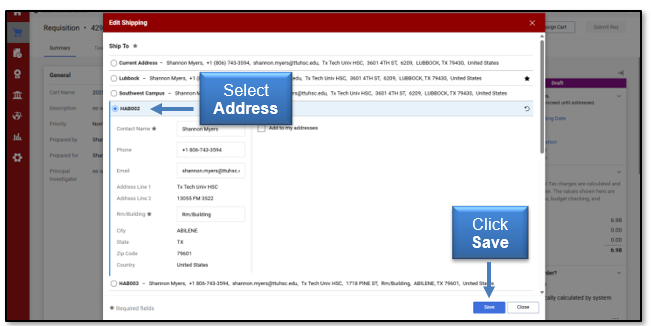
If information needs to be corrected for the Current Address, you can edit the Contact Name, Phone, Email, and Rm/STOP. You can also save this change as a new address in your personal list of addresses by selecting the checkbox titled Add to my addresses.
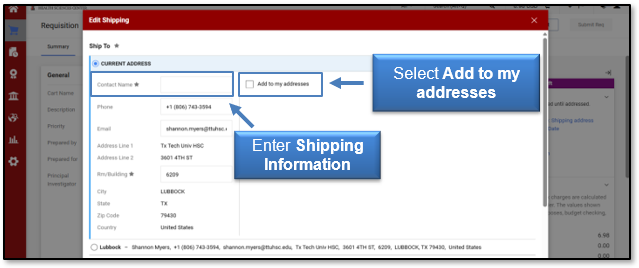
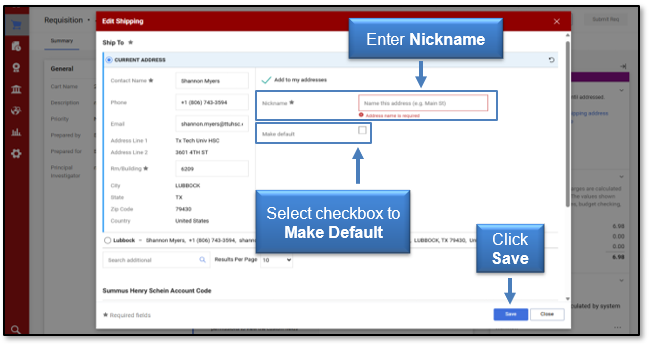
You will need to enter a Nickname for this new Current Shipping Address. If you want to make this your new default Current Shipping Address, select the checkbox next to Make default.
When you have completed editing the information, click Save or return the cart without making changes by choosing Close.
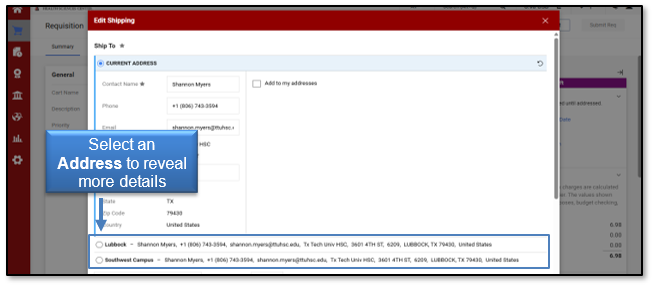
In the Choose From Your Addresses area, your default address is displayed first and is noted with a star icon. Fields that are required for checkout are displayed in bold. Optional fields are displayed in normal font. Change/edit your address by selecting the address to reveal more detailed information.
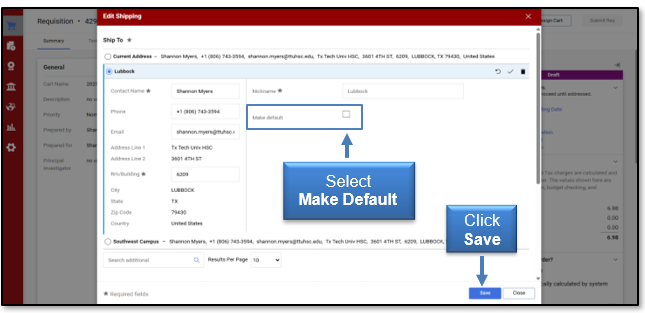
Update your default address by selecting the Make Default checkbox to the right and clicking Save. This address will now become the Current Shipping Address.
Note: If you cannot locate the correct shipping address from the TechBuy list, contact purchasing@ttuhsc.edu.
In the Select a New Address area, you have the option to search and select from TTUHSC's list of available addresses. You can enter search criteria or simply select the Magnifying Glass to bring in all the shipping addresses.
By entering no search criteria, you can determine the number of results viewed per page and scroll through pages.
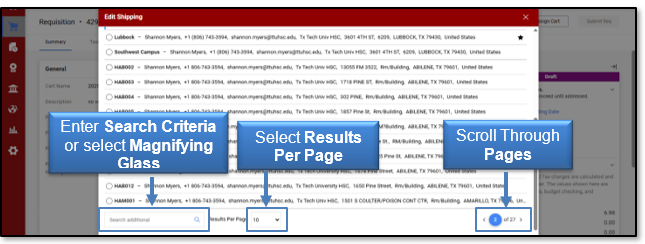
After a new address is selected, click Save. That address will now appear as the Current Address.
To edit the Delivery Options information, select Edit (pencil icon) in the Shipping section area.
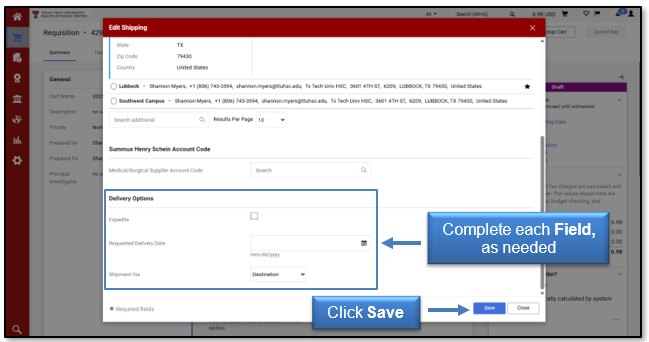
The Delivery Options area contains the following fields:
- Expedite - Use this checkbox to flag an item as a rush item. If expedite is selected, the order is flagged in the system. Expedite should only be marked for truly urgent orders. If all orders are marked as urgent, the flag will no longer have its intended significance.
- Ship Via - Provides a list of shipping methods.
- Requested Delivery Date - Use this field to indicate a requested delivery date to be sent to the supplier. This is not a firm shipping date from the supplier.
Complete each field as appropriate for the request. Click Save when completed.
Billing Section
The Billing section has two vital sections titled Bill To and Billing Options. Each of these fields is required and needs special attention. The Credit Card Info is available for select vendors only.
The Bill To should populate automatically based on your profile settings. If TTUHSC Payables does not automatically populate, refer to the TechBuy User Profile document. Failure to enter a bill to code and save as default could result in an error.
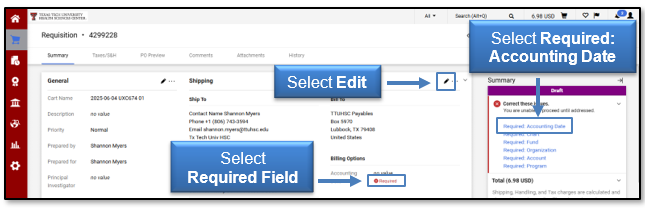
The Billing Options field requires the Accounting Date. The Accounting Date feeds into Banner as the transaction date and drives the fiscal period. It is important to enter a date within an open accounting period unless instructed otherwise by Purchasing.
To edit the Bill To or the Billing Options in the Billing section, select an item from the list in the right message box or in the corresponding section that needs to be addressed before submitting the request You can also select Edit (pencil icon) to update the information.
Enter the current date unless instructed otherwise by Purchasing, and click Save.
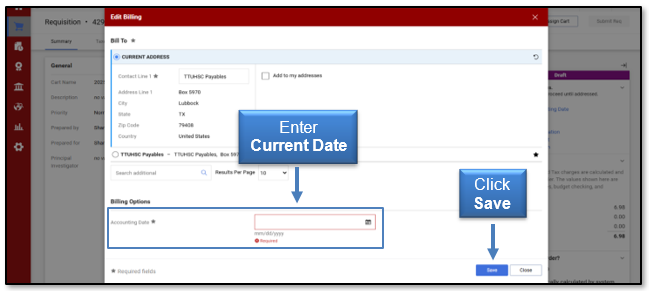
Note: You may unknowingly add items to an empty cart that was activated previously; your accounting date should reflect the current date.
Recurring Payment and Advanced Pay
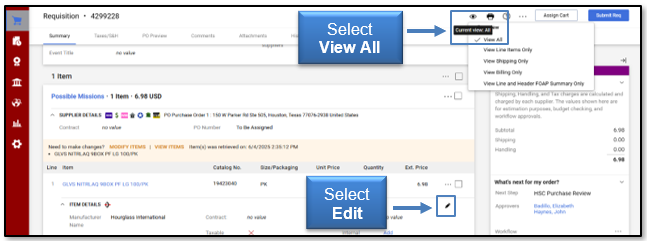
You have the opportunity to mark an order as a Recurring Payment or an Advanced Pay. In the View All of the Summary of your cart, scroll to the Supplier/Line Item Details and select Edit (pencil icon) to the right of the line item(s).
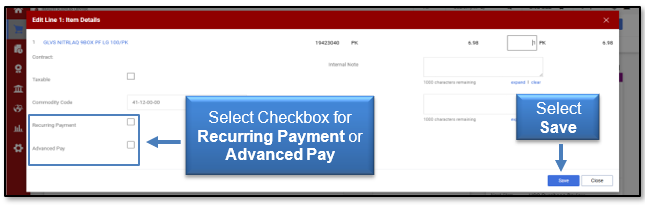
The Edit Line window will open. If the Advanced Pay box is selected and approved by Purchasing, Payment Services will receive an email notification with the information to create a payment. Advanced payments should only be requested when there is a specific business advantage to the institution.
Select the Recurring Payment box if you would like a payment to process automatically on a schedule each month. If the Recurring Payment box is selected and approved by Purchasing, Payment Services will receive an email notification with this information to schedule the payments.
Enter any justification or additional information in the Internal Notes section. Once you have marked the appropriate options, select Save.
Workflow and Approval Steps
The Workflow and Approval Steps area will display on the right side of the Summary screen. The number of steps needed to finish the order will depend upon many factors, including the total value of the requisition, items requested, and departmental policies.
Your current workflow step will be highlighted with a blue location pin. Details on future action steps can be viewed by selecting Options (ellipsis icon) to the right of a specific step.
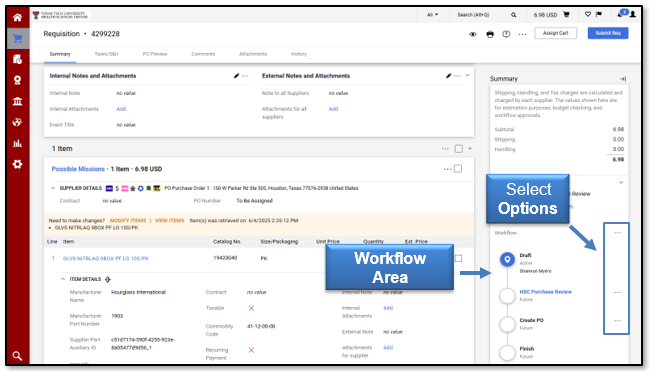
A new window will open and display details regarding the future workflow step.

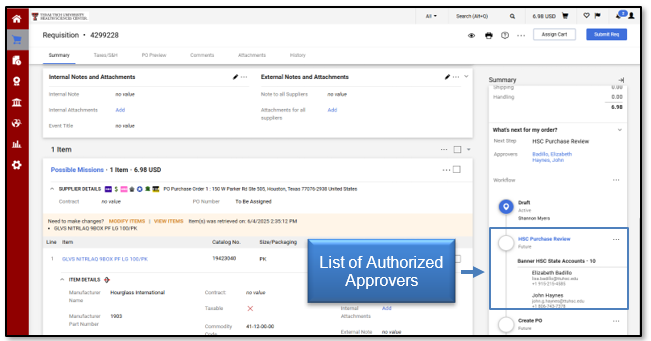
Click a workflow step highlighted in blue to view approvers for the specified step.
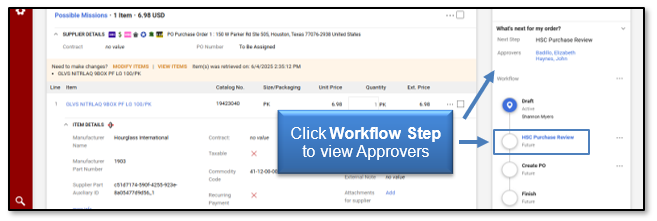
A list of authorized approvers, along with their email and phone contact information, will display.
PO Preview
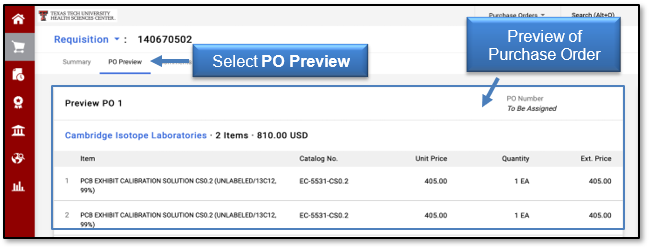
Once a requisition flows through the entire workflow process and receives the proper approvals, a PO is automatically created and sent to the vendor electronically. The PO Preview allows you to see what information will be sent to the vendor.
To preview the information, select the PO Preview section. A preview of each purchase order by vendor will display.
For additional questions about TechBuy, email purchasing@ttuhsc.edu.
Contact
Finance Systems Management
-
Address:
3601 4th Street STOP 6209 | Lubbock, Texas 79430-6209 -
Email:
fsm@ttuhsc.edu