
Property Inventory Help
Table of Contents (TOC)
Overview
Inventory
- View Edit
- Property Inventory Page
- Department Inventory Reports
- All Property
- Items Missing Information
- Missing Property
- Stolen Property
- Transfer
- Initiate Transfer
- Transfer to Surplus
- Remove/Change Status
- Remove
- Change Status
- Annual Certification
- Preparing for Annual Certification
- Scanning Procedure for Annual Certification
- Submitting the Annual Certification
- Approving the Annual Certification
- Transfers
- Surplus Pickup
- Removals/Status Changes
Search
- Asset Search
- Search by Tag Number
- Search by Category
- Search by Serial Number
- Search by Building and Room
- Search by Department and Organization
- Transfer Search
- Surplus Pickup Search
- Removal/Status Change Search
Forms, Help, & Contacts
Overview
HSC OP 63.10, Property Management, defines the scope of property management at TTUHSC, and provides the policy and procedures to manage, control, and account for all institutional property at TTUHSC.
State law requires that a complete physical inventory be conducted each year. This inventory, or Annual Certification, will be completed by the departmental Property Custodian, Delegate, and other departmental personnel using the most recent listing from the Property Inventory System. The inventory process will occur during a two-month period in the spring of each year. Email notifications will be sent to Property Custodians and Delegates.
How to Access the Property Inventory System (Click to return to TOC)
The Property Inventory System can be accessed from:
- Property Inventory System
- WebRaider portal > Business Affairs tab > Links to Financial Systems > Property Inventory
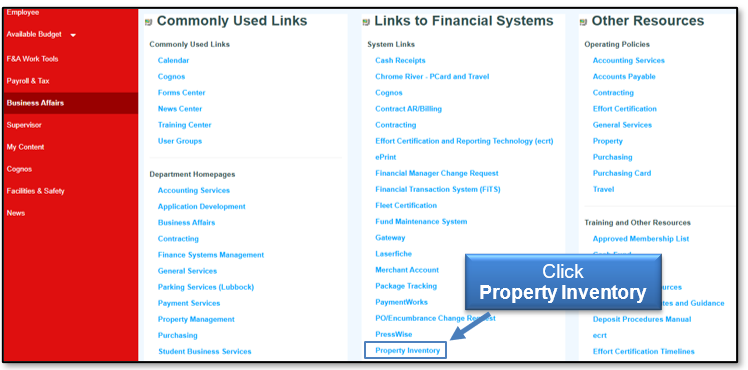
The Property Inventory System may also be accessed through the F&A Work Tools tab and the Property Management webpage.
Navigation Menu Bar (Click to return to TOC)
The primary method of navigating within the system is using the navigation menu bar along the top of the page. The navigation menu bar is on every page of the application, allowing you to move from one page to another quickly.
Inventory
View/Edit (Click to return to TOC)
Property Inventory Page
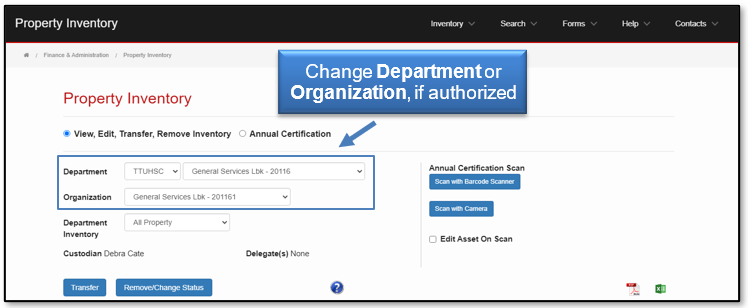
The application opens to the Property Inventory page and will default to your home department. If you are authorized to view inventory for more than one department/organization, change departments/organizations by selecting a different department and organization from the drop-down lists. The department/organization selected will be displayed on the page.
Department Inventory Reports
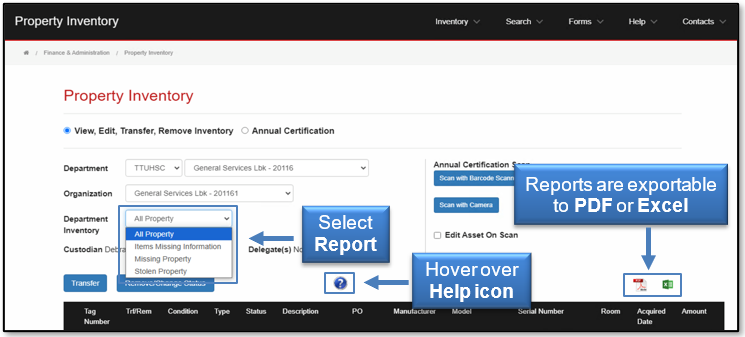
Help Icon - Hover over the Help icon (blue circle with a question mark) located next to the Remove/Change Status button for a brief explanation of an element or process on the report page.
All of the department inventory reports are available by selecting the report from the Department Inventory drop-down list. Column headers can sort the inventory listing, and the reports are exportable to PDF or Excel by selecting the corresponding icon.
All updates and changes must be entered into and reflected in the department inventory reports before the Annual Certification can be completed.
All Property
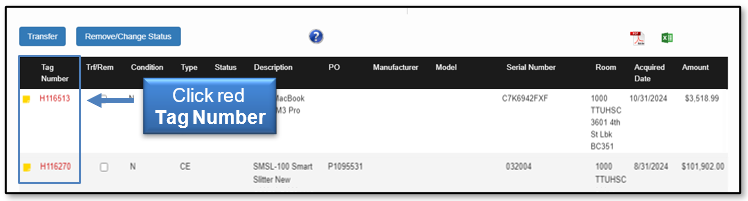
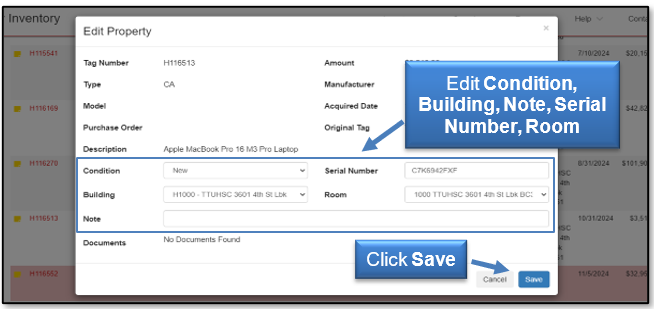
This report lists all properties that are tied to the selected department/organization and includes a Status column that is populated with Missing for items that have been reported as missing and Offsite for items that are temporarily removed from the department. The Offsite User Name and Offsite User ID are listed on the Excel report for items identified as Offsite through the Property Inventory System. Items missing information (serial number and or location) are highlighted in red. The report should be reviewed and updated on an ongoing basis. Verification includes verifying the Condition, Serial Number, and the Building and Room location of the asset. These fields, as well as the Notes field, can be edited to reflect current information. To edit an item, click the red Tag Number.
To edit the condition of the asset, click the drop-down arrow in the Condition field and select from New, Good, Fair, or Poor.
- New - This condition is assigned by Property Management when the inventory tag is issued, and the property is in excellent condition.
- Good - Somewhat used or reconditioned property that, while still in usable condition, is slightly shopworn, soiled, or otherwise precluded from being considered “new”. The condition of the property does not impair the utility of the property.
- Fair - Property that is soiled, shopworn, rusted, deteriorated, or damaged to the extent that utility is slightly impaired, or reconditioned property that has been repaired or renovated but has since deteriorated and which needs or may need additional repair or renovation in the near future.
- Poor - Property so badly broken, soiled, rusted, mildewed, deteriorated, or damaged that its utility is seriously impaired, or property that has been repaired or renovated but has since seriously deteriorated due to factors such as major wear and tear, corrosion, or exposure to weather.
To edit the serial number, enter the correct serial number in the textbox. It is important to note that the serial number must be entered as the serial number assigned by the manufacturer. Do not enter any other information in this field. Placing other information in this field renders the asset unsearchable.
To edit the room location, first select the correct Building from the drop-down list. After the correct building is selected, select the correct Room number. If the room number is not available, complete the Add Room Number(s) to Property Inventory System form.
The Asset Note field allows users to enter information that will help locate or identify an item. Enter, edit, or remove the information in the Note field. You can view the note by clicking the yellow sticky note next to the asset number on the Department Inventory Reports. The asset notes are also included when the inventory listing is exported to PDF or Excel.
To cancel the changes for an item, click Cancel. After all the changes are complete, click Save. Selecting Save completes the process and updates the information in the Property Inventory System.
Items Missing Information
The Items Missing Information report displays a list of inventory items from the selected organization that require a serial number and/or room location. This report should be reviewed and updated on an ongoing basis, and all missing information should be completed before submitting your Annual Certification. To edit an item, click the red Tag Number.
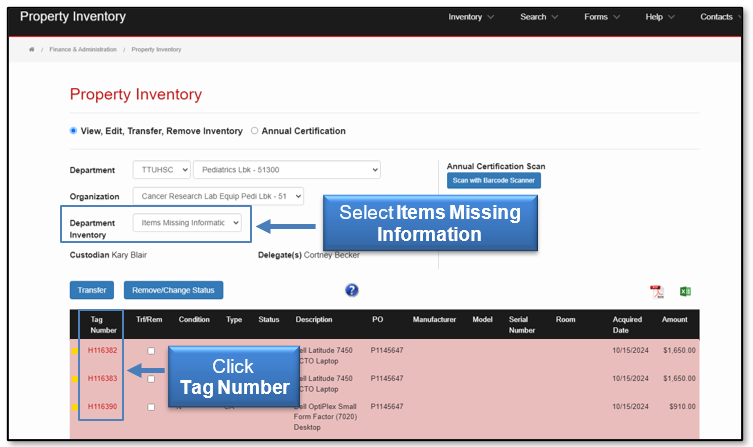
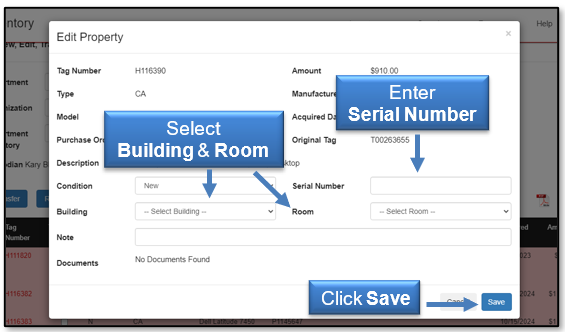
To edit the serial number, enter the correct serial number in the text box. It is important to note that the serial number must be entered as the serial number assigned by the manufacturer. Do not enter any other information in this field. Placing other information in this field renders the asset unsearchable.
To edit the room location, first select the correct Building from the drop-down list. After the correct building is selected, select the correct Room number. If the room number is not available, complete the Add Room Number(s) to Property Inventory System form.
To cancel the changes for an item, click Cancel. After all the changes are complete, click Save. Selecting Save completes the process and updates the information in the Property Inventory System.
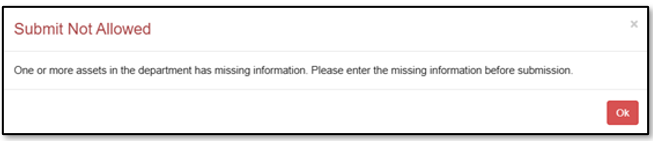
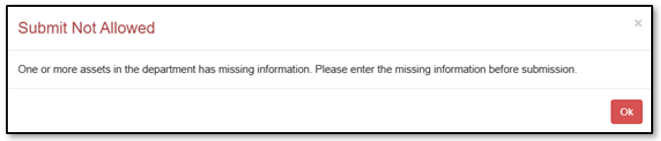
The system will not allow you to submit the Annual Inventory Certification with assets on the Items Missing Information report. The error below will display.
Missing Property
If there are inventory items that are on the All Property report that cannot physically be located, these items must be reported as missing. Due diligence must be made to locate the items before reporting them as missing.
Before the Annual Certification is submitted, all items that were not found during the review must appear on the Missing Property report.
- For items already on the report because they were reported as missing in previous inventory cycles and are still missing, no further action is required.
- For items identified as missing in the current review that are not already on the report, check the Trf/Rem box located on the line item of the missing asset and then click the Remove/Change Status button. Select Missing Property from the Type drop-down list. Enter Details related to the missing item and complete the Negligence Statement, and then click Save. The request will be forwarded to the Property Custodian and Delegate(s) for approval and submission. When the Property Custodian or Delegate submits the request, it will be routed to Property Management for final approval. After final approval, the item will appear on the Missing Property report and will remain in the department's inventory for two years before being written off as lost. "Missing" will appear in the Status column on the All Property report.
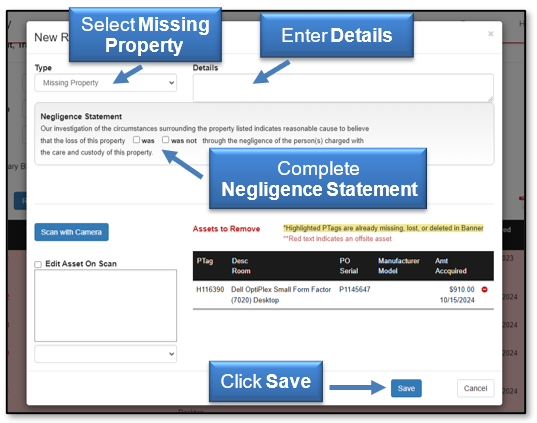
Please allow 3 to 5 business days for Property Management to process the removal request. The missing items must appear on the report before proceeding with the Certification Process.
Make every attempt to locate all missing items.
- For items reported in previous inventory cycles that were located during the current review, check the Trf/Rem box located on the line item of the found asset and then click the Remove/Change Status button. Select Missing Property Return from the Type drop-down list. The Property Custodian/Delegate will verify that the items returned are in good condition with a legible tag affixed and ensure building and room information is updated.
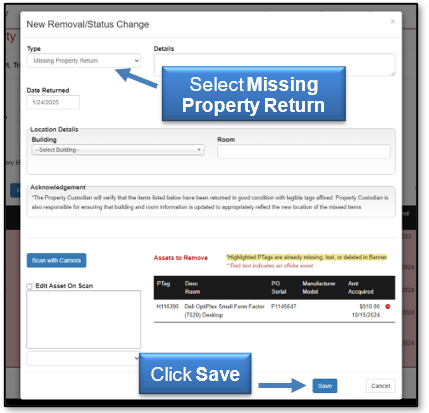
Stolen Property
To report stolen property, check the Trf/Rem box located on the line item of the missing asset and then click the Remove/Change Status button. Select Stolen Property from the Type drop-down list. Enter Details related to the stolen item, complete the Negligence Statement, attach the Police Report, and then click Save. The removal request will be forwarded to the Property Custodian and Delegate(s) for approval and submission. When the Property Custodian or Delegate submits the request, it will be routed to Property Management for final approval. After final approval, the item will be removed from the department's inventory and will appear on the Stolen Property report.
If items on this list have been located, please notify Property Management at PropertyManagement@ttuhsc.edu.
Transfer (Click to return to TOC)
Initiate Transfer
To initiate a transfer to another department within TTUHSC, check the Trf/Rem box located on the line item of the asset to transfer and then click the Transfer button.
Before initiating the transfer, ensure that the transferred item has a location code assigned in the Room field. The transfer request will fail if this field is blank.
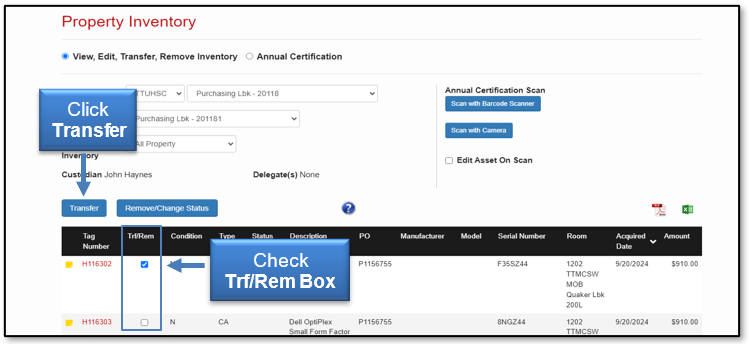
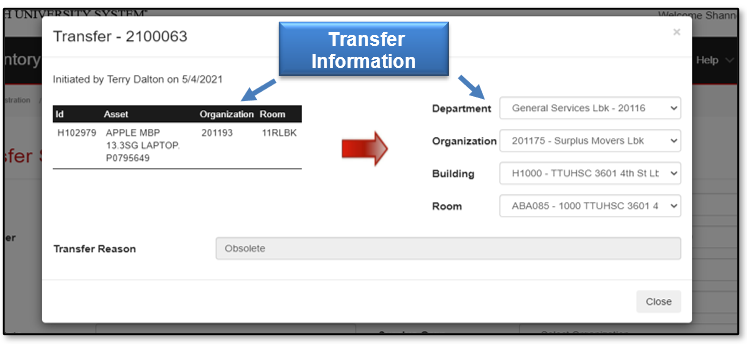
The Transfer page will be pre-populated in the left box with the Tag Number, Description, current Orgn, and Room of the asset selected to transfer. Displayed in the right box are drop-down lists to select the new Department, Orgn, Building, and Room for the transfer. Department, Orgn, and Transfer Reason are required for submission. The Building and Room may be entered, but are not required for submission. Click Save to initiate the transfer.
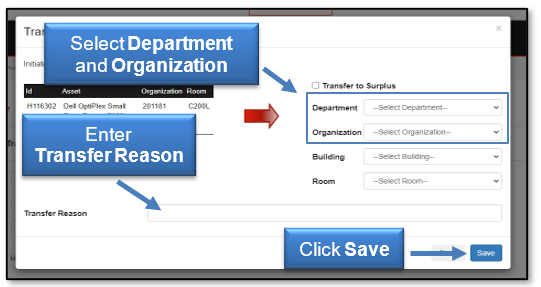
A confirmation screen will appear indicating the transfer has been successfully submitted. The transfer number will be provided. The Property Custodian and all Delegates of the receiving department will receive an automated email indicating that the transfer request needs their approval. A Pending Transfer notice will appear on the Inventory page of the Property Custodian and all Delegates that a transfer needs approval.
Transfer to Surplus
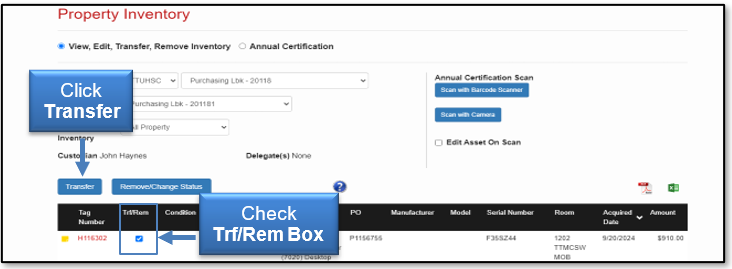
The department must initiate the transfer to the Surplus Property Department for their respective campus. Check the Trf/Rem box located on the line item of the asset to transfer and then click the Transfer button.
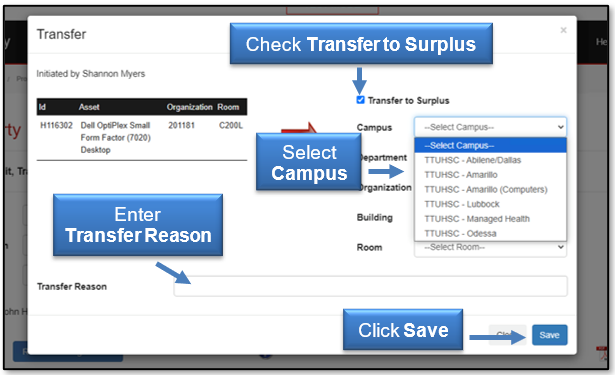
The Transfer page will be pre-populated in the left box with the Tag Number, Description, current Orgn, and Room of the asset selected to transfer. Check the Transfer to Surplus box and select the appropriate Campus from the drop-down list. The information for Department, Organization, Building, and Room will auto-populate. Add a Transfer Reason and click Save.
How to Transfer Items to Surplus outlines the surplus process.
All TTUHSC departments must review and follow the Information Technology (IT) procedure How to Surplus Computer Devices.
Remove/Change Status (Click to return to TOC)
There are two ways to initiate the removal or change the status of an item from your departmental inventory from the Property Inventory page.
- Check the Trf/Rem box located on the line item of the asset to remove and then click the Remove/Change Status button.
- Click the Remove/Change Status button without selecting any assets.
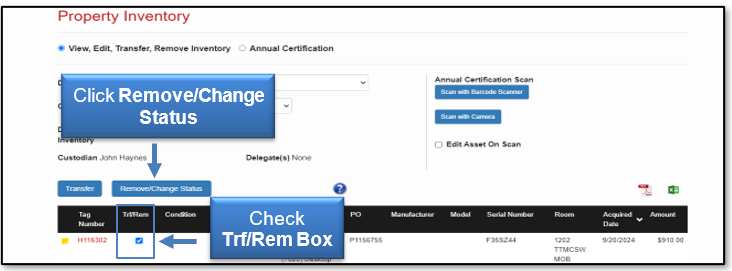
If specific assets are selected, the New Removal/Status Change page will be pre-populated with the Tag Number, Description, PO Number, Manufacturer, Amount, Room, Serial Number, Model, and Acquired Date for the asset selected.
If no assets are selected, click the Scan button and then scan the barcode of assets to be removed or changed. As items are scanned, information will populate in the Assets section of the New Removal/Status Change page.
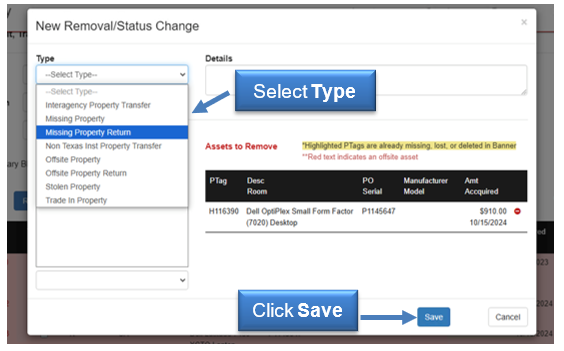
Select the Type from the drop-down list.
Remove
- Interagency Property Transfer - Select this option for transfers to another Texas State Agency. A link to a List of State Agencies is included.
- Non Texas Inst Property Transfer - Select this option for transfer to any institution that is not a Texas State Agency. These transfers are often related to the transfer of a grant when the PI is moving to another institution. In this case, enter the Grant ID so that the Office of Sponsored Programs can approve the transfer of the equipment based on agreements with the granting agency.
- Stolen Property - Select this option for items that were stolen. Completion of the Negligence Statement and Details related to the stolen item(s) is required. A copy of a Police Report is also required.
- Trade In Property - Select this option when you are receiving trade-in value for an older asset when purchasing a new asset. Include the Requisition Number and product information for the new item, as well as the Applied Trade-In amount received for the old item. The Pick Up Date should be the date that the old item is removed from the department. The request can be saved and forwarded to the Property Custodian/Delegate without the Pick Up date, but the Property Custodian/Delegate cannot Sign and Submit the request until the items are removed from the department and the Pick Up Date has been entered.
When the appropriate fields are complete for each removal type, click Save to forward to the Property Custodian/Delegate for review and submission. The Property Custodian and Delegate will receive an email indicating that they have pending removal requests to submit. A Pending Removal notice will appear on the Inventory page of the Property Custodian and all Delegates, indicating that a removal request needs to be signed.
Change Status
- Missing Property - Use this option to designate items that are missing. Completion of the Negligence Statement and Details related to the missing item(s) is required. Items approved as missing will remain on your inventory for two years before being removed as lost.
- Missing Property Return - Use this option when items marked as Missing are found. The Property Custodian/Delegate will verify that the items returned are in good condition with a legible tag affixed and ensure building and room information is updated.
- Offsite Property - use this option for an item that is temporarily removed from the department to an employee's personal residence or other like facility.
- Offsite Property Return - Use this option when an Offsite item is returned to the department. The Property Custodian/Delegate will verify that the items returned are in good condition with a legible tag affixed and ensure building and room information is updated.
When the appropriate fields are complete for each status change type, click Save to forward to the Property Custodian/Delegate for review and submission. The Property Custodian and Delegate will receive an email indicating that they have pending status change requests to submit. A Pending Removal notice will appear on the Inventory page of the Property Custodian and all Delegates, indicating that a status change request needs to be signed.
Annual Certification (Click to return to TOC)
Preparing for Annual Certification
Prior to submitting your Annual Certification, make sure you have completed any necessary edits and transfers and that all reports have been reviewed. Please keep in mind that any changes that were submitted to Property Management could take several days to process, and you must ensure these items are appropriately reflected on the reports before submitting for certification. The Annual Property Certification Checklist provides important steps to complete prior to submitting.
Scanning Procedures for Annual Certification
Scanning must be utilized to complete the Annual Certification of Departmental Inventory. There are two methods: scanning using a scanner under the storage mode setting, and scanning using a device with a camera or a scanner.
The scanning functionality allows off-site workers to scan the barcode on their equipment and eliminates the need for them to bring the asset to the authorized location or to provide a photo of the inventory tag to the property custodian for verification.
If you are unable to scan an item, contact Property Management, and we will send you a new tag.
Scanning Procedure Using a Scanner Under Storage Mode Setting
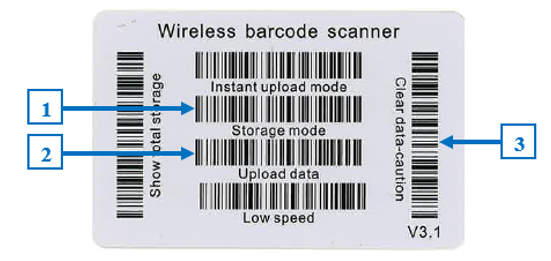
(Instructions for NADAMOO Model Bur 3076 Wireless Barcode Scanner)
To set the scanner to storage mode, scan the Storage Mode barcode from the User Manual or the Wireless Barcode Scanner card (See 1 below). Under the storage mode setting, all scanned tags are stored in the memory of the scanner. Internal storage supports up to 100,000 barcodes.
When you have completed scanning tags, connect the scanner to your device either by using the USB cable provided with the scanner or through Bluetooth.
- Sign in to the Property Inventory System on your device. You will see the Annual Certification Scan box in the upper right corner of the page. Click the blue Scan with Barcode Scanner box and place the cursor in the blank drop-down box.
- To upload the data from the scanner, scan the Upload Data barcode from the User Manual or the Wireless Barcode Scanner card (See 2 below). All of the stored barcodes will upload. A green barcode icon will appear for all scanned tags just below the note icon for the asset on the inventory listing page.
- When you determine all tags have been marked as scanned, scan the Clear Data – Caution barcode (See 3 below).
- A column titled Certified is included in the downloaded Excel spreadsheet. A value of True indicates that the item was successfully scanned, and a value of False indicates the item has not been scanned.
Scanning Procedure Using a Device with a Camera or a Scanner
You can use a phone, iPad, or another device that can connect to the internet and also has a camera. Or you can use a handheld scanner that can connect to your device.
Sign in to the Property Inventory System from your device. You will see the Annual Certification Scan box in the upper right corner of the page.
- Click the appropriate blue box based on the type of device you are using. If you're using a camera, allow the system to access the camera on your device. If you are using a scanner, make sure the scanner is connected to your device and place the cursor in the blank drop-down box.
- *New Feature* - Edit Asset on Scan: Click the checkbox to activate this feature. This allows you to verify/edit the condition, serial number, and the building and room location of the asset. Uncheck the box to turn this feature off.
- Use your camera or scanner to scan the barcode on the inventory tag.
- If the scan is successful, you will receive a notification that the item has been scanned.
- If the scan is not successful, you will receive a notification with additional information:
- If the item is in the inventory listing for a department/organization that you do not have authority to view, you will receive a message: "You can't certify that asset because you don't have access to its ORGN." Search for the tag number (Search, Inventory) to determine which departmental listing includes the item. That department can transfer the item to your departmental listing, allowing you to scan the item.
- If the asset has been previously deleted or is identified as Missing, follow the instructions on the message received: "The scanned asset is marked as missing, lost, or deleted. If missing, create a missing property return removal/status change. If lost or deleted, contact the property management office."
- If you have already successfully scanned an item, you will receive an Alert: "Asset has already been certified."
- When an item has been successfully scanned, a green barcode icon will appear just below the note icon for the asset on the inventory listing page. A column titled Certified is included in the downloaded Excel spreadsheet. A value of True indicates that the item was successfully scanned, and a value of False indicates the item has not been scanned.
The system will not allow you to submit the Annual Inventory Certification with assets on the Items Missing Information report. The error below will display.
The Annual Certification is a two-step process. It must first be submitted and then approved.
Submitting the Annual Certification
The Annual Certification can be submitted by the Property Custodian, a Delegate, or an individual the Property Custodian has designated who has access to the inventory reports of the department.
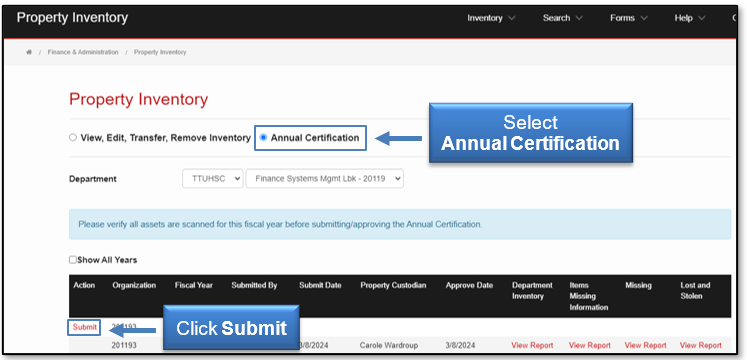
On the Property Inventory page, select Annual Certification. Then, click Submit.
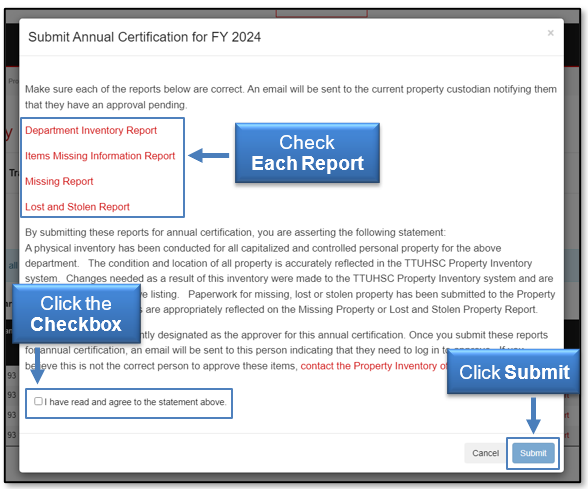
Make sure each of the reports is correct. If the reports are not correct, click Cancel. If they are correct, click the checkbox: I have read and agree to the statement above. Click Submit.
The Property Custodian and all Delegates will receive an email notifying them that they have an approval pending and a link is provided to log into the Property Inventory System.
Approving the Annual Certification
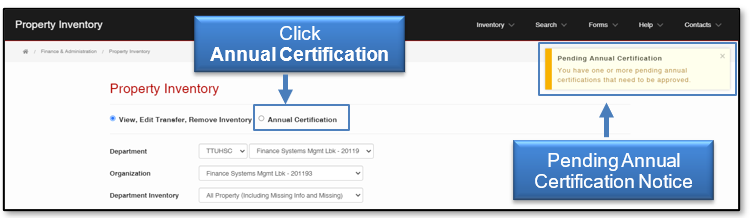
The Annual Certification must be approved by the Property Custodian or a Delegate. A Pending Annual Certification notice will appear on the Inventory page of the Property Custodian and all Delegates that an annual certification needs approval. Click Annual Certification from the Property Inventory page.
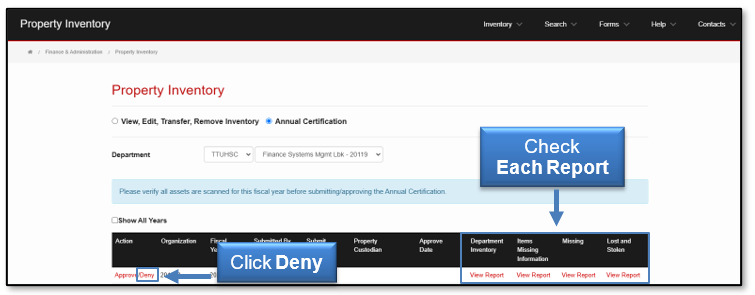
Before approving, make sure each of the reports is correct. If the reports are not correct, click Deny.
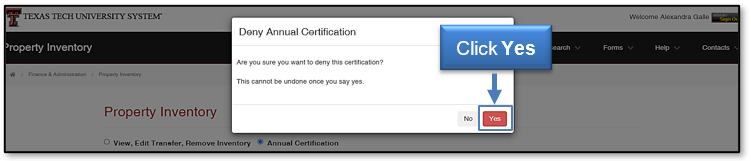
Then click Yes. Selecting Deny will return the user to the Property Inventory page.
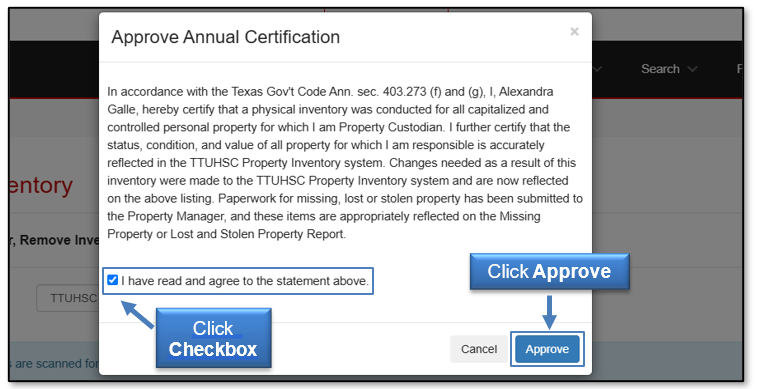
If the reports are correct, click Approve.
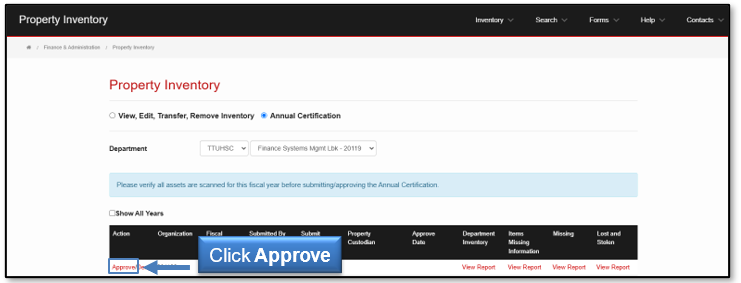
Click the checkbox: I have read and agree to the statement above. Click Approve.
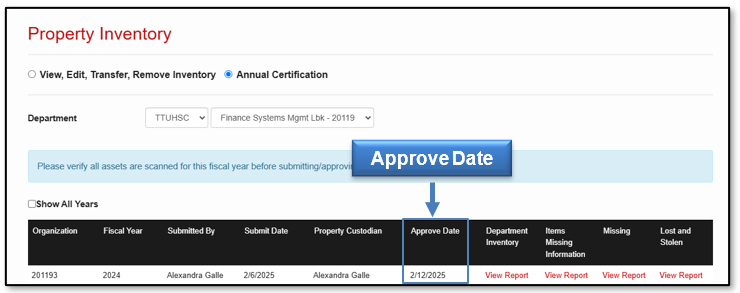
The Annual Certification has been submitted and approved.
For policy questions regarding the Annual Certification process, contact Property Management at PropertyManagement@ttuhsc.edu.
For training questions about the Annual Certification process, contact Finance Systems Management at fsm@ttuhsc.edu.
Transfers (Click to return to TOC)
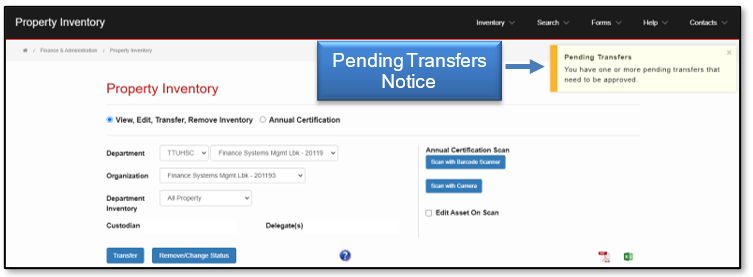
A Pending Transfers notice will appear on the Inventory page of the Property Custodian and all Delegates of the department receiving the transferred items.
The Transfers page provides a list of Pending transfers for which you are either the Initiator, the Property Custodian of the Department receiving the transfer, or a Delegate for the receiving Department.
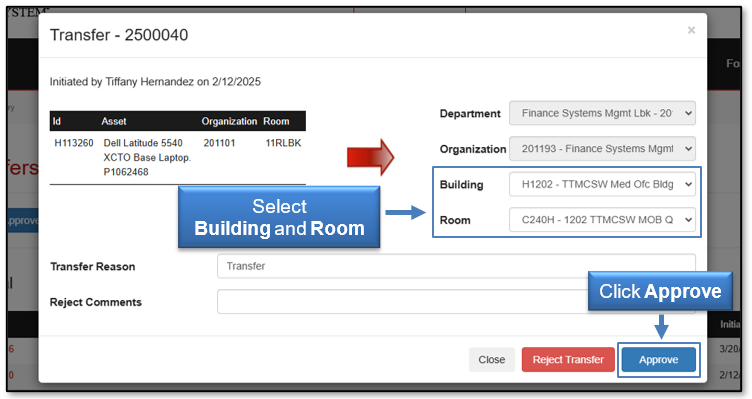
Click the red transfer ID number link to view the transfer.
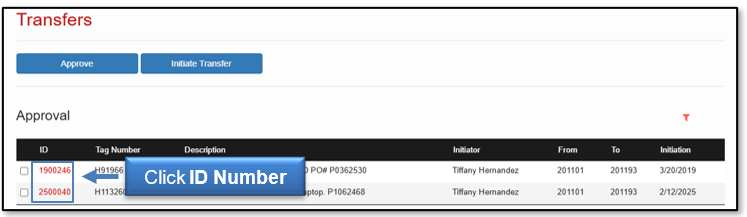
To approve initiated transfers to the department for which you are the Property Custodian or Delegate, click the Approve button. The Building and Room information must be selected from the drop-down lists before approval.
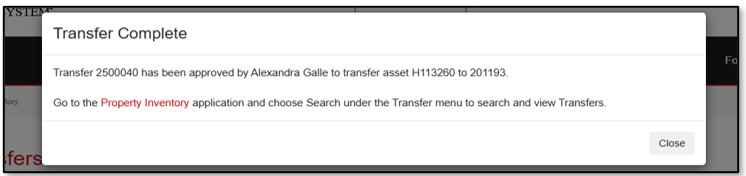
A confirmation screen will indicate the transfer has been successfully approved. The initiator will receive an email when a transfer has been approved.
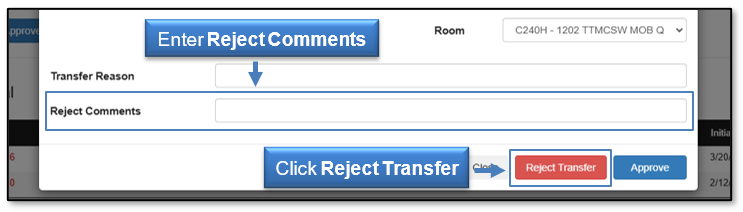
To reject initiated transfers, click Reject Transfer. Entering comments for the reason of rejection is required.
The initiator will receive an email when a transfer is rejected.
Surplus Pickup (Click to return to TOC)
The Surplus Pickup page provides a list of Pending pickup requests that were initiated by you and are pending IT service. Click the link to the training document How to Transfer Items to Surplus for more information on the process.
Click the red ID number to populate the Stars work order number and IT sticker number when available. When this information has been added, the request is ready for submission.
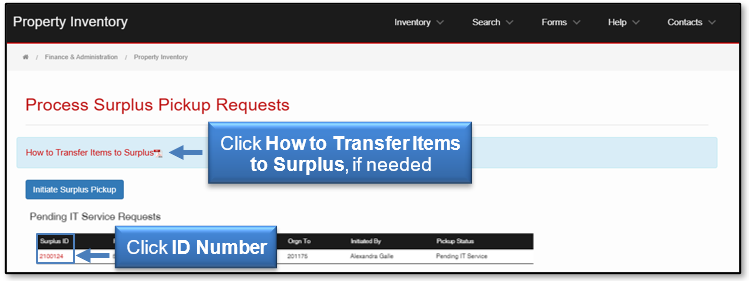
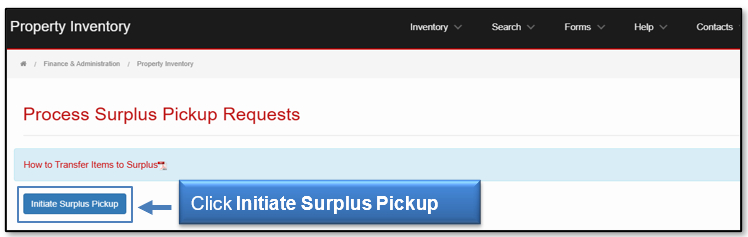
The Surplus Pickup page also allows the user to initiate a surplus pickup request by clicking the Initiate Surplus Pickup button.
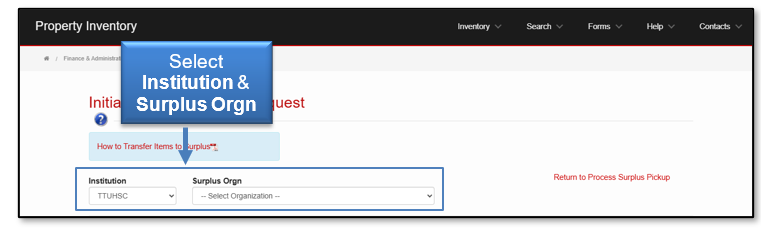
Select the appropriate Institution and Surplus Orgn.
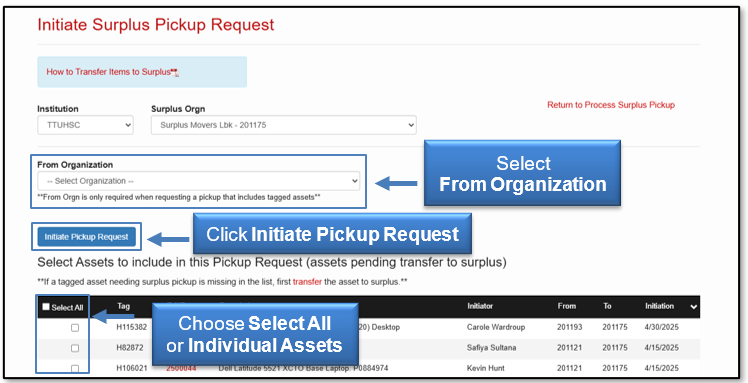
Select From Organization from the drop-down list. A list of Assets Pending Transfer to Surplus from the selected organization will display. To choose assets for pickup, either Select All or select individual assets from the list and then click Initiate Pickup Request.
Select the Pickup Building and enter the room number (inventoried items only) for pickup. Add any non-inventoried items and comments if needed.
If IT Service is needed, IT must clear any computer-related device. Initiate an IT Work Order by clicking the link provided. Save the request, print the IT Hardware Surplus Form, and attach it to each asset. When IT Service is complete, access the request on the Surplus Pickup page, and enter the IT Work Order Number and IT Sticker Number prior to completion of the pickup request.
Certify that items are ready for pickup and then Submit. Surplus Property for your campus will contact you to schedule the pickup. Refer to How to Transfer Items to Surplus for more information.
Surplus Property will scan tags if possible. If all items on the request are scanned successfully, the associated transfers in the Property Inventory System are automatically accepted, and the items are no longer in the inventory listing. If any tag cannot be scanned, the asset pickup will be verified by a supervisor before completion of the request and removal from the inventory listing.
Removals/Status Changes (Click to return to TOC)
The Removals/Status Changes page provides a list of Pending removals and status changes for which you are either the Initiator, the Property Custodian of the Department, or a Delegate for that Department.
Click the red ID number link to view the removal/status change details.
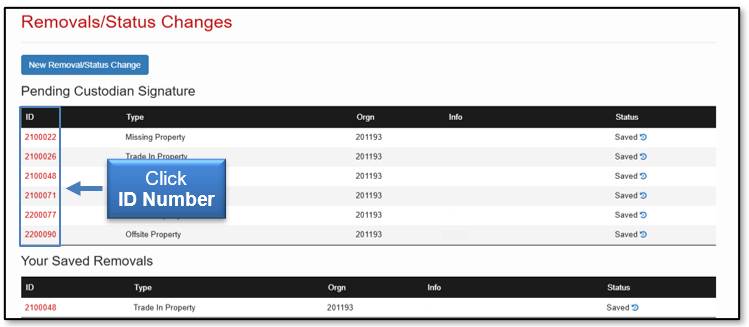
To approve a removal/status change request as a Property Custodian or Delegate, click the checkbox: I certify that the item(s) should be removed from TTUHSC inventory or their status changed for the item(s) and to the best of my knowledge the above information is correct. Click the Electronically Sign and Submit button.
A confirmation message will indicate that the removal/status change request has been signed and is waiting for approval from Property Management. An automated email will be sent to the initiator when a removal/status change request has been approved.
The Removals/Status Changes page also offers a way to initiate the removal/status change of an item from your departmental inventory. Click the New Removal/Status Change button and then click the Scan button. Scan the barcode of assets to be removed or status changed. As items are scanned, information will populate in the Assets section of the New Removal/Status Change page.Refer to the Remove/Change Status section for instructions on how to remove or change the status of an asset.
Search
Search pages allow the user to enter parameters and click Search. The Institution and at least one other search parameter are required. The search feature uses “AND” when more than one criterion is specified, so the results will match all the criteria specified and not just one or the other. The percent symbol (%) may be used to help with a search.
Asset Search (Click to return to TOC)
To search for assets, click Search on the navigation menu bar and then select Inventory.

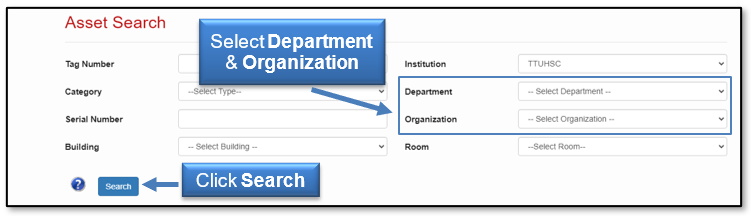
The Asset Search page allows the user to search assets by Tag Number, Category, Serial Number, Building/Room, Institution, Department, and/or Organization. Deleted assets are highlighted in the search results.
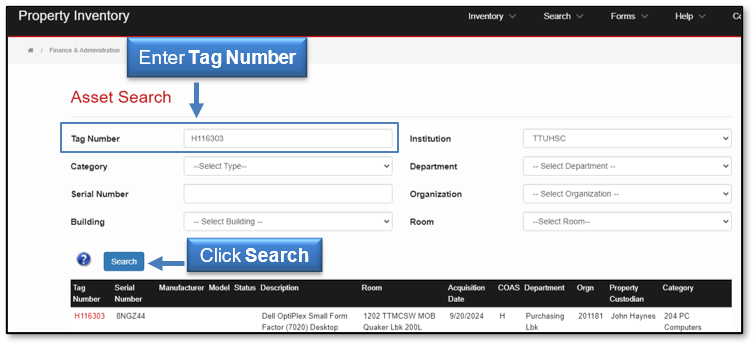
Search by Tag Number
To search by Tag Number, enter the Tag Number and click Search. The Institution from the drop-down list will default to TTUHSC; change if needed. The search results will display with the Tag Number, Serial Number, Manufacturer, Model, Description, Room (Building and Room), Acquisition Date, COAS, Department, Organization, Property Custodian, and Category.
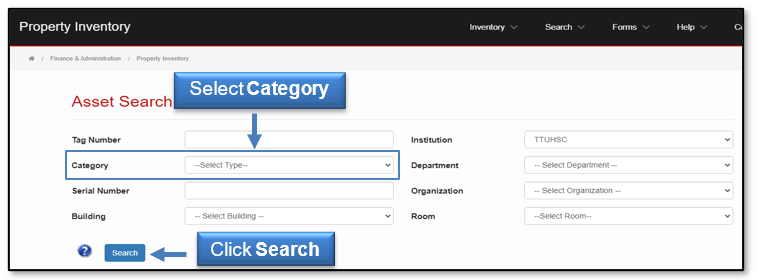
Search by Category
To search by Category, select the Category from the drop-down list and click Search. The Institution from the drop-down list will default to TTUHSC; change if needed. A list of all items that are in the category and institution selected will display with the Tag Number, Serial Number, Manufacturer, Model, Description, Room (Building and Room), Acquisition Date, COAS, Department, Organization, Property Custodian, and Category.
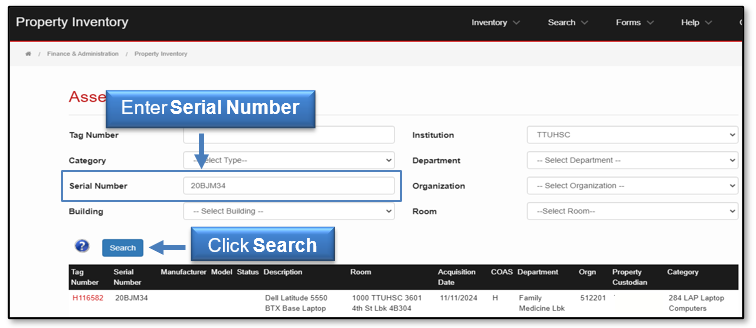
Search by Serial Number
To search by Serial Number, enter the Serial Number and click Search. The Institution from the drop-down list will default to TTUHSC; change if needed. The search results will display with the Tag Number, Serial Number, Manufacturer, Model, Description, Room (Building and Room), Acquisition Date, COAS, Department, Organization, Property Custodian, and Category. The serial number search is not case sensitive.
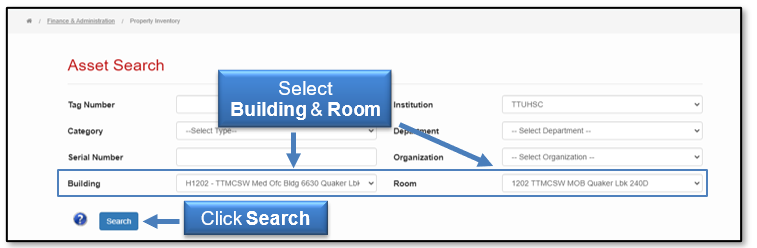
Search by Building and Room
The Institution from the drop-down list will default to TTUHSC; change if needed. The Room drop-down list is dependent on the Building being selected first. Select the Building and then the Room from the drop-down lists and click Search. A list of all items that are in the building and selected room will display with the Tag Number, Serial Number, Manufacturer, Model, Description, Room (Building and Room), Acquisition Date, COAS, Department, Organization, Property Custodian, and Category.
Search by Department and Organization
The Organization drop-down list is dependent on the Department being selected first. The Institution from the drop-down list will default to TTUHSC; change if needed. Select the Department and then the Organization from the drop-down lists and click Search. A list of all items that are in the department and organization selected will display with the Tag Number, Serial Number, Manufacturer, Model, Description, Room (Building and Room), Acquisition Date, COAS, Department, Organization, Property Custodian, and Category.
If you find Items in your department that are not on your All Property list, search by either tag or serial number to determine what department inventory the item is on. It is possible that an item was transferred (moved) to your department, but the transfer in the Property Inventory System was not completed. Please notify Property Management at PropertyManagement@ttuhsc.edu if this is the case.
Transfer Search (Click to return to TOC)
To search for transfers, click Search on the navigation menu bar and then select Transfers.
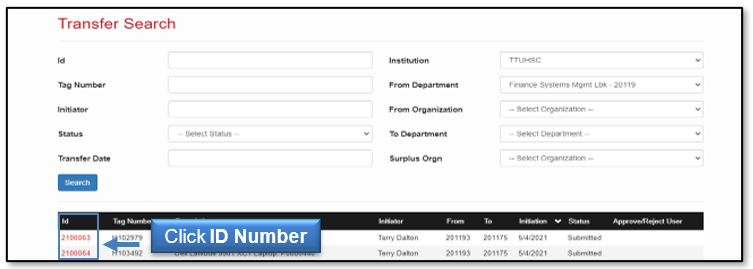
The Transfer Search page allows the user to search transfers by ID, Tag Number, Initiator, Status, Transfer Date, Institution, From Department, From Organization, To Department, or To Organization. For the Initiator, enter all or part of the name to search. The percent symbol (%) may be used to help with a search. Enter the desired search criteria and click Search.
Click the red ID number link to view the transfer.
The transfer will display.
Surplus Pickup Search (Click to return to TOC)
To search for surplus pickup requests, click Search on the navigation menu bar and then select Surplus Pickup.
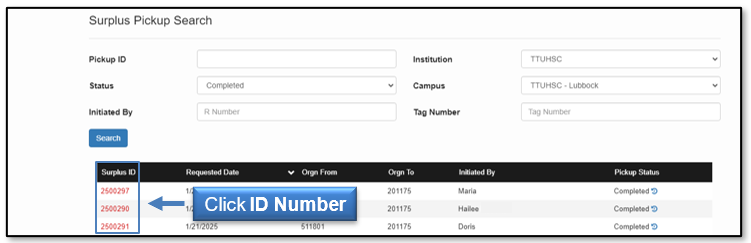
The Surplus Pickup Search page allows the user to search assets by Pickup ID, Status, Initiated By, Campus, or Tag Number. The Institution from the drop-down list will default to TTUHSC; change if needed. Enter the desired criteria and click Search.
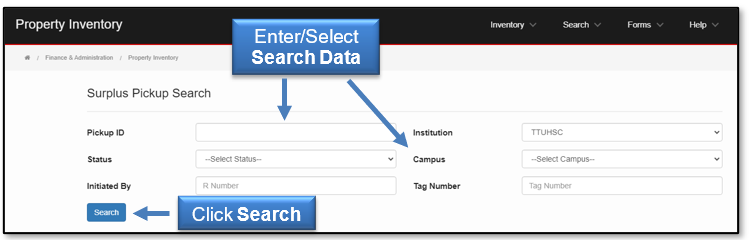
Click the red ID number link to view pickup request details.
Removal/Status Change Search (Click to return to TOC)
To search for removals or status changes, click Search on the navigation menu bar and then select Removals/Status Changes.
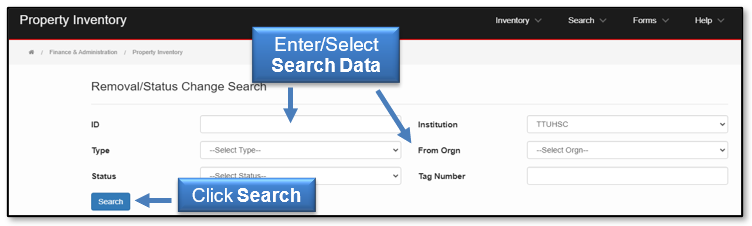
The Property Inventory System allows the user to search assets by ID, Type, Status, From Orgn, or Tag Number. The Institution from the drop-down list will default to TTUHSC; change if needed. Enter the desired criteria and click Search.
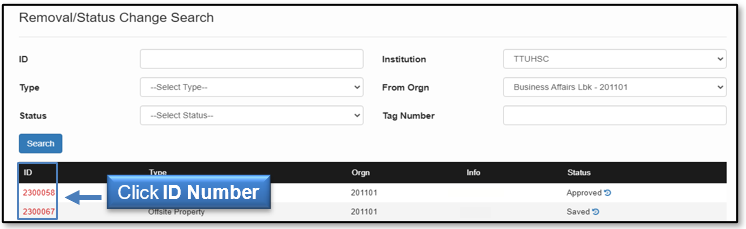
Click the red ID number link to view the removal.
Forms, Help & Contacts (Click to return to TOC)
For property-related forms and policies, click Forms in the navigation menu bar and then click TTUHSC.
For additional help resources, click Help in the navigation menu bar and then click TTUHSC.
For contact information for Property Management, click Contacts in the navigation menu bar and then click TTUHSC.
For questions, contact Property Management at PropertyManagement@ttuhsc.edu.
For questions about Surplus, contact your respective campus.
- Abilene/Dallas: abilenesurplus@ttuhsc.edu
- Amarillo: Generalservicesama@ttuhsc.edu
- Lubbock/Managed Care: generalservices@ttuhsc.edu
- Odessa: generalservicespermianbasin@ttuhsc.edu
Contact
Finance Systems Management
-
Address:
3601 4th Street STOP 6209 | Lubbock, Texas 79430-6209 -
Email:
fsm@ttuhsc.edu